-
Which CMS is Best for Creating a Website to Sell Online Courses
-
How to Create an Online Course on Your Website: Step-by-Step Guide
-
The Future Prospects of a Website for Selling Online Courses
Udemy, SkillShare, Coursera, Teachable, Podia – these platforms allow you to sell your online courses to millions of people. However, they heavily restrict sellers: controlling pricing, taking a commission of 30-75%, and retaining certain rights to the course content. That's why more and more users are opting to create their courses on their own websites, but they often face difficulties due to a lack of knowledge. However, in this article, you will find answers to frequently asked questions and a step-by-step guide to developing a website for selling online courses from scratch.

Advantages of Selling Online Courses on Your Own Website
Selling educational materials on your own website requires more effort in creating the platform, technical support, and marketing compared to using third-party services. If you don't have a regular audience, you'll need to invest a lot of effort in promoting the project, including search engine optimization and paid advertising.
However, such investments are worthwhile, as selling online courses on your website has many advantages:
- Complete Independence: you can create an educational program from scratch, quickly change it at any time, put it up for sale without additional checks, and set your own price;
- Advanced Online Courses: a properly chosen topic and plugins allow you to create educational programs with a sound structure, add images and videos, create tests, grade them, issue certificates, and more;
- Higher Profit: there's no need to pay commissions to platforms (for example, Udemy takes 50-75% of each sale);
- Useful Reports: you can receive valuable data about students and their behavior on the site, and then use this information to improve educational materials and marketing strategies;
- Additional Income: along with your educational programs, you can sell other people's courses, earning a percentage of the sales.
A special mention deserves the ability to create a marketplace with online courses. You can enable teacher registration to sell their educational programs, and you can receive a certain amount or percentage of each sale monthly. Alternatively, you can join an affiliate program, select popular courses, describe them in detail on your website, and place a referral link. Once a person clicks on the partner's website and pays for the course, you'll receive a certain percentage.
Which CMS is Best for Creating a Website to Sell Online Courses
If, after studying the advantages, you are convinced of your desire to create a website for online courses, you should immediately choose a CMS. A Content Management System (CMS) is software that allows you to quickly create and manage a website using separate themes and plugins. It processes content automatically, so you don't even need to know how to write code, yet you can create large-scale educational platforms like Udemy.
Let's consider the top 3 CMS options for a website selling online courses:
- WordPress – impressive collection of themes and plugins. WordPress boasts a large community with forums, hundreds of videos, and articles for beginners, as well as numerous ready-made themes and extensions. However, the use of too many extensions can lead to slower page loading speeds, so it's important to monitor their quality and quantity.
- Drupal – used by leading educational websites. Harvard, Stanford, and Yale due to its high level of customization and flexibility, reliable security model, and many built-in modules. However, it may be more challenging for beginners compared to WordPress.
- Joomla – suitable for creating small educational websites. CMS Joomla offers simplicity and ease of use, but it may not be suitable for scaling up to a large number of online courses or creating a full-fledged marketplace due to its smaller ecosystem and scalability challenges.
It's also worth mentioning the option of creating a website for selling online courses using a custom CMS. A custom CMS allows you to add unique features, integrate any tools, ensure maximum security, and easily update and scale the project.
However, developing your own content management system requires a lot of money and time, and maintenance requires the constant intervention of a professional, which means additional costs. Therefore, if you do not have enough resources, it is better to choose a ready-made CMS.
Read also: What sites are created on WordPress
Which LMS to Choose for a Website Selling Online Courses
LMS (Learning Management System) is software for creating, managing, and conducting online courses. For example, well-known learning management systems for WordPress include Tutor, MemberPress, Lifter, LearnDash, and MasterStudy. They work as follows: you obtain the necessary plugin (developers usually offer limited free and advanced paid versions), upload it to the admin panel, activate it, and then all the necessary functions become available to you.
When choosing an LMS for creating an educational website, make sure to check for the following features:
- Course Builder: convenient addition of information (cover and title, description and parameters, text, PDFs, videos, etc.) to a ready-made template with subsequent easy editing;
- Student Registration: each student can register and gain access to the dashboard to track purchased online courses and progress;
- Homework Assignments: adding various types of assignments to assess student knowledge at a specific stage, and then decide whether to grant access to the next topics or recommend additional materials for reinforcement;
- Various Gamification Methods: tests, assessments, certificates, bonus learning materials, etc., to better engage students;
- Payment Gateway Support: the LMS should have features that help create a simple and secure payment process for students, as well as facilitate receiving funds for sold online courses and ensure subscription functionality;
- Detailed Reports: maximum information about the number of courses sold, quality of educational materials, student progress, etc;
- Marketing Tools: coupons, discount systems, affiliate programs, and other methods to attract potential buyers;
- Convenient Communication: instructors can communicate with all students or individuals through chat, provide comments on each lesson topic and homework, and send out newsletters.
Tutor LMS provides all these features – it's a functional learning management system that offers one of the most convenient course creation and customization processes. The key feature is its support for the Ukrainian language interface, unlike most other products that only offer English or Russian versions.
Many people find the free plan sufficient, which includes a course builder, unlimited number of educational programs, a FAQ section, video player, student and instructor dashboards, various quizzes, and support for WooCommerce and Easy Digital Downloads. However, there is also an advanced version for $199 per year (for one site), which includes push notifications, more tests and detailed reports for students, unique templates for each course, powerful analytics, grading system, course preview, paid membership, and several other useful features.
How to Create an Online Course on Your Website: Step-by-Step Guide
We have prepared a convenient step-by-step guide on creating a website for selling online courses from scratch: from registering hosting and a domain to adding educational programs and connecting payment systems. For example, we chose WordPress CMS and Tutor LMS. If you want to use other systems, we still recommend familiarizing yourself with our guide, as the basic principles of creating a project and functions are similar.
Registering Hosting and a Domain for Your Website
A domain is the address of a website, while hosting is the place where all its files and data are stored. To register a domain with Cityhost, go to the appropriate page, enter a name and check the available zones, then register and pay for your order.
Renting hosting for a website is also very simple: study the available tariffs and choose the one you need, place and pay for the order. Web hosting is already protected against DDoS attacks, has antivirus protection and Anti-Spam, supports modern PHP versions with the possibility of automatic switching in the control panel. Plus, you will get an SSL certificate for free!
Read also: TOP-11 advantages of domain registrar and hosting provider Cityhost
Installing and Configuring CMS WordPress
On every tariff, we offer an automatic content management system installation module. To install WordPress, go to the Cityhost control panel, select "Hosting 2.0", and click "Manage" next to the domain you need. Then, on the MYSQL tab, click "Create a database" and fill in the fields. In the final step, go to the "Sites" tab, click "Manage", and then "Install" (in the "CMS Auto-Install" line). You can find a detailed instruction with screenshots in the article – How to Install WordPress on Hosting.
After installing WordPress, go to the admin panel, "Settings" –> "General", and set Ukrainian as the site language. There, also set the time zone, date and time format, and website address. In the "Permalink" section, choose the link structure: the most common options are "Post name" or "Custom structure" (/%category%/%postname%/).
Next, download and activate the essential plugins:
- Elementor – a page builder with a drag-and-drop feature;
- Yoast SEO or Rank Math SEO – helps to optimize your website correctly for search engines;
- WooCommerce – a powerful e-commerce plugin that integrates seamlessly with Tutor LMS;
- WPForms – helps create various types of forms without the need to write code yourself.
To install any application, go to the "Plugins" –> "Add New Plugin" tab. Find the extension through the search form, install and activate it. If it is not available in WordPress, go to the plugin's official website, find the .zip file, and then upload it to your website, activate, and configure it.
Installing and Configuring LMS Tutor on WordPress
You can download the Tutor LMS plugin for free from the official WordPress website and then add and activate it through the admin panel. The system will then offer a step-by-step setup guide, and you will only need to select the desired parameters and provide information about your project. At any time, you can go to the plugin settings (after activation, a separate tab will appear in the admin panel) and change the basic or additional parameters.
Installation and Configuration of the Website Theme
One of the huge advantages of Tutor LMS is its compatibility with many WordPress themes. However, when choosing a template, it is important to check if it is compatible with the WooCommerce plugin, which is necessary for selling online courses.
For beginners, special themes from the developers of this learning management system are an ideal option. For example, TutorStarter comes with demo materials. You can import one of the templates, choosing the editor beforehand: the classic Gutenberg or the more functional Elementor. Demo templates will help you create the foundation of your project, and then you can completely change the design, creating a unique educational website from scratch.
Read also: How to change a template in Wordpress
Creating and Populating Online Courses in LMS Tutor
Finally, we can move on to filling the website. To start, go to the "Categories" section, add and format groups of courses (covers, names, SEO). This can be done at any time, but it is better to think through the structure first, create the main pages and categories, so that it will be easier to distribute and optimize the educational materials later.
Now go to the "Courses" section –> "Add New". Specify the basic information about the online course: title, description, category, number of students, difficulty, total duration of training, and so on. Then go to the "Course Builder" block, add lessons and/or quizzes.
If adding the title, main image, and text content is easy, there are questions about videos. There are two main ways to attach videos to an online course on Tutor LMS:
- YouTube. Upload the video to your channel first, make it available via a link, then specify it in the corresponding field when creating the lesson. In terms of service, make sure to state that the student should use the video only for self-study and does not have the right to pass it on to third parties or sell it.
- Own video player. You can upload all videos to the server or to a file storage, and then link them to the platform through CMS or FTP (File Transfer Protocol). Yes, this method requires additional costs, but it minimizes the risks of illegal distribution of your educational materials.
If you decide to host videos directly on the hosting where your course website is published, you should know that media files on the hosting should not exceed 10% of the total disk space.
For example, if you have chosen a plan with 50 gigabytes of disk space, this means that videos and images should not take up more than 5 gigabytes on the disk.
In this case, there may be two solutions:
- Get a dedicated server or VPS for the entire project;
- Create a combination: hosting for the site + storage or server for video files.
Read also: XXX-files: what can and what is prohibited to host
Once you have entered all the information and added videos (if necessary), the lesson will appear under the topic in the course builder. You just need to repeat the steps for subsequent lessons. If you want, you can add quizzes: click the appropriate button, enter the basic information (question, description, points, answer), and additional settings (time limits, retries, minimum grade, etc.). At the final step, click "Preview", and if everything looks good, click "Publish".
Setting up WooCommerce Payment System for Tutor LMS
While the learning management system can be used to provide free materials, we are creating a website to sell courses, so we need to choose the best way to accept payments. For one-time payments, the free WooCommerce plugin is suitable, and to create automatic recurring payments (subscriptions), you need to purchase WooCommerce Subscriptions.
Let's see how to set up payment acceptance on the site using the free WooCommerce plugin:
- Enable monetization. Go to Tutor LMS settings, "Monetization" section. Choose the appropriate payment method and save the changes.
- Install WooCommerce. In the admin panel, go to "Plugins" –> "Add New". In the search, find the corresponding application, install, and activate it.
- Add a product to WooCommerce. Click "Products" –> "Add New". Be sure to specify the name, description, image (displayed only during checkout), and price.
- Link the product to the course. Find the suitable online course, the "Add Product" field, and then change the "Course Type" to "Paid".
Now visitors to your website near the paid online course will see "Add to Cart". Once they click the corresponding button, the system will automatically redirect them to the checkout page. When the payment is made, the person will receive an email confirming the successful purchase and full access to the educational materials.
Beautiful Website Design for Selling Online Courses
At the beginning of the article, we recommended you to install and activate Elementor. Now, go to the plugin settings, "General" tab –> "Post Types", and check the boxes next to Courses, Lessons, Quizzes, Assignments. Now you can use the features of this application to design online courses and pages.
In the first case, you can create a global template: go to the relevant section of the plugin, click "Add New", then select Pages and check the box next to Tutor LMS Single Course Template. Now, using widgets (even in the free version, there are dozens of them), create a template for the online course page. Don't forget to save the changes!
You can also individually create/edit online courses using Elementor. Go to Tutor LMS –> Courses, and then create a new product using Elementor or edit an existing one.
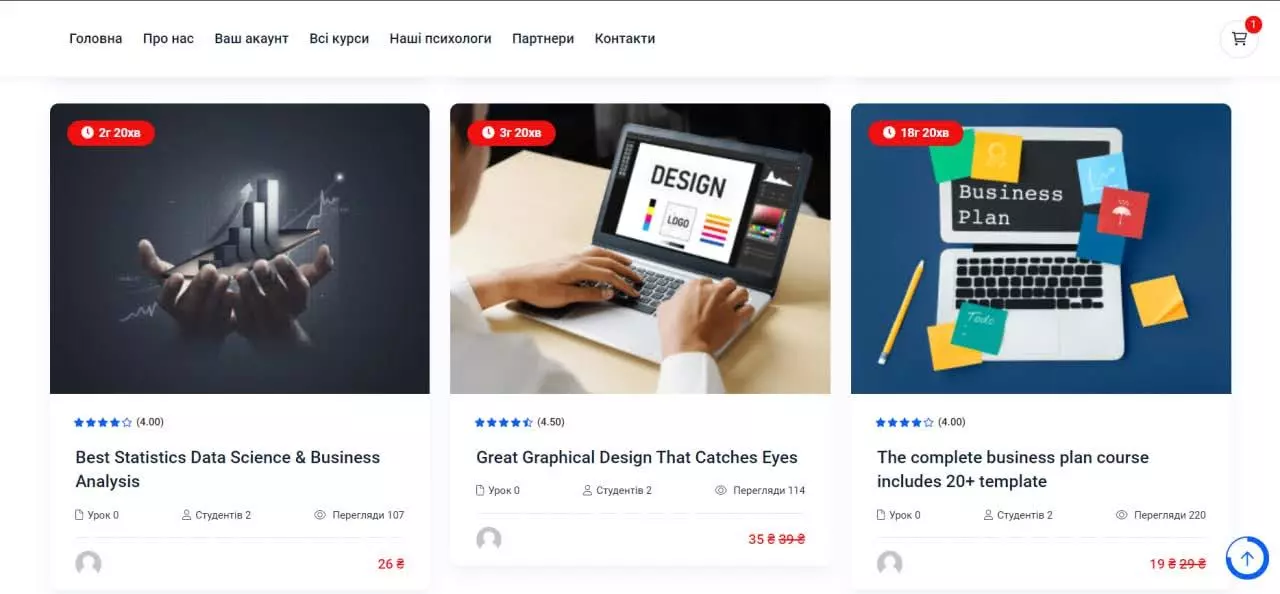
However, the learning management system itself offers a good look for courses, so it's better to use the editor for designing the archive page. It is needed if you plan to post many educational materials on the site (your own, other teachers', partner programs). And here the system offers two cool widgets: "Course List" for displaying all educational programs and "Carousel".
The Future Prospects of a Website for Selling Online Courses
Online education is a vast and continuously growing industry. People appreciate the ability to choose materials on topics of interest, gain useful knowledge and practice, and, along with them, add new items to their portfolios and certificates. Your task is to create a convenient platform where users can easily find the online course they need, securely and conveniently pay for it, and receive high-quality educational materials.
Initially, you can create a small website with a few courses, focus on improving them, and developing a thematic blog to attract the target audience. When you notice good website traffic, you can open registration to other teachers: they will get a platform to sell their educational materials, and you will get additional income. Later, you will be able to create a profitable marketplace and earn good money selling online courses.