
- What are the advantages and disadvantages of Pinterest for traffic
- How to create a Pinterest account for traffic generation
- How to publish pins to drive traffic to the website
- How to analyze the effectiveness of pins and the Pinterest account
- What mistakes to avoid when promoting a Pinterest account
In the first four months of 2026, 68.01% of searches in the USA ended without any clicks to an external site — AI Overviews blocks and AI Mode are increasingly closing queries right in the search results. Therefore, website owners have to look for their target audience outside of Google, and one of the most obvious sources is Pinterest. This platform, unlike X, where posts with links have received significantly less reach for years, has built a business model around clicks to websites. I checked how it actually works on my own English-language site and on the test sandbox TasteWP.

What are the advantages and disadvantages of Pinterest for traffic
Pinterest is not a social network in the usual sense, but a visual search engine. People come here not to communicate, but to search for ideas — kitchen interior, dinner recipe, tattoo sketch.
And this is where the main advantage for a website owner lies: the user is set from the first second to go somewhere and do something. The platform only helps with this: each pin has a Destination Link field — a clickable link to your site that you specify during publication. Thanks to this, Pinterest counts a separate metric — "Outbound Clicks," which shows how many times a person saw a pin and clicked through to your domain, rather than just saving the image to their board.
But there is a downside: links from Pinterest have the rel="nofollow" attribute, and according to Google documentation, such links generally do not pass weight for ranking. John Mueller from Google stated back in 2014 that the search engine mostly ignores links from Pinterest, YouTube, and similar platforms.
Since March 1, 2020, nofollow has become a hint rather than a directive, but the essence has not changed: pins will not boost your positions in Google. So, from the very beginning, Pinterest should be viewed as a source of direct referral traffic, rather than a way to build link mass.
How to create a Pinterest account for traffic generation
To register on Pinterest, you can either create a business account from the start or convert a personal one to a corporate one. Then you only need to provide information about the internet project, add and verify your domain.
To demonstrate the process of creating a new account and connecting Pinterest to the site, I created a test site Pinterest UA on TasteWP and published an article with two images inside and one main image. For optimization, I installed the free version of Rank Math SEO. And I displayed the analytics data on my main English-language account, which I created back in 2025.
Creating a business account
A business account is free and mandatory: without it, there will be no analytics, no website verification, and no built-in scheduler. According to Pinterest's official documentation, there are two paths — creating a new account directly as a business, or converting an existing personal profile to it.
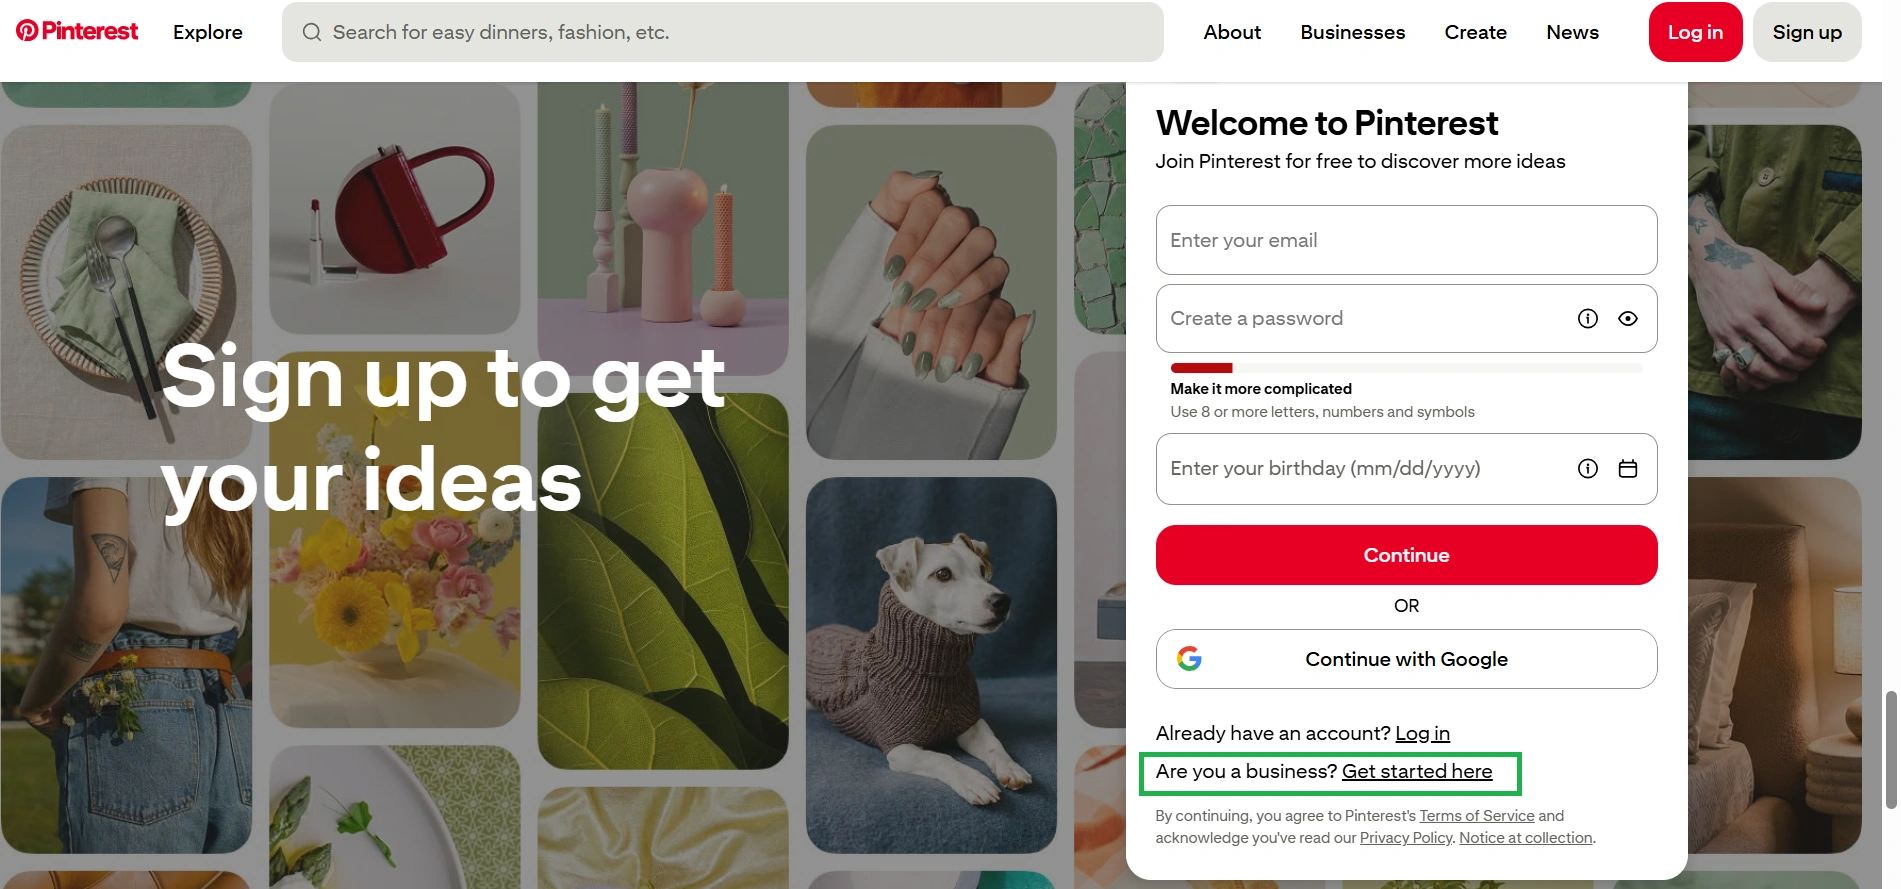
Path one — directly a business account. The registration form can be accessed in two ways: by clicking "Sign up" in the upper right corner (a pop-up window will appear) or simply scrolling to the bottom of the Pinterest homepage. In both cases, it works the same:
- Go to pinterest.com using a desktop browser. Specifically a desktop one, because this option is not available in the mobile app.
- Open the registration form: by clicking the "Sign up" button or by scrolling to the end of the page.
- Under the form fields, instead of the "Continue" button, click the small text "Are you representing an organization? Go here."
- Provide your email, password, and age. The email must not be linked to any existing Pinterest account.
- Fill in the "Build your profile" and "Tell us about your organization" sections.
Important! At the third step, there is a trap: a noticeable red button just below the fields leads to regular registration, while the transition to a business account is hidden in a single line of small text below it. When I was testing, I simply missed it and registered as a regular user. But there is nothing to worry about: the platform will just continue with the standard scenario "Nice to meet you! What is your name?", and you can switch to a business account through the second path described below.
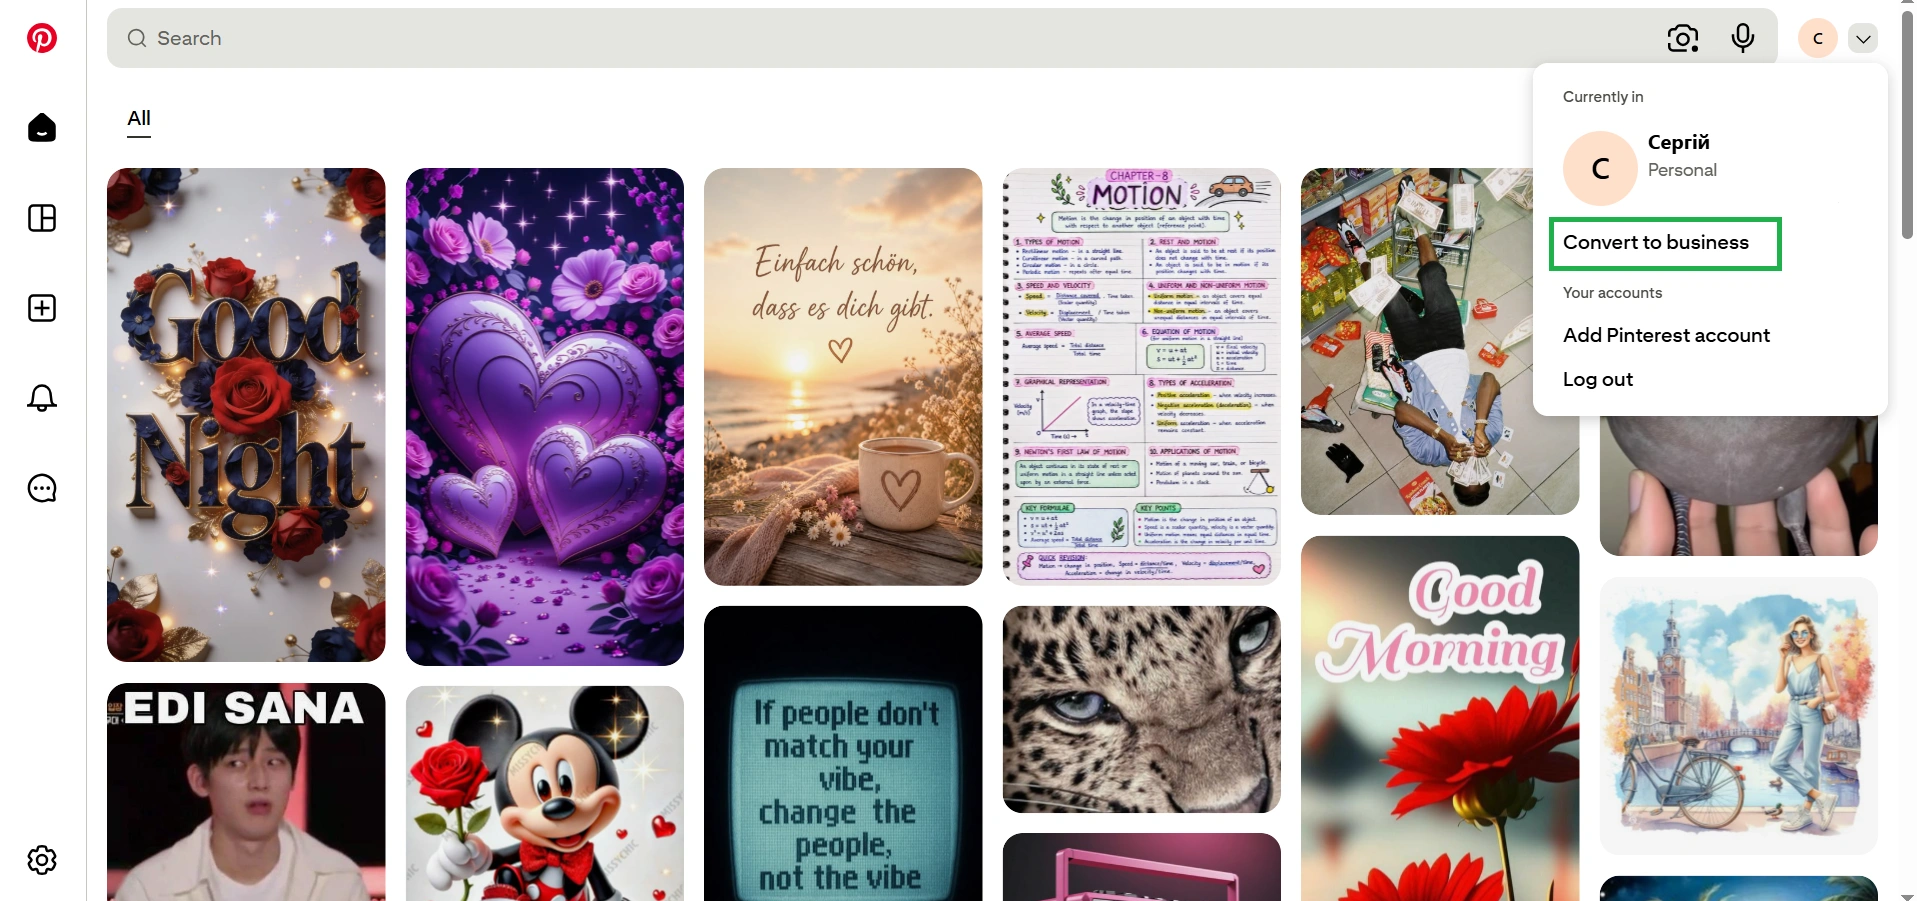
Second path — converting a personal Pinterest account to a business account. Click on the profile icon in the upper right corner and select "Switch to a business account." You will go through the same steps as with direct registration of a business account.
Next, regardless of the chosen path, you will encounter the "Tell us about your organization" section: company name, country or region, and website. Provide the website immediately — it is not the same as domain verification, but the field will be needed.
Profile setup
As soon as you complete the registration or change the account type, click "Edit profile." This process is one of the most important because it is literally your showcase on Pinterest.
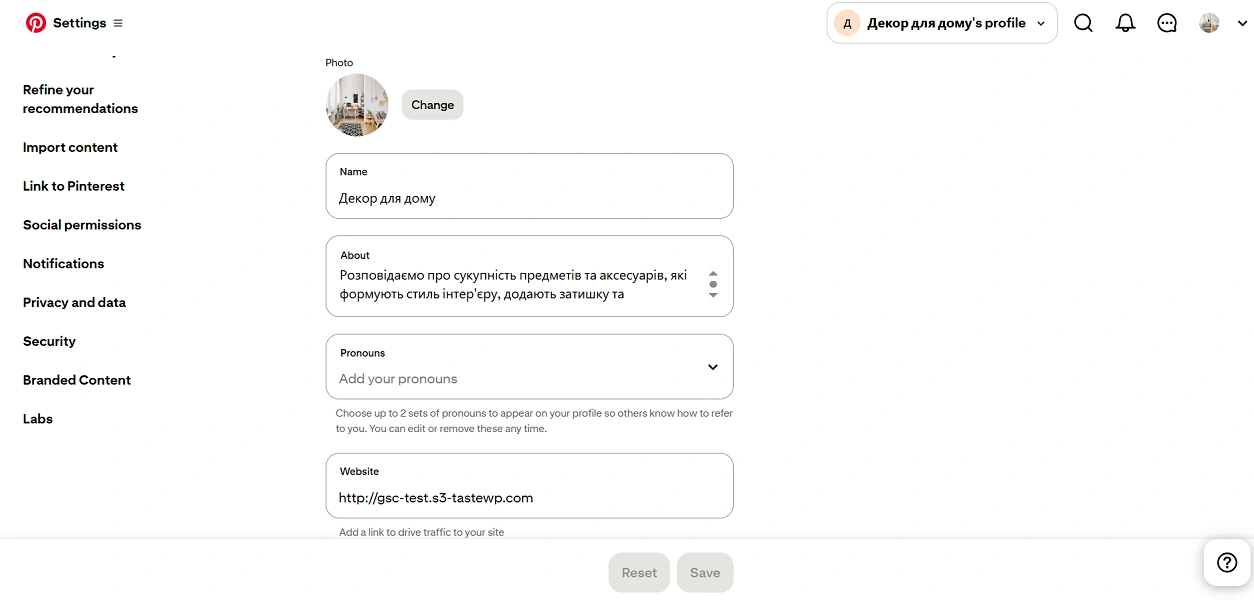
In the profile settings, you can (and should) change the following data:
- Logo. Click "Change" next to the photo and upload an image. The platform does not publish a direct official requirement for size, but the actual display size is 165×165 pixels in a circular crop, so upload a square image of 600×600 pixels to avoid blurriness on high-density screens.
- Name. In the "Name" field, specify the profile name with a niche keyword, not just the brand. I put "Home Decor."
- Bio. In the "About you" field — a short explanation with keywords in natural language.
- Website. In the "Website" field, insert the address of your web resource. Below it, Pinterest suggests: "Add a link to increase traffic to your site."
If you scroll down the profile editing page, you will see a whole block of addresses: "Address 1," "Address 2," "City," "State/Province/Region," "Postal Code," "Country." It looks like something mandatory — but it is not. I checked my working account for mobile apps, which has been active for over a year and receives impressions and clicks: this block is completely empty, including the country.
Important! The address block in the profile and "Country/Region" in personal data are two different fields in different sections of the settings. Do not confuse them: the first can be left empty, the second is automatically filled by Pinterest.
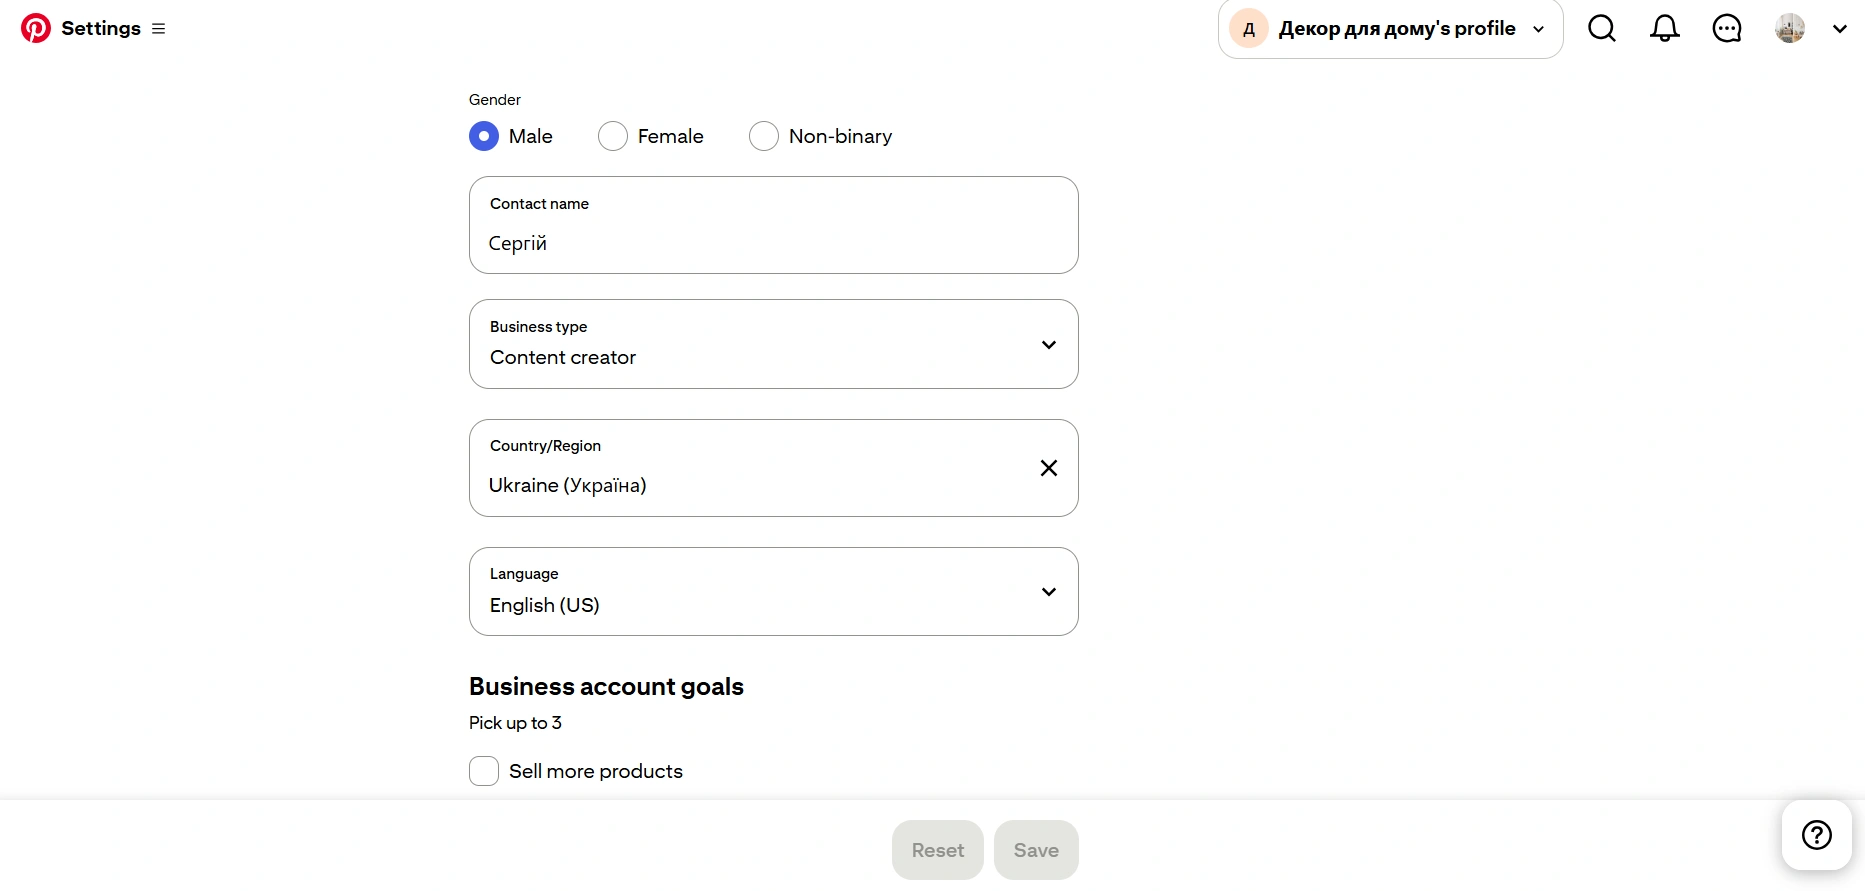
The account's country lives separately — in the "Account management" section → "Personal data." There, "Organization type" and "Language" are also located. This field can be edited at any time, as confirmed by official documentation.
Website verification
Verifying your domain (claim website) provides three things: analytics for all content from your site, attribution for saves, and your logo on every pin created from your domain.
You can verify your site on Pinterest in four ways: HTML tag, HTML file in the root of the site, TXT record in DNS, and connection through Google Merchant Center. The last option is not available for all accounts — as you can see, it is not displayed for me.
To verify your site on Pinterest:
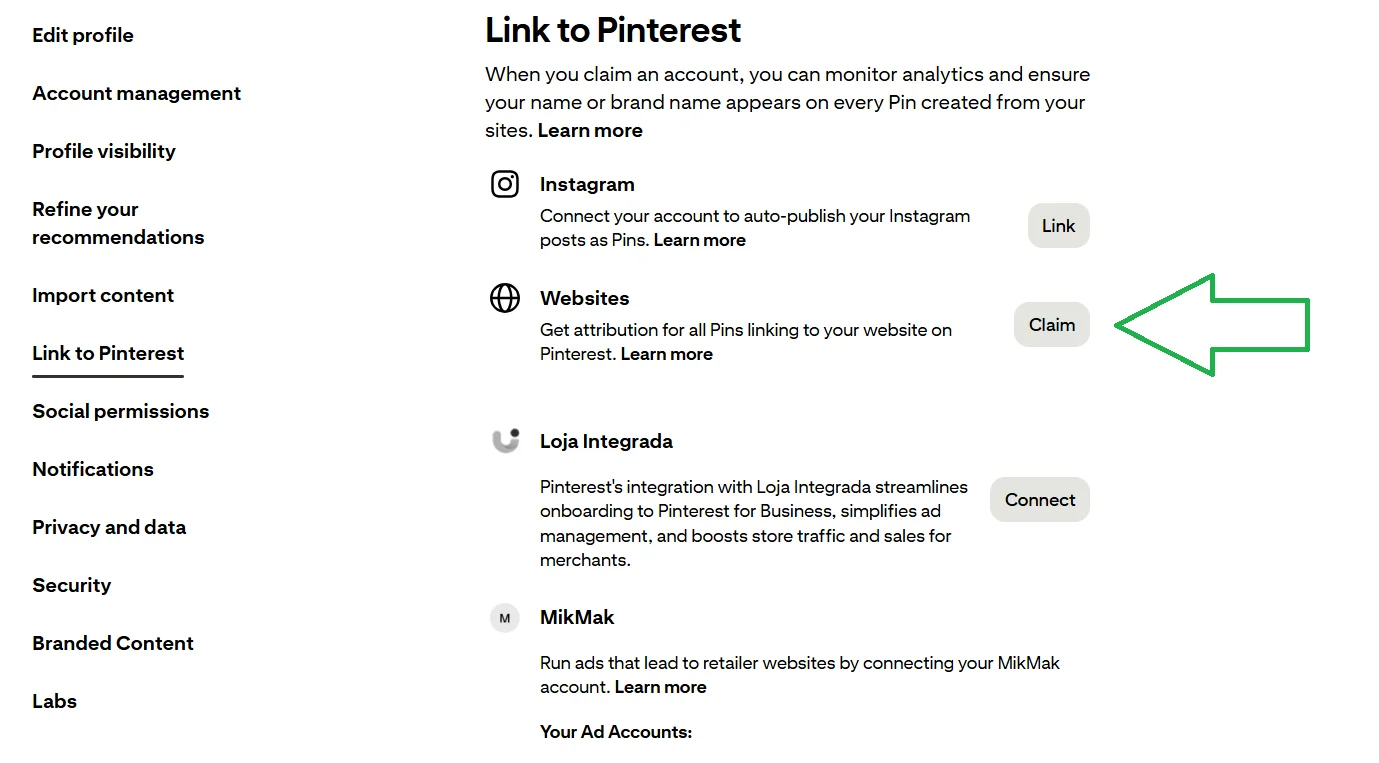
- In the settings, go to the "Link to Pinterest" section and click "Verify" next to "Websites."
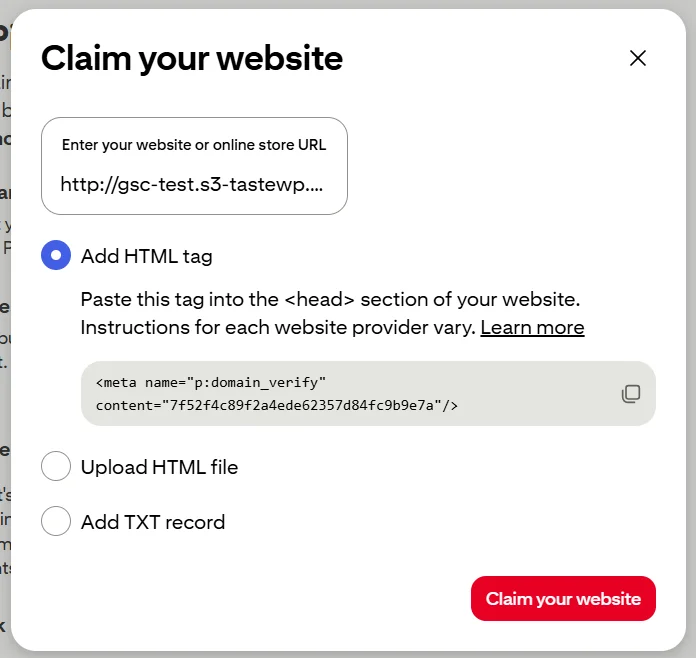
- Select "Add HTML tag" — this is the easiest way for WordPress sites.
- Copy the issued meta tag of the form <meta name="p:domain_verify" content="your-code"/>.
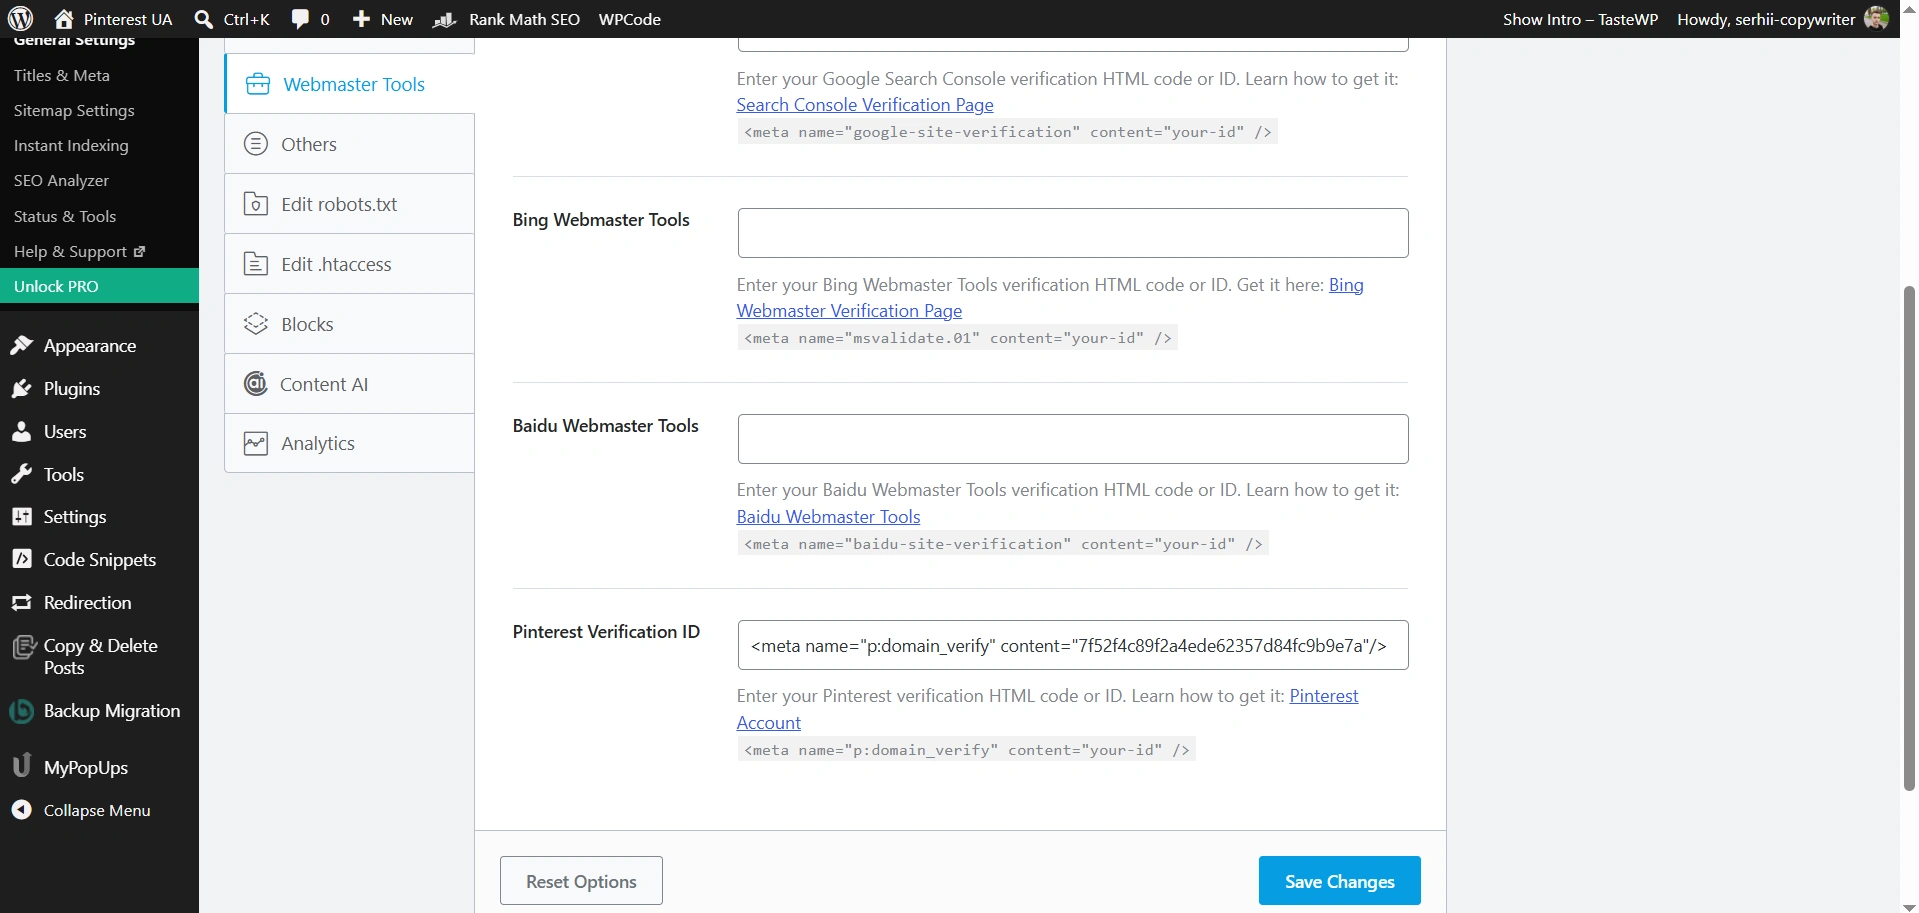
- In WordPress, go to Rank Math SEO → General Settings → Webmaster Tools, find the Pinterest Verification ID field, and paste the copied value there (the plugin will convert it into code). Then click Save Changes.
- Return to Pinterest and click "Website verification."
Important! Adding the HTML tag is the most convenient way for WordPress sites. You can use SEO plugins, including All in One, Rank Math, Yoast, or add the tag directly through the template editor or with the WPCode plugin. You can also use the admin panel of the hosting provider where your site is hosted on shared, virtual, or dedicated server, going to the file manager and uploading the HTML file to the root of the site.
However, my site is hosted on the test platform TasteWP, so the only method was the HTML tag, and even here it did not work: Pinterest returned the error "No relevant meta tag was found." I checked the source code of the homepage via Ctrl+U — the p:domain_verify tag was in place, with the correct code, in the <head> section, generated by Rank Math.
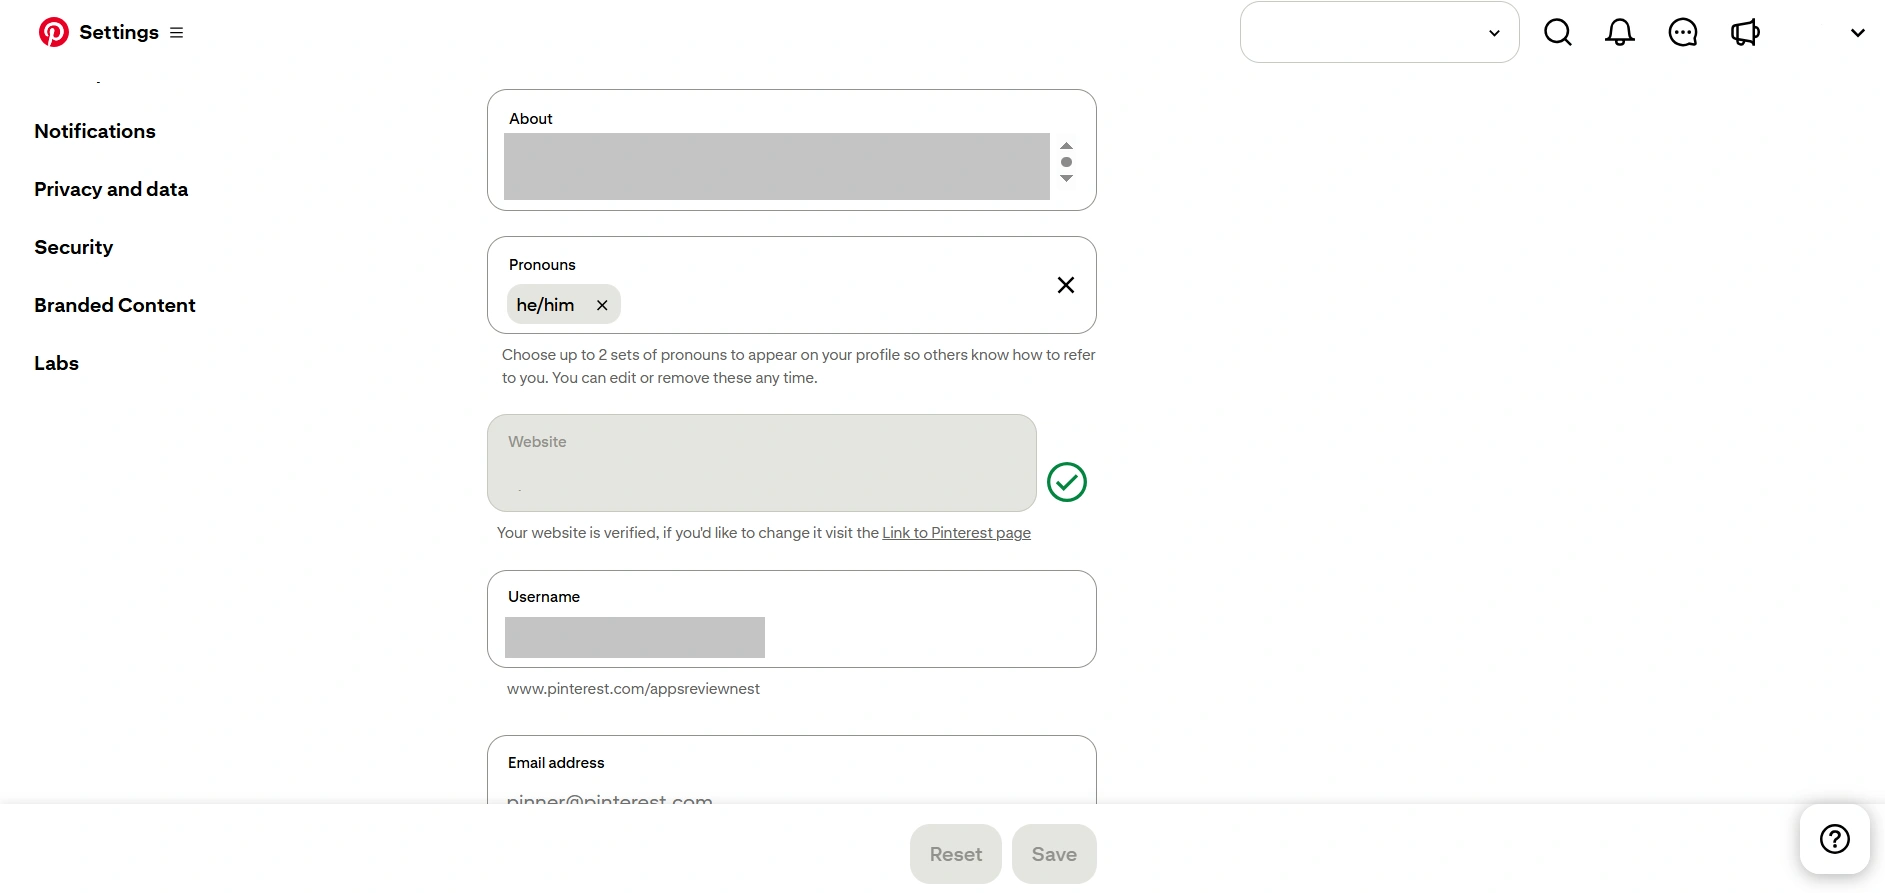
Example of a successfully verified site on Pinterest on classic hosting
So, the free sandbox TasteWP is great for demonstrating the process — the forms, fields, buttons there are identical to real hosting. But the final domain verification on it did not pass for me twice, despite technically correct markup. Instead, on the working domain, the same method with the HTML tag worked without problems — the web resource has the status of verified with a green checkmark. So, going forward, we will focus on my main site and Pinterest account.
How to publish pins to drive traffic to the website
There is a simple strategy: take images from the site, change their sizes to meet Pinterest requirements, and publish them on the platform. However, this often looks like a dump of unrelated images, gaining minimal views and clicks. It is more effective to create boards, make pins in a consistent style sized 1000×1500 pixels, and have a clear publication schedule.
- Current technical requirements for pins
- What are boards on Pinterest
- How to plan publications on Pinterest
Current technical requirements for pins
In the Pinterest advertising documentation, it is stated: the recommended aspect ratio is 2:3, that is, 1000×1500 pixels. Pins that exceed the 2:4.2 ratio are cropped in the feed — the user only sees part of the image.
Practical guidelines:
- Standard pin: 1000×1500 pixels (2:3). It is suitable for most content.
- Cropping: anything above 2:4.2 (approximately 1000×2100) loses the bottom part — and that is usually where the logo or call to action is.
- Video pins in a vertical 9:16 format support the Destination Link just like regular pins and usually gather more views.
- Square and horizontal: technically work, but take up less vertical space in the feed, meaning they gather fewer impressions.
- File size: up to 20 MB on desktop, up to 32 MB in the mobile app.
- Text on the image: better at 24 pixels, otherwise it won't be readable on phones.
- Pin title: up to 100 characters, description — up to 800.
Important! In 2026, Idea Pins no longer exist as a separate format — Pinterest merged them with regular pins back in 2023.
What are boards on Pinterest
A board is a thematic folder for pins. And it is not just a way to create a system for your posts, but also to improve promotion on the platform itself. Pinterest uses the name and description of boards as a signal of relevance, so it is worth spending time on properly organizing pins in your account.
In general, the following basic rules should be highlighted:
- Create boards for subtopics, not just one general "My Blog."
- Use a keyword in the title.
- Fill in the board description — one or two sentences with keywords in natural language.
How to plan publications on Pinterest
You can use Pinterest's built-in scheduler. You simply click "Create" → "Pin," add an image and fill in the details, just select "Publish later," specify the time and date. You can have a maximum of 10 pins in the queue.
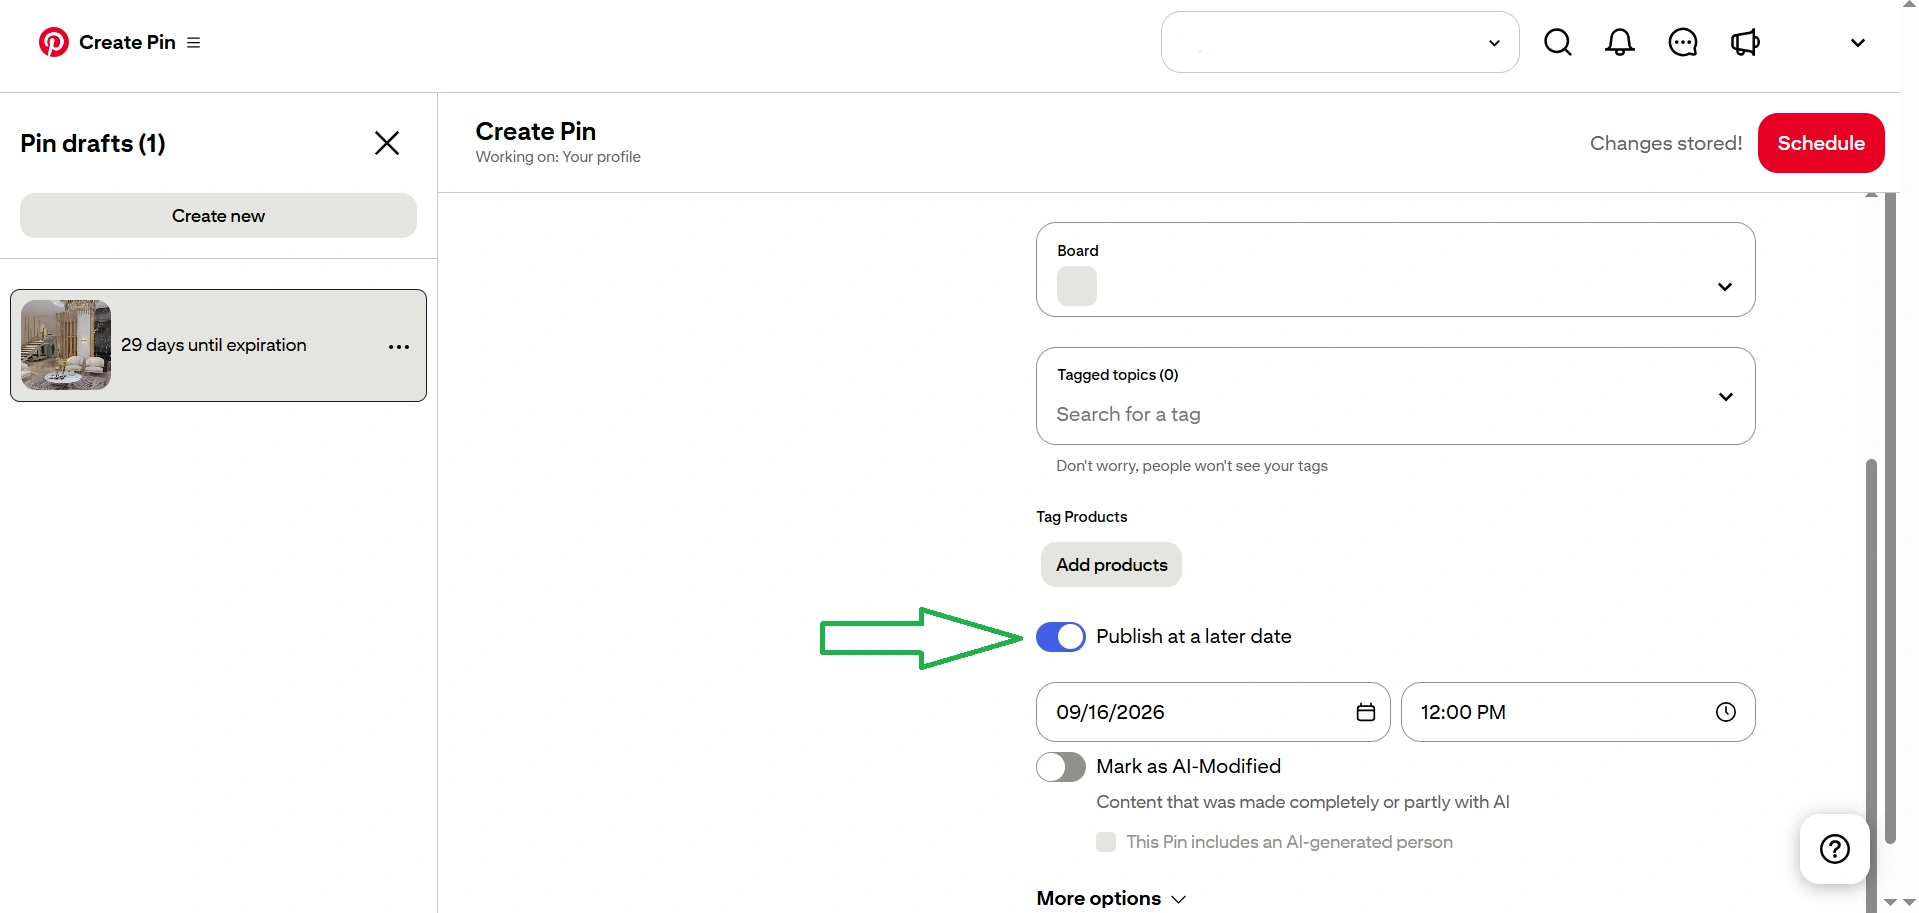
If you need a larger number or have other platforms, then you should consider specialized social media management services. For example, Buffer and Publer provide 3 channels for free, with 10 scheduled posts for each, and paid plans start from $5-6 per channel per month.
How to analyze the effectiveness of pins and the Pinterest account
Pinterest provides analytics data for both the entire account and each individual pin. You can also analyze trends, but only for a limited number of countries, which does not include Ukraine.
- Metrics in the "Overview" section
- Analyzing individual pins
- How to cross-check Pinterest data with GA4
Metrics in the "Overview" section
The first screen — "Overview" with the "Overall Performance" block. Here are six metrics, among which the main one for a website owner is "Outbound Clicks," as it shows how many people actually went to your domain. "Saves" are important for promotion on the platform itself, as they are a strong quality signal for the algorithm.
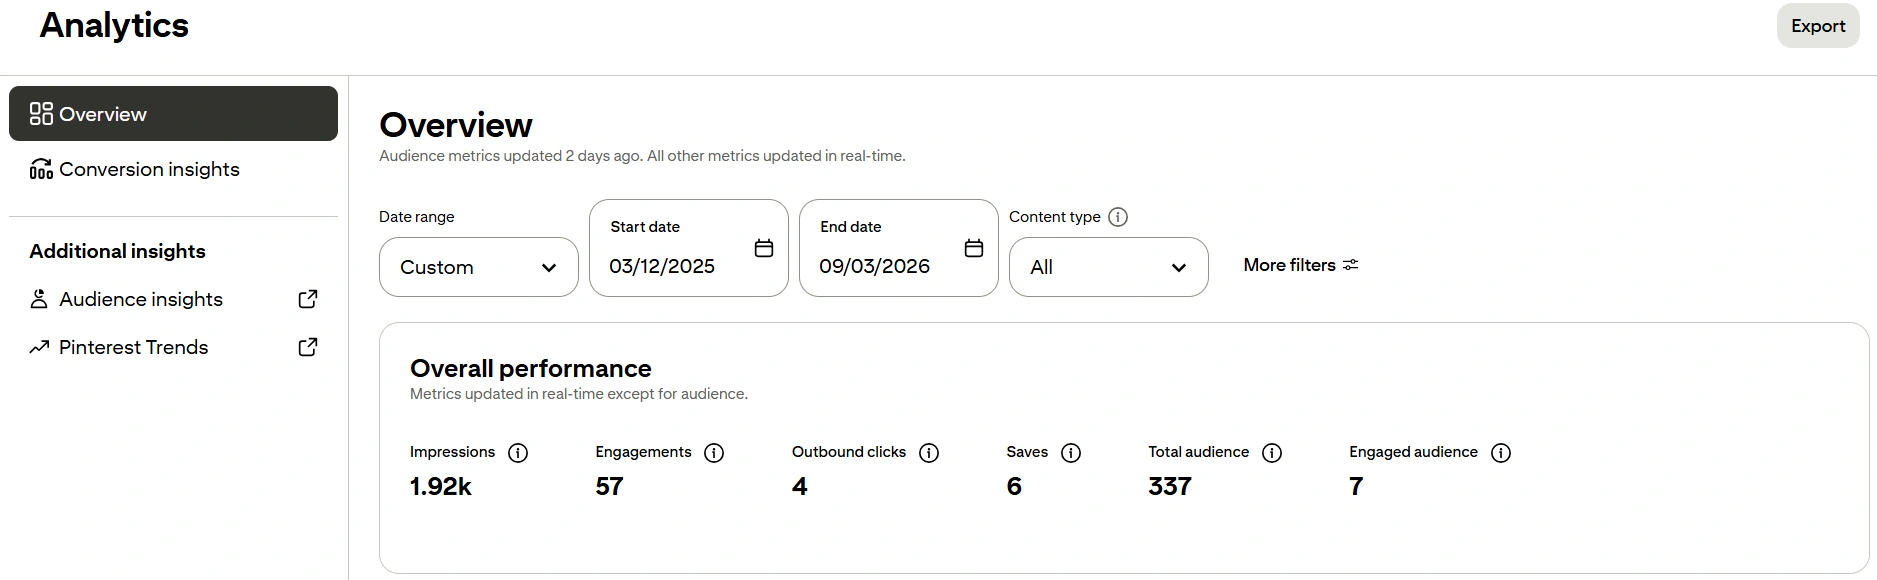
The statistics of my account for the entire period (March 12, 2025 — September 3, 2026): 1,920 impressions, 57 interactions, 4 clicks, 6 saves, 337 total audience.
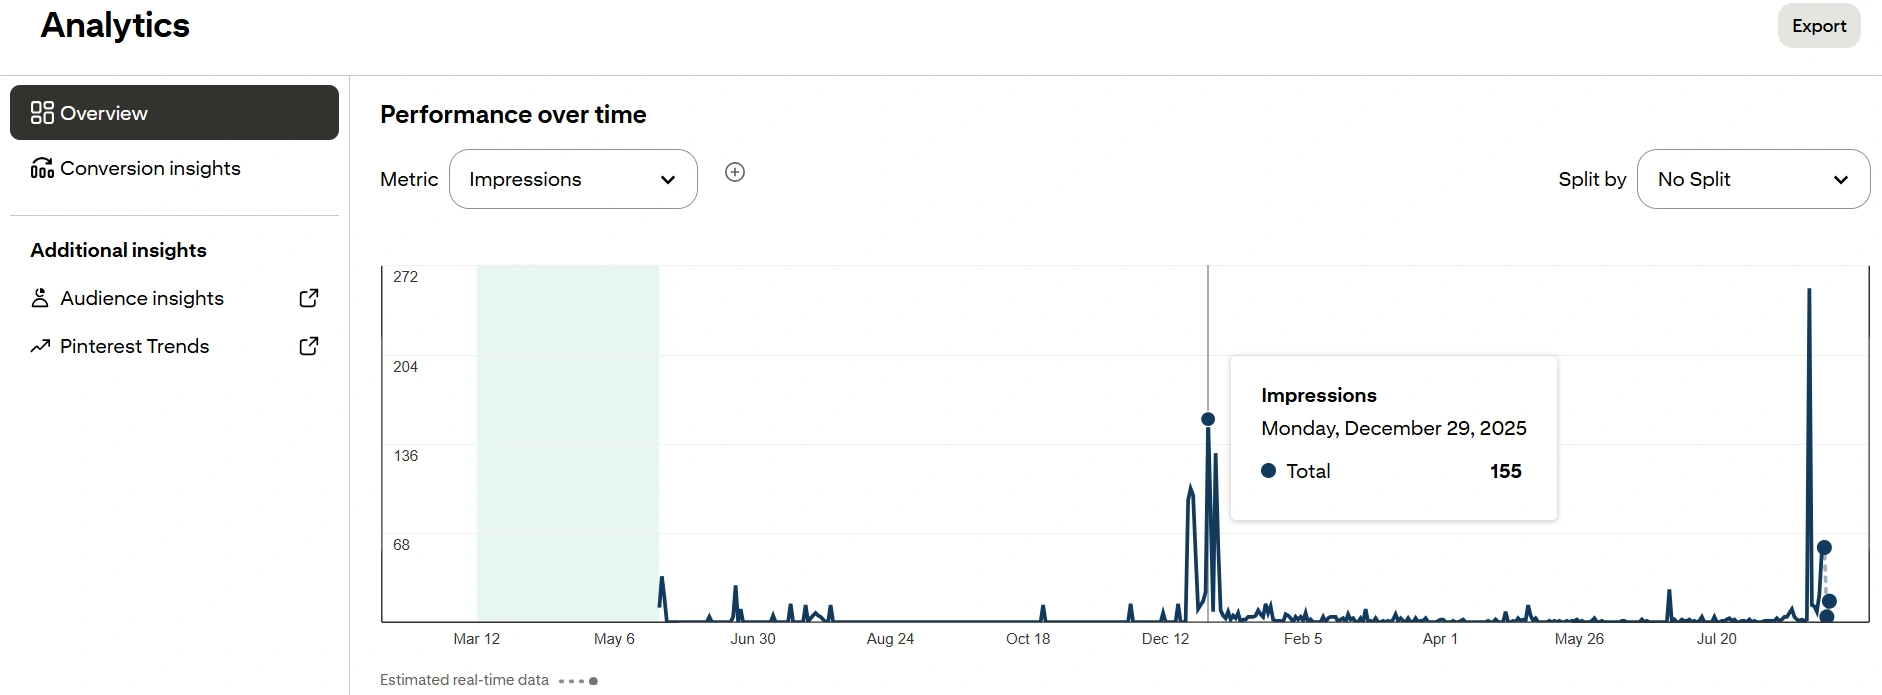
Below is the "Performance over time" graph, where the metric can be switched. And it is on the graph that you can see what the summary number does not show: for me, it is a flat line near zero with two or three spikes (December 2025 and the end of August 2026), not a smooth accumulation.
Analyzing individual pins
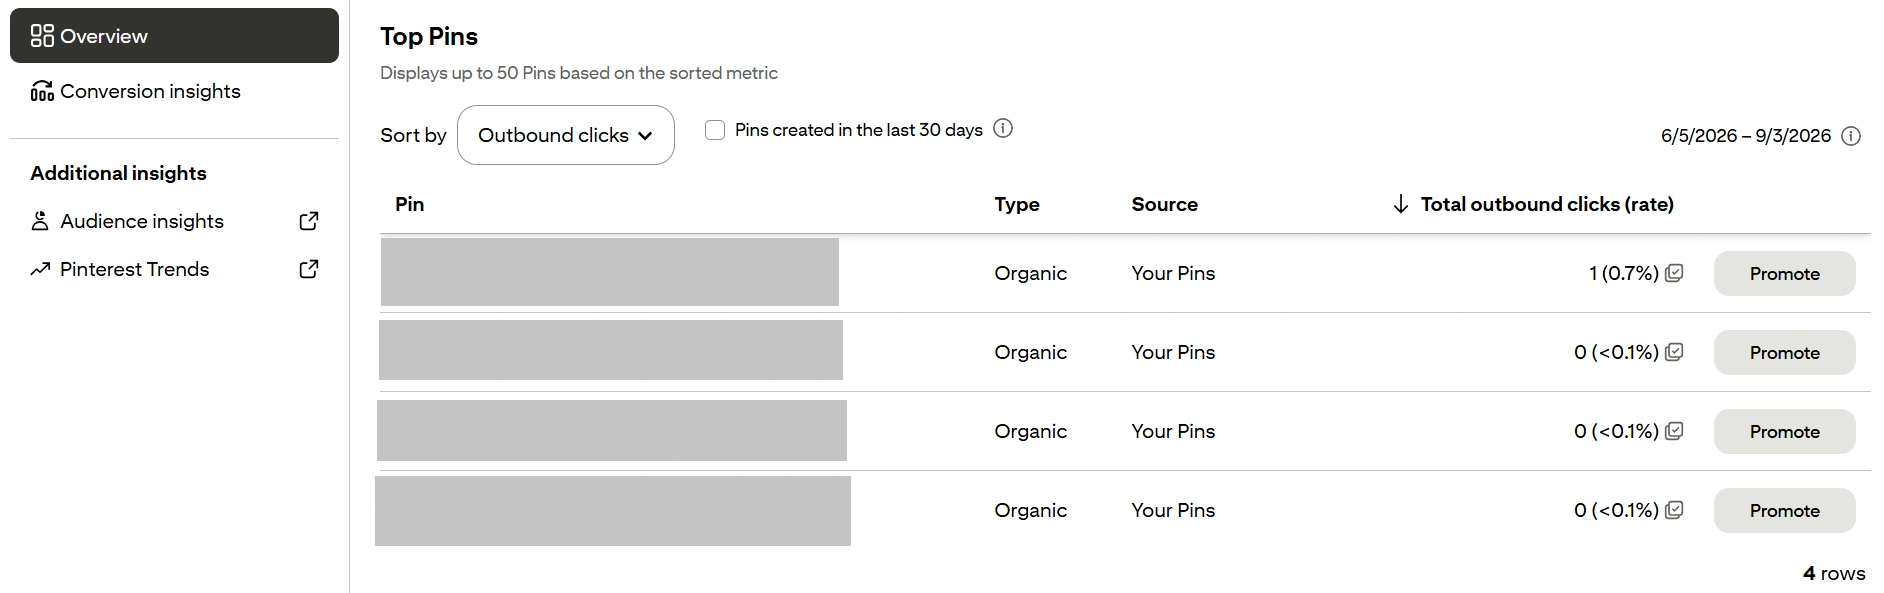
Below on the same page — the "Popular Pins" block. It shows up to 50 pins, and the main thing here is the "Sorting" switch: by default, it is sorted by impressions, but to assess traffic, it should be switched to "Outbound Clicks." Then you will see not the most noticeable pins, but the most useful ones — with the number of clicks and the percentage rate.
How to cross-check Pinterest data with GA4
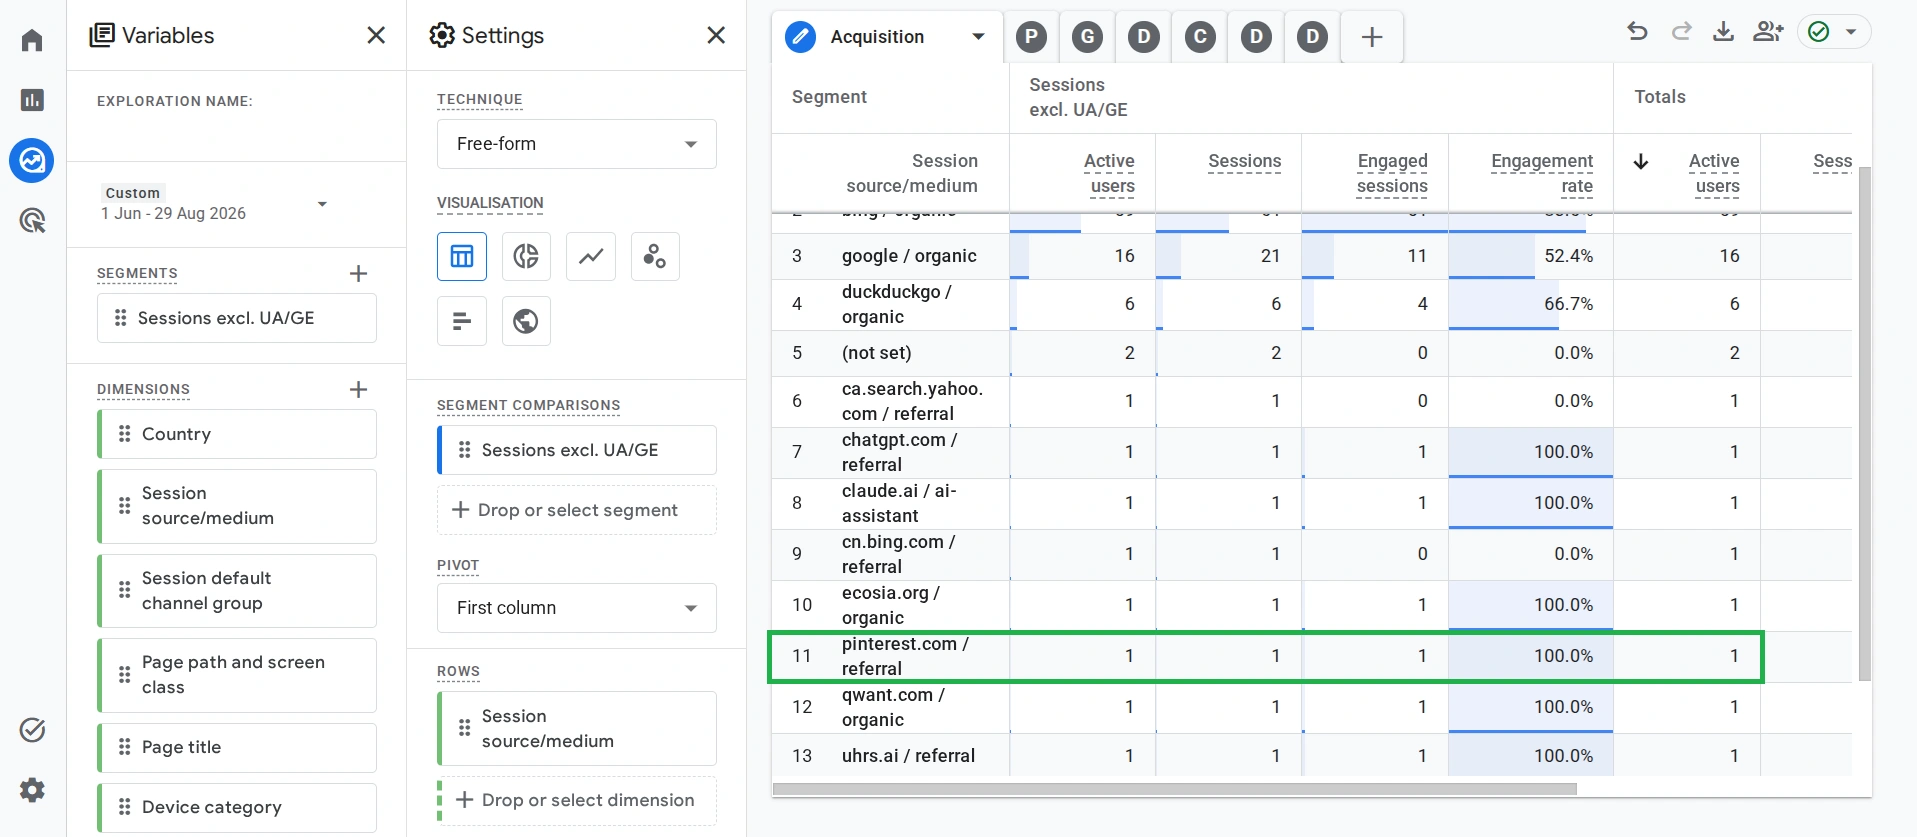
The most important part of the analysis is to check whether Pinterest clicks are actually reaching your site. To do this, in Google Analytics 4, open the traffic sources report (Session source/medium) and find the line pinterest.com / referral.
Previously, I filled this account with various content. For example, since December 2025, I actively promoted my Notion template through Pinterest, rather than the site: about 70-80% of all pins led to the marketplace, and only 20-30% to the web resource. In August 2026, I relaunched the direction — removed old pins and published four new ones, purely under app reviews.
And here is what the comparison showed. The total number of clicks over time is 4. In GA4 for the period from June 1 to August 29 from the source pinterest.com / referral — 1 session.
At first glance — a classic fourfold inflation. But the clicks graph shows four separate spikes: two coincide with the period of promoting the Notion template, meaning those clicks went to the marketplace, not to my site. The other two were at the end of August 2026, already on the new pins.
When I looked at the breakdown by pins for the last 30 days — Pinterest showed exactly one click. One click on Pinterest — one session in GA4. The match is perfect.
What mistakes to avoid when promoting a Pinterest account
Several practical warnings that are better to consider right away, rather than after something goes wrong:
- Suddenly increasing the frequency of publications. A jump from five pins a day to twenty-five overnight may be perceived by Pinterest as spam and limit the account.
- Panic over a sudden drop in impressions. The platform periodically and without explanation drops impressions by 60-70% — this is documented behavior, for example, such was recorded in April 2026. Usually, everything restores itself within a few weeks.
- Trying to launch ads from Ukraine. According to Pinterest's official documentation, the ad cabinet opens directly in 42 countries and in another 46 through partners — Ukraine is not on any list. It’s better not to waste time on attempts.
- Setting the country in the profile to the USA, hoping for targeting. The "Country/Region" and "Language" fields only affect the interface you see yourself, not who sees your pins.
And before investing months in content, spend half an hour on preparation: go to Pinterest Trends and see if there is stable search demand for three to five keywords in your topic. If there is no demand — no amount of good 1000×1500 pins will create it, and it’s better to invest that time in another channel.



.webp)