-
How to open the finished html site code in notepad for editing
-
What is the developer tool in the browser and how to open it
Why make a site on html
When it comes to creating your site, novice webmasters usually choose between several options that don't require you to work with code. It can be one of many CMS or online builders . Rarely, anyone is ready to take on a handwritten website or an html site, because it is more difficult.
But in fact, there is one way to cope with this task, having at least a rough idea of how the markup language works - download the ready-made html code of the site and slightly edit it to your needs. Working with a template, you immediately receive a ready-made frame, designed styles (fonts, colors, arrangement of elements), working JS scripts (buttons, menus, feedback forms). At the same time, you only need to replace the content — insert your images and texts.
This will require a little attention and knowledge, but the adaptation of the ready-made template is quite accessible to beginners. Such experience will be useful for those who are interested in typesetting, as well as for creating their own site in the simplest format - a landing page or business cards. Static html is more profitable for small sites than CMS development, because content management systems weigh much more. Using an engine with a large amount of php code and a set of various modules just for the sake of landing is not very profitable. An Html site requires very little hosting resources, so if the task is to create a site with only one page, it is the best option.
Read also: TOP-3 CMS for creating an online store
So, let's start working. First, you need to find a good template (paid or free) and download it to your computer in the form of a zip folder.
Two options can be used for its adaptation:
-
Edit on a computer and then upload the finished site to hosting.
-
Upload the site to hosting and edit in the file manager.
We will go the first way so that potential users do not see an unfinished site.
How to open the finished html site code in notepad for editing
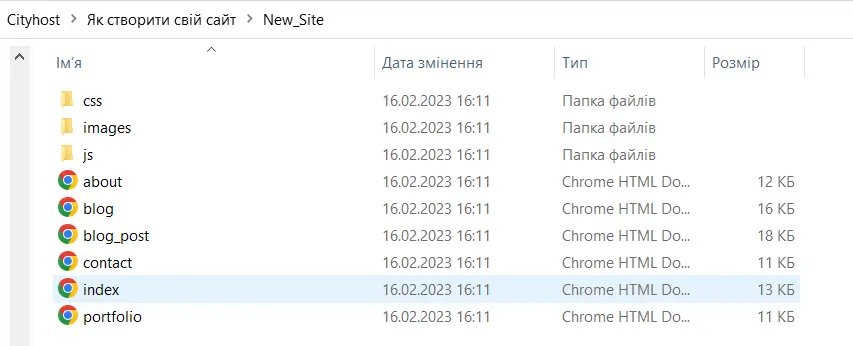
Unzip the archive on your computer and go to the folder. You will see something like this - directories with JS and CSS code, images and main pages. Among them, you need to choose index.html — this is the page from which the site starts. In the case of a one-page site, this will be a single html file. In our example, the site has several sections, so there are more files.
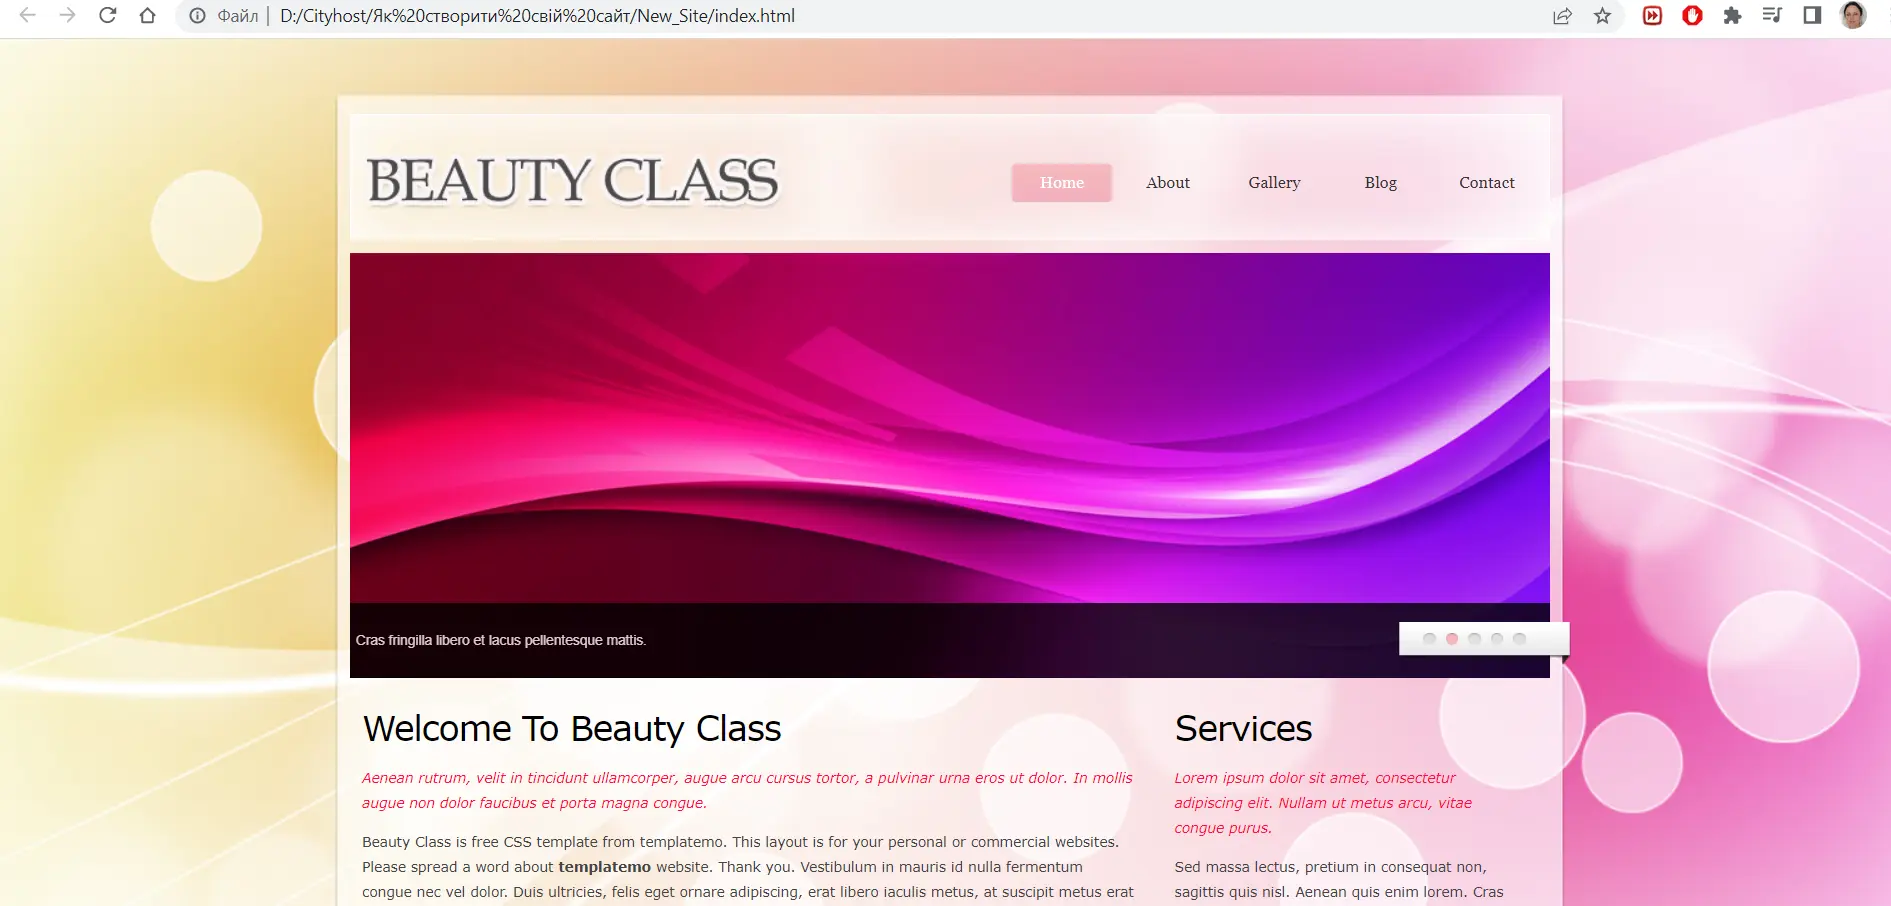
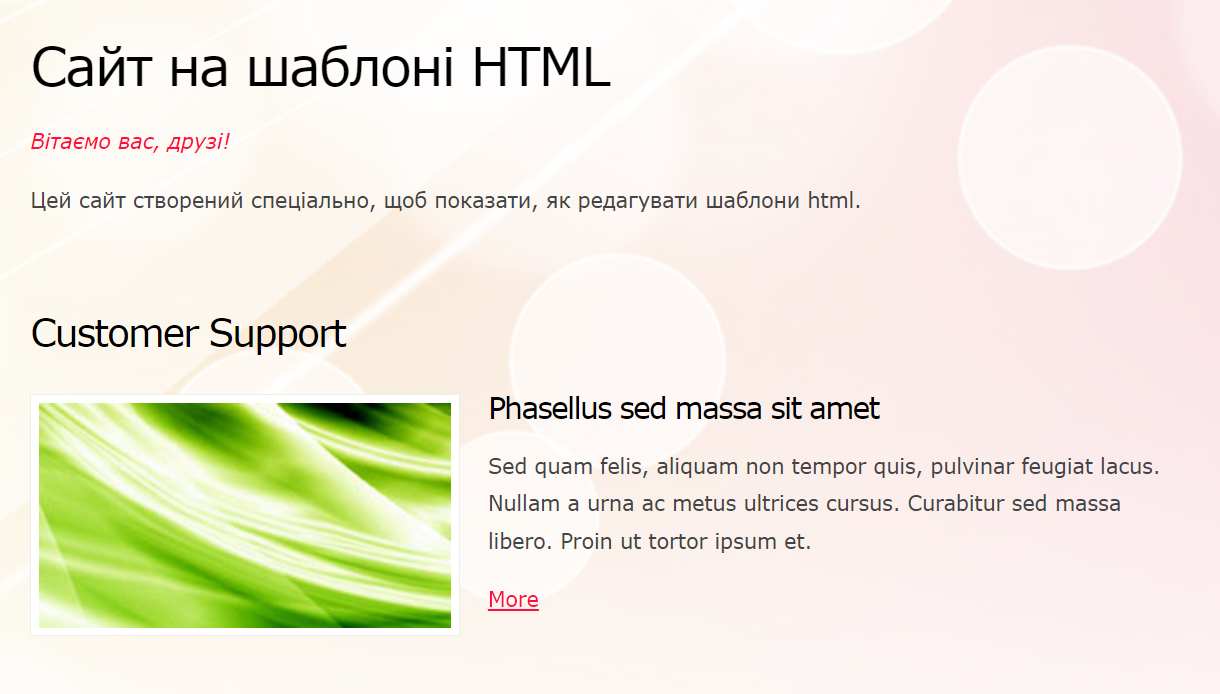
The system has already pulled in the html files of Google Chrome, and they will automatically open in this browser. You can immediately see what the main page of the template will look like on the network (for now, only you can see it).
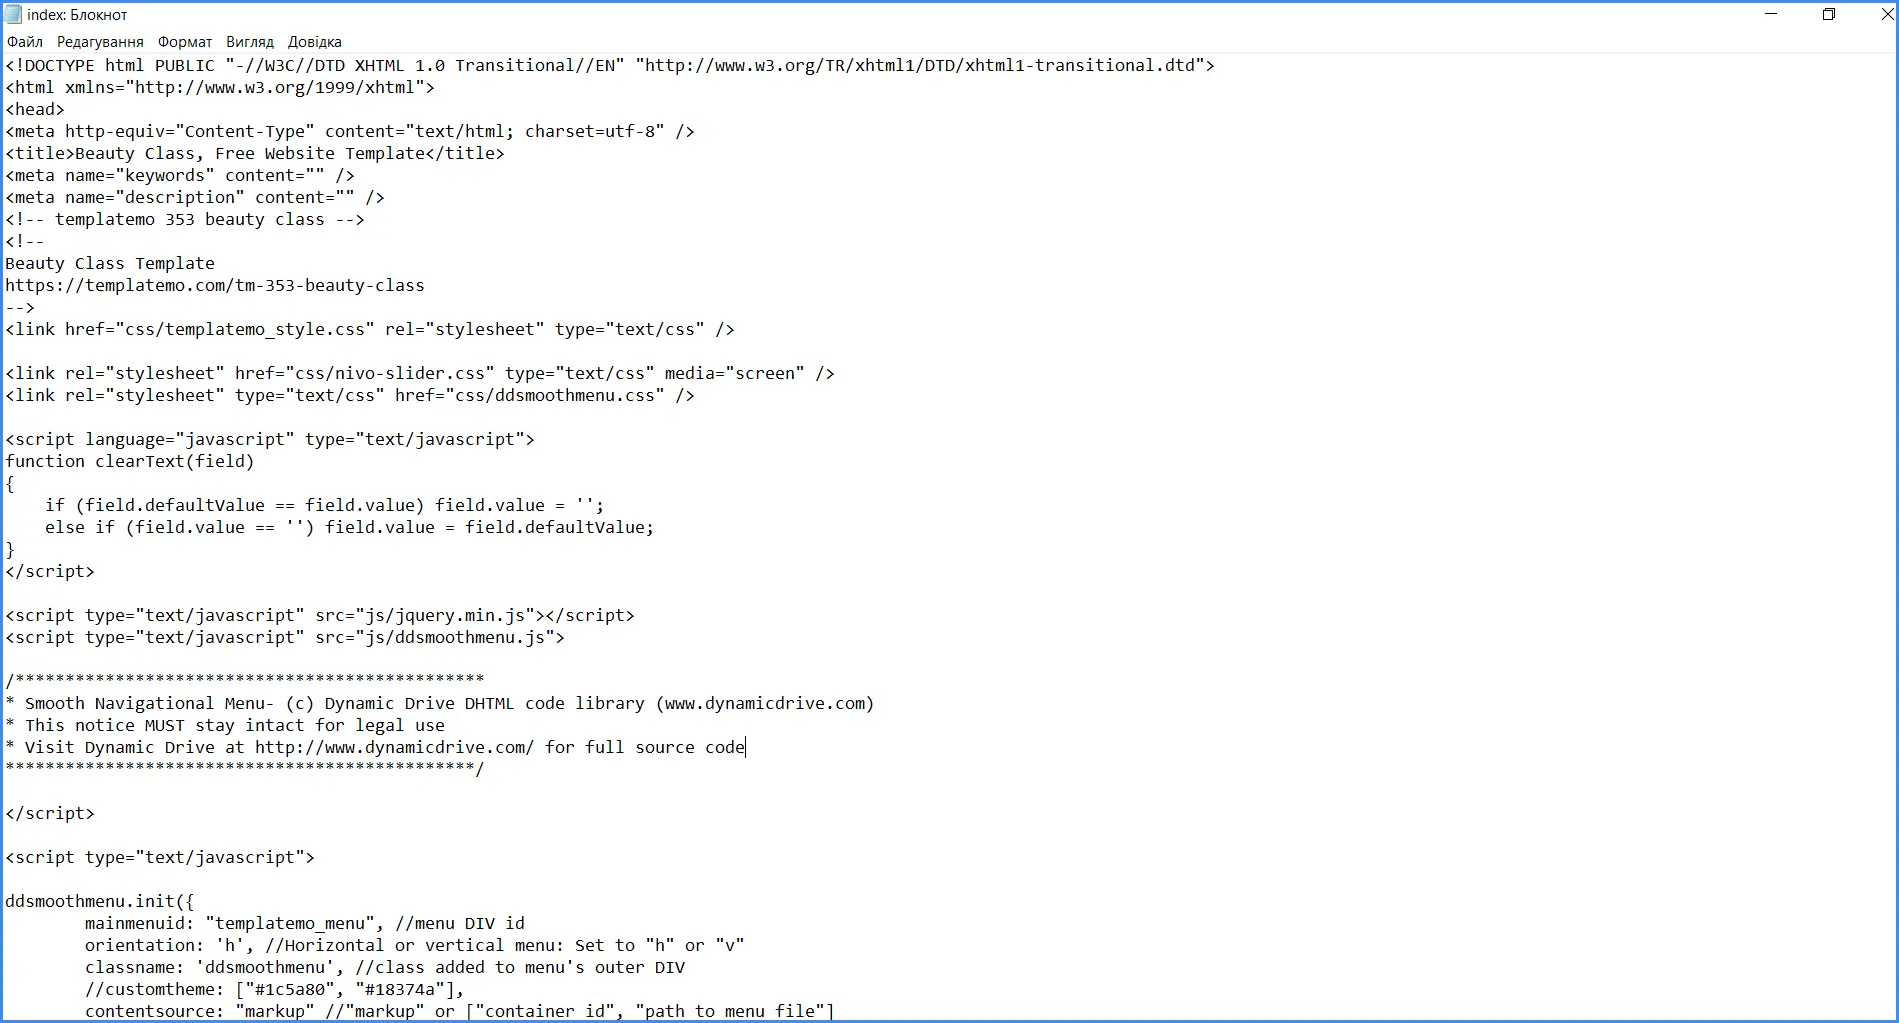
To edit the page, we will open it with the right mouse button in another program. If you're a beginner developer, you probably already have custom programs like Subline or Visual Studio Code. But this guide is made for non-professionals, so let's imagine that you don't have such a program. The site's HTML code is perfectly editable in a standard notepad or WordPad, so let's open it through a notepad.
Don't forget to select the Format => Word wrap option to see all the code in one window. Here's how you'll get it.
Basic html tags
To replace elements, you must first find them in the code. To do this, you should know the main tags that contain different types of content:
-
div is a universal container for grouping content blocks;
-
H1, H2, H3... H6 — headings;
-
li — list element;
-
p — text paragraph;
-
a href - link;
-
img — image.
There are a lot more tags in general, but that's enough for now. You also need to understand where the content of the tag begins and ends.
The opening tag looks like < p >, the closing one is somewhat similar to it, but with a slash < /p >. That is, the text paragraph must be contained between them.

"Lorem ipsum" and everything that follows it in Latin means "any text" or simply "blah blah blah" in "programming" language. It is installed when you need to see how the text block will look, but the content itself is not yet there.
Read also: Learn to program on your own or attend developer courses — what to choose?
Replacing text blocks in a template
Let's try replacing the title and body text on the page.
The title "Welcome To Beauty Class" is easily found by the < h2 > tag (a large second-order title). And the main text is highlighted in blue so you can see where it starts and ends.
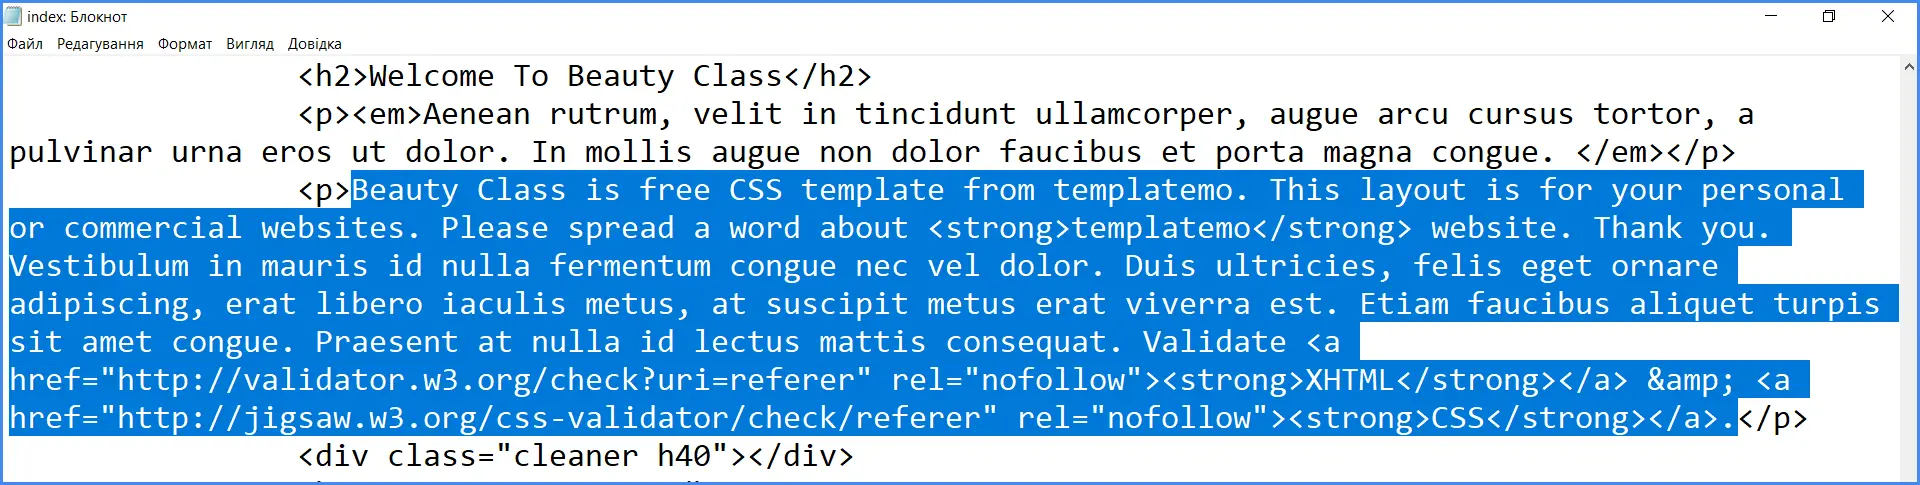
Instead of the text, insert your own, click File => Save in the notepad and refresh the browser to check the result. As you can see, we have changed the text.
What is the developer tool in the browser and how to open it
If you don't understand which thesis an element is in or what it's called, use the developer tools in your browser.
How to open developer tools in Chrome:
-
Right-click on the element and select "Check" from the list.
-
Press the F12 key on your keyboard and select Elements.
-
Go to the browser menu in the upper right corner => Other tools => Developer tools.
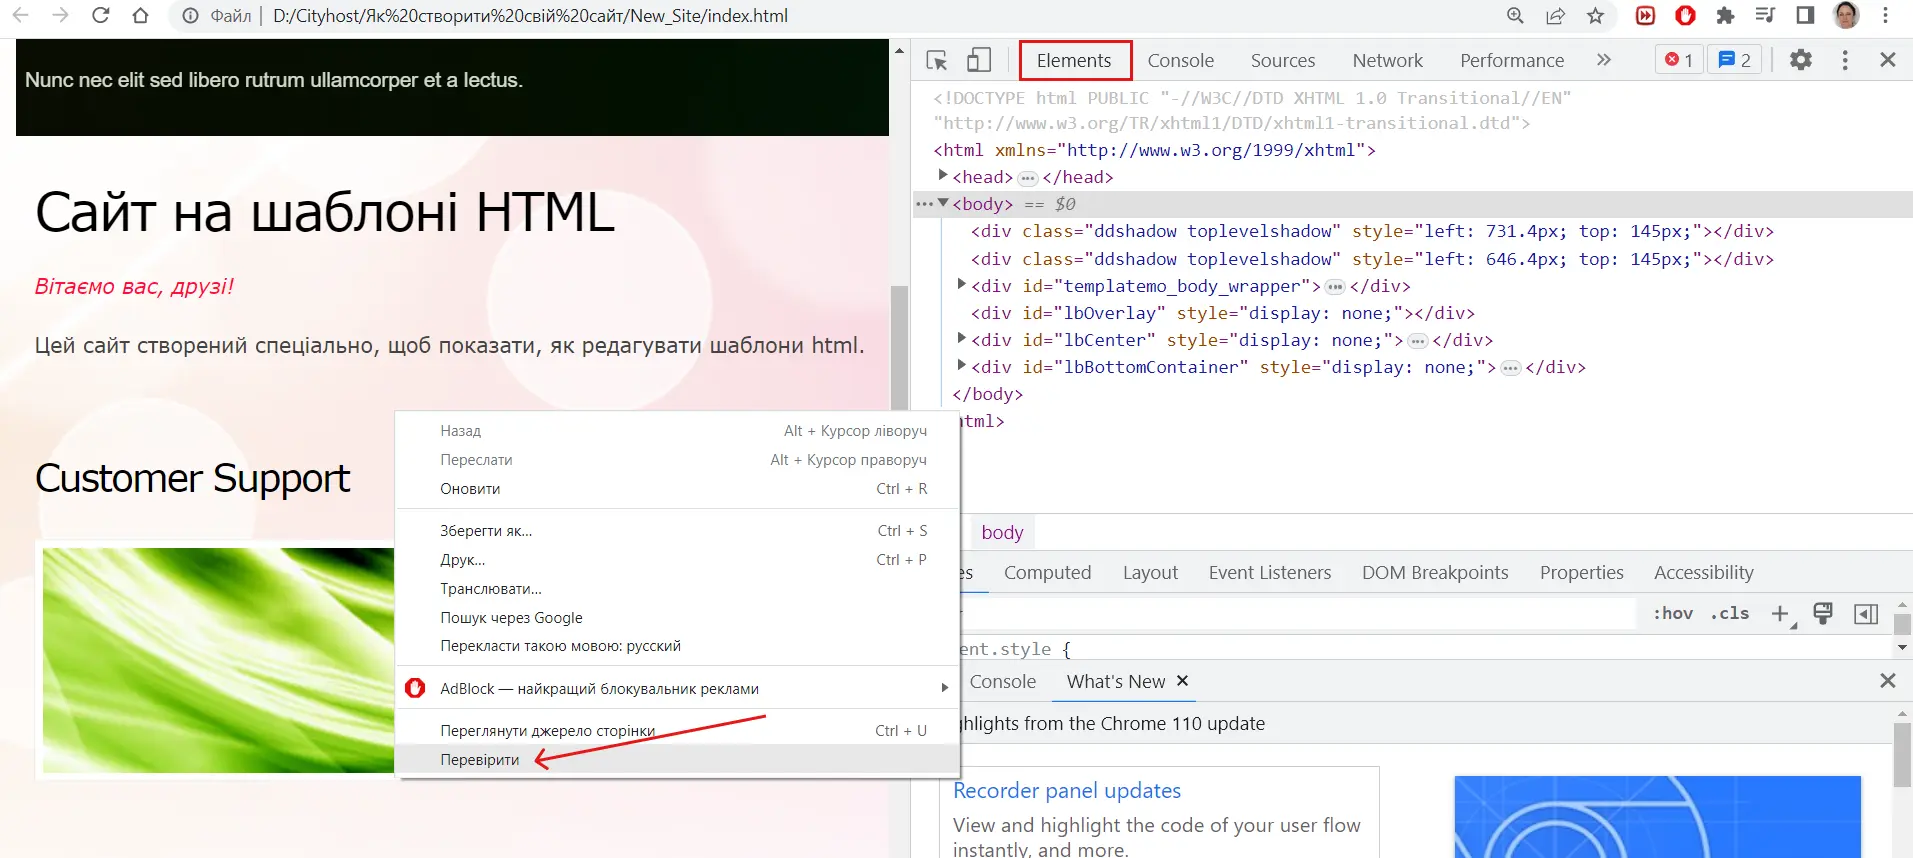
To see the name and tag of the element, right-click on it again and select "Inspect".
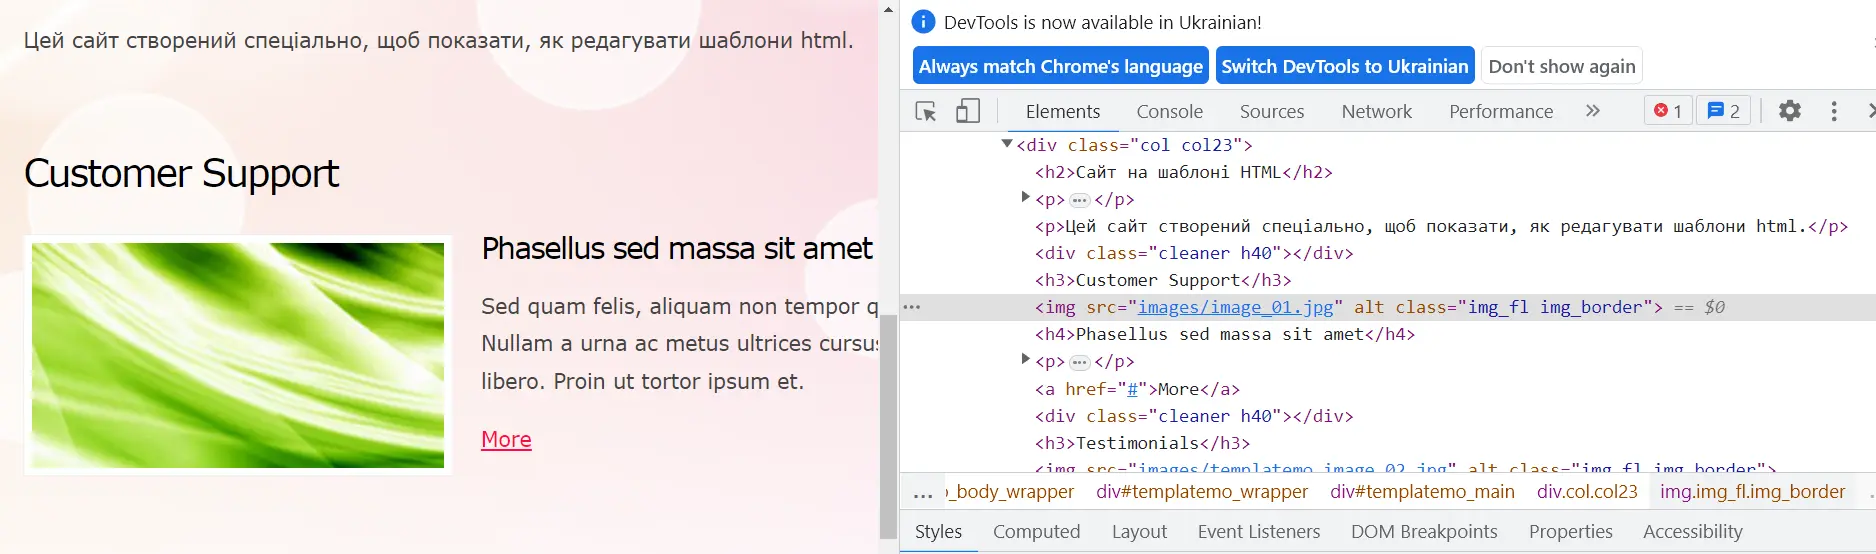
For example, this image has the address images/image_01.jpg , where images is the folder name and /image_01.jpg is the file name.
Replacing images in html code
Let's replace the picture. This needs to be done in two places - in the folder and in the code. How does it even work?
There are no images in the markup itself - they are in the images folder. The path to them is written in the code in the form of the place where the picture is located and its name. When you see a photo on a website, the html code just shows you the file from the folder.
Therefore, to replace or add an image, you need to upload it to the images folder and write the path in the code.

A slash means a folder, and the last name in quotes must always refer to a file.
For example, if we have a folder images , and in it there is a folder banners , inside which lies the image main-picture.jpg , then the path will look like this:
“images/banners/main-picture.jpg”
But keep in mind that it is better not to make a lot of investments.
There is an easier way to insert your photos: if you upload another image with the same name to the folder, it will be automatically replaced on the site without unnecessary editing of the markup. Let's try this option.
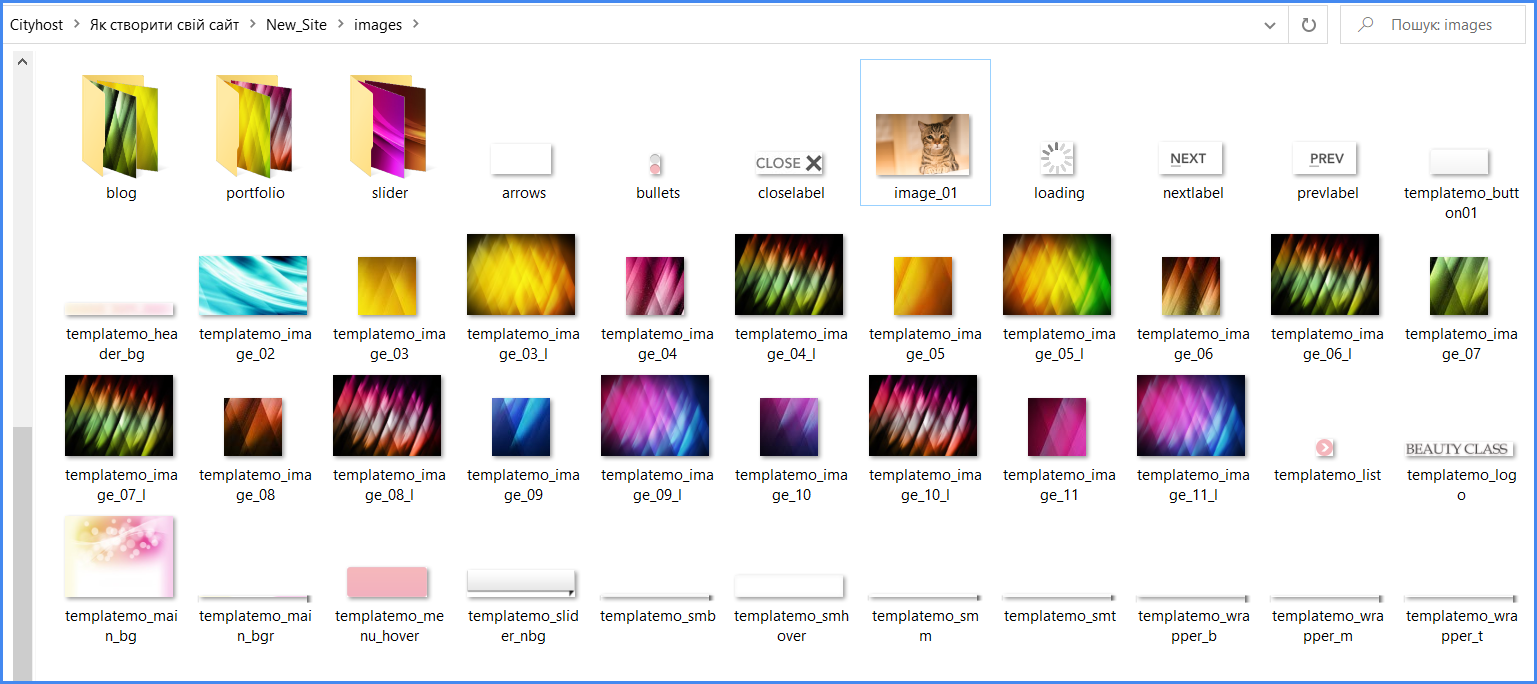
We replace the existing photo in the folder with images with another (we will have a photo of a cat) with the same name image_01.jpg . Make sure that the extensions are also the same. If the names are the same, but the original image had a .jpg extension, and you added it in .webp format, the images will not be replaced on the site.
If it is necessary to download pictures in a different format, then the name must be rewritten in the code. But our photo was replaced without editing the markup.
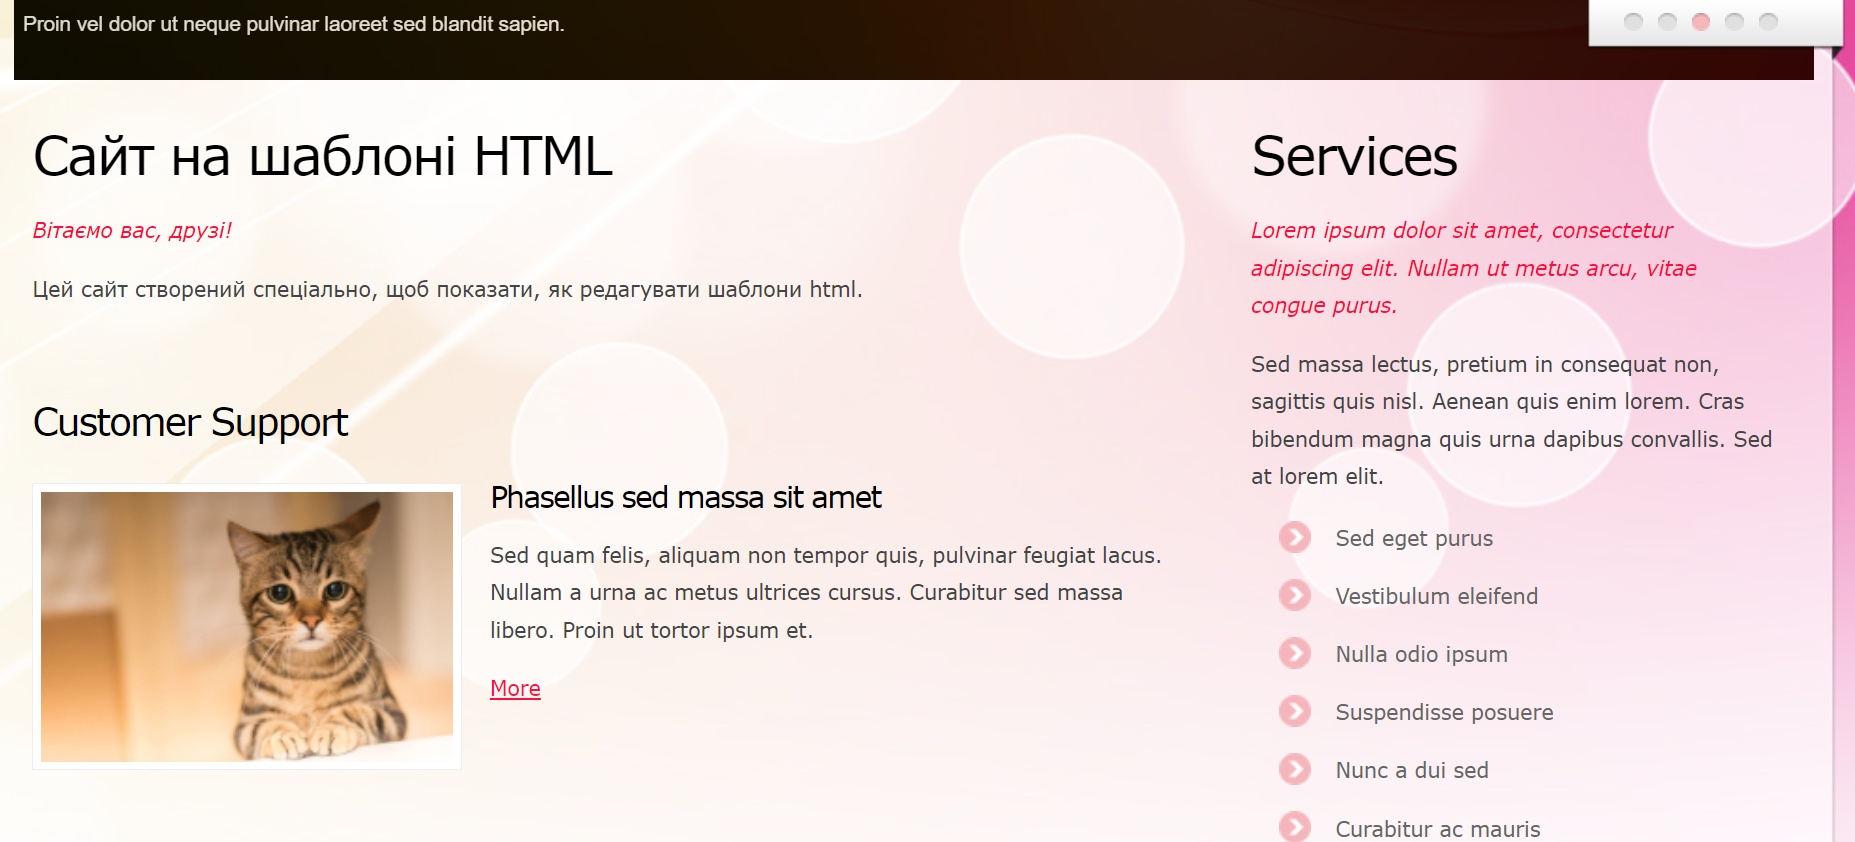
It is worth noting that the creators of free templates do not always specify the size of the pictures in the styles, so sometimes they have to be adjusted manually. Our picture was adjusted to the size of all others in the Figma graphic editor.
In this way, you can replace all the content with your own, get a unique site and feel free to use it. If you understand CSS, customize the design using colors or fonts.
Read also: Top 10 Ukrainian YouTube channels about IT
What you need to know about working with html code
We offer a few more tips on working with markup that may be useful for beginners:
-
Elements in the markup code are placed in the same order as on the page. That is, if the element is at the top, it will be at the beginning of the code, if it is at the bottom, then at the end.
-
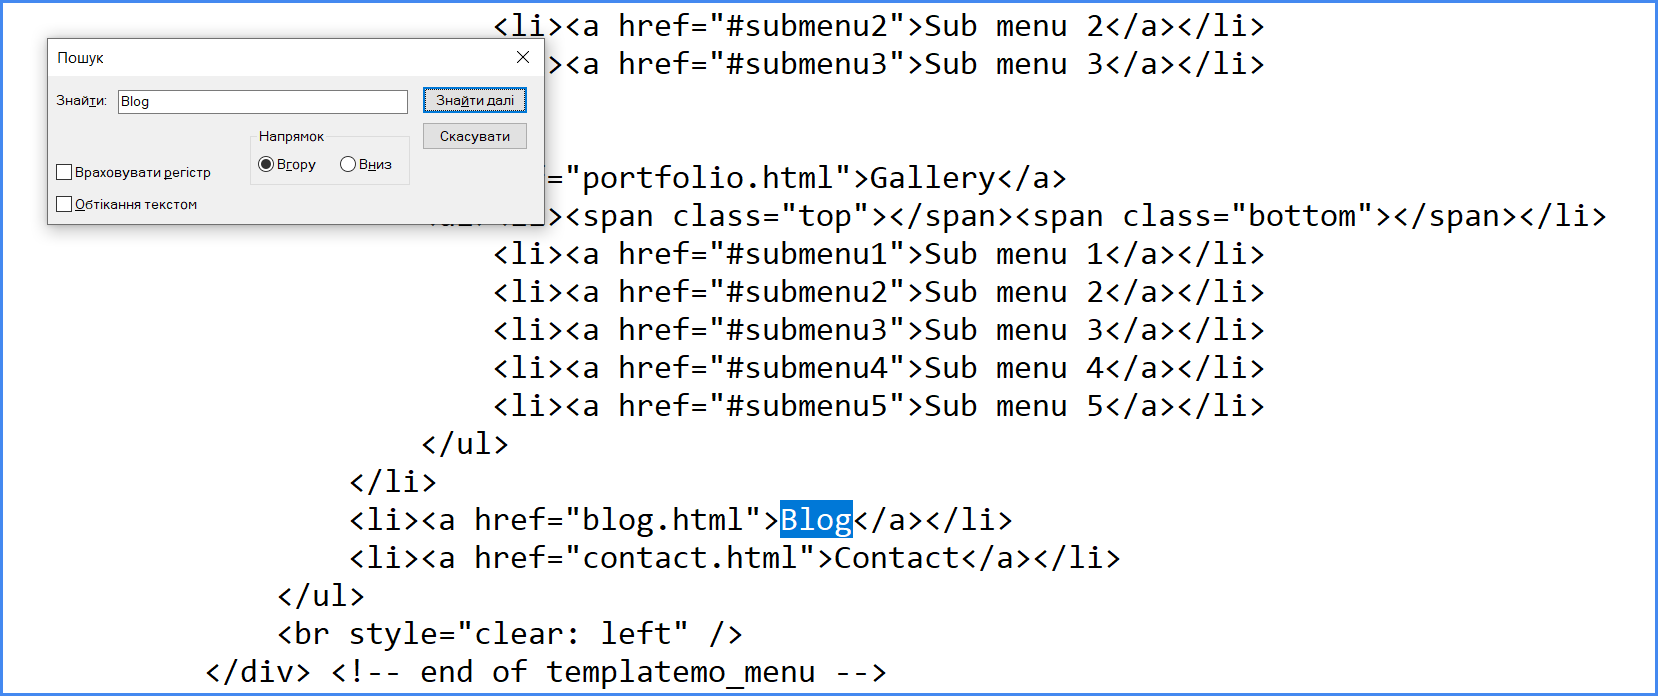
You can also find an element in the code by its text. For example, you need to find the button with the inscription "Blog", which is located in the top menu. Press CTRL + F in notepad and type the word "Blog" and you will see it in the code.
-
Every character is important for the code. If you "broke" something, it could mean that some character was removed or added incorrectly - a quotation mark, a period, or even a space, which also has a meaning.
-
Try not to edit or delete other parts of the code unless you understand what it is. It has many interrelationships with JS and CSS files, and if you remove any link, you risk being left without styles or interactive elements.
-
Developers have an unwritten rule - to name files in the code with English words that directly indicate the type of content itself, and not its content. That is, the image is most often called image or picture, and the video will be called: video_1. This greatly simplifies work with markup and helps third-party developers quickly understand what is written in the code.
Downloading the finished site to hosting
Our site is ready and it's time to bring it to a domain and hosting. We will show you how to do it in the Cityhost.ua panel, but the principle is similar for other providers. We will not describe the process of buying services, but we will keep in mind that you have already bought hosting and linked a registered domain to it.
To begin with, you need to get inside the site, which can be done using FTP. But we won't be working with heavy files, so a file manager is quite enough for this task.
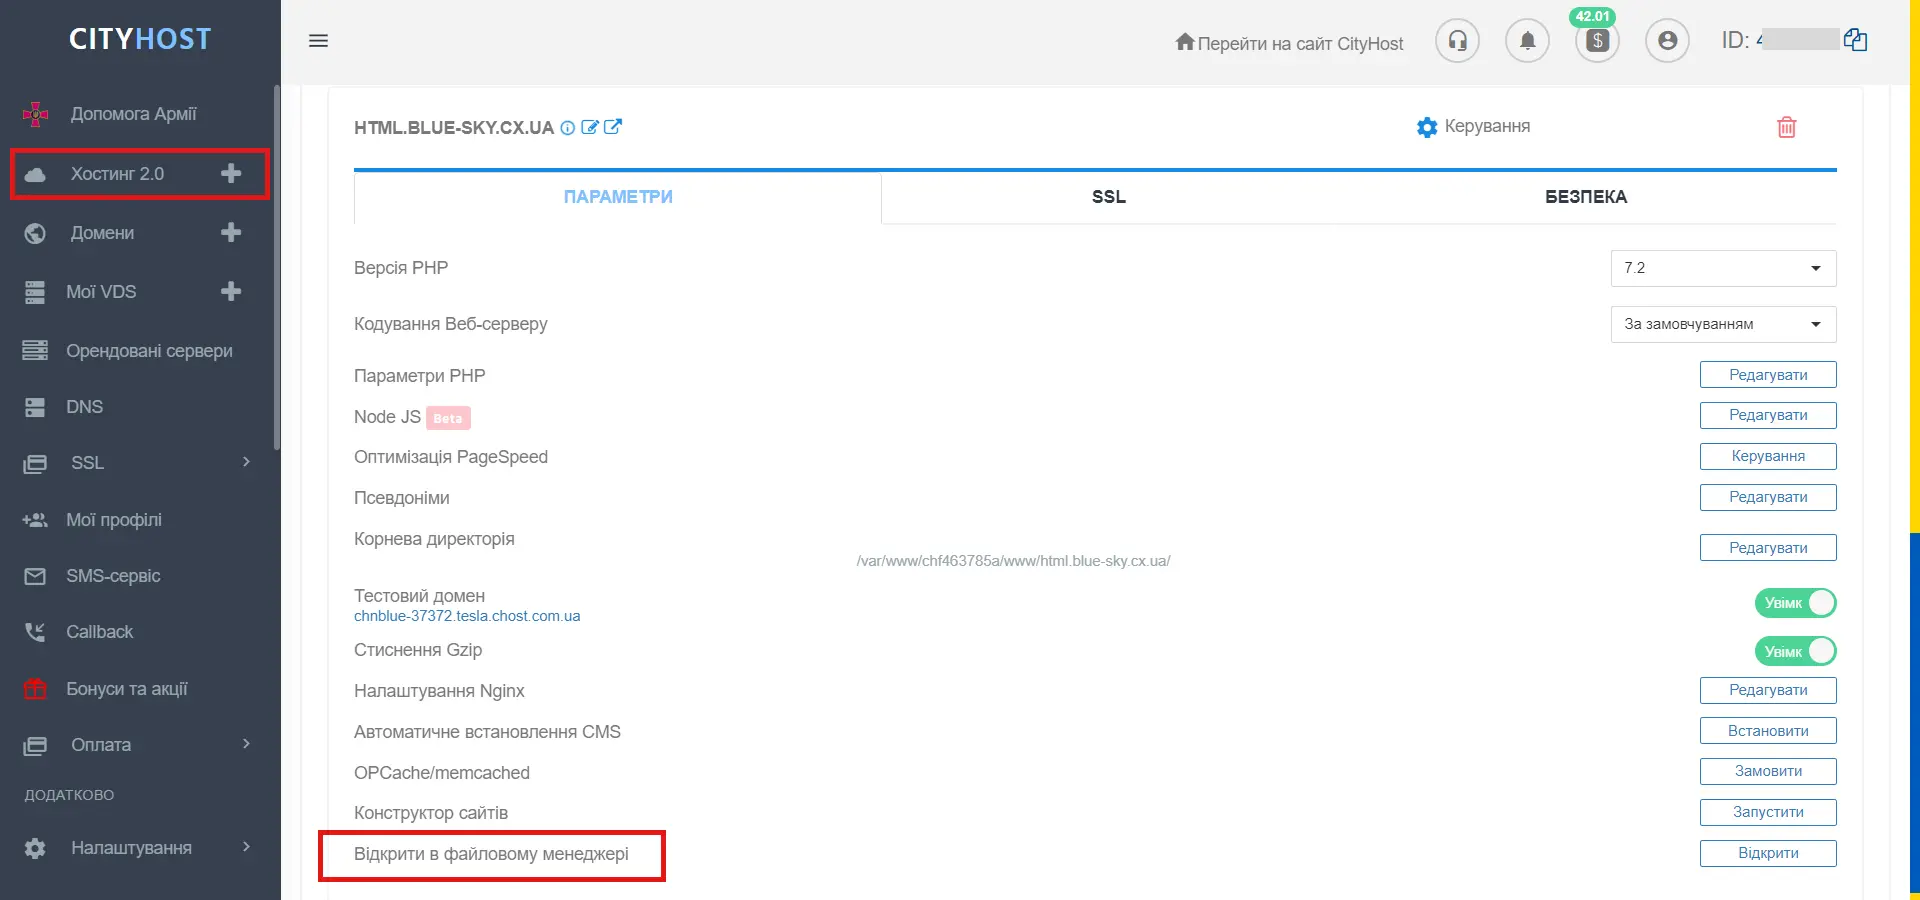
Log in to your account on the Cityhost website and open the Hosting 2.0 tab => Management => Open in file manager.
Now the site is empty, but the new hosting usually has a "banner stub" in the form of a php file - it can be removed.
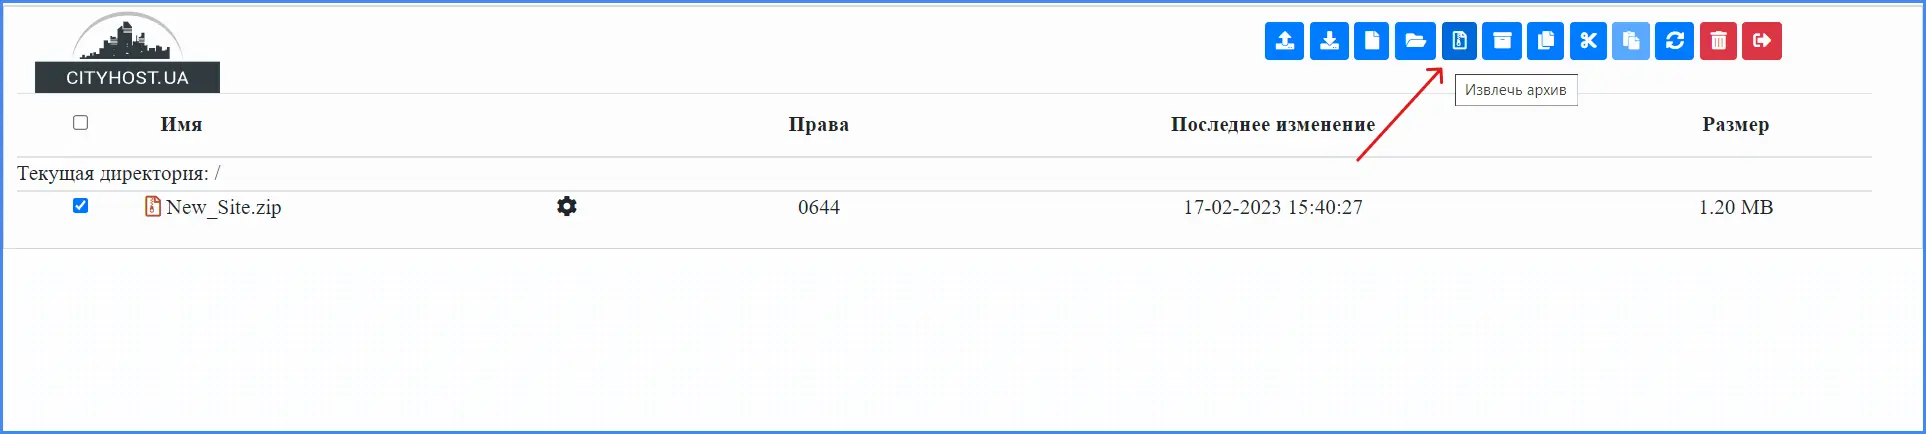
Archive your site in a zip folder and upload it to your hosting via the "Upload File" button.

Next, you need to unpack the folder using the "Extract archive" button. After unpacking, it is better to delete the archive immediately.
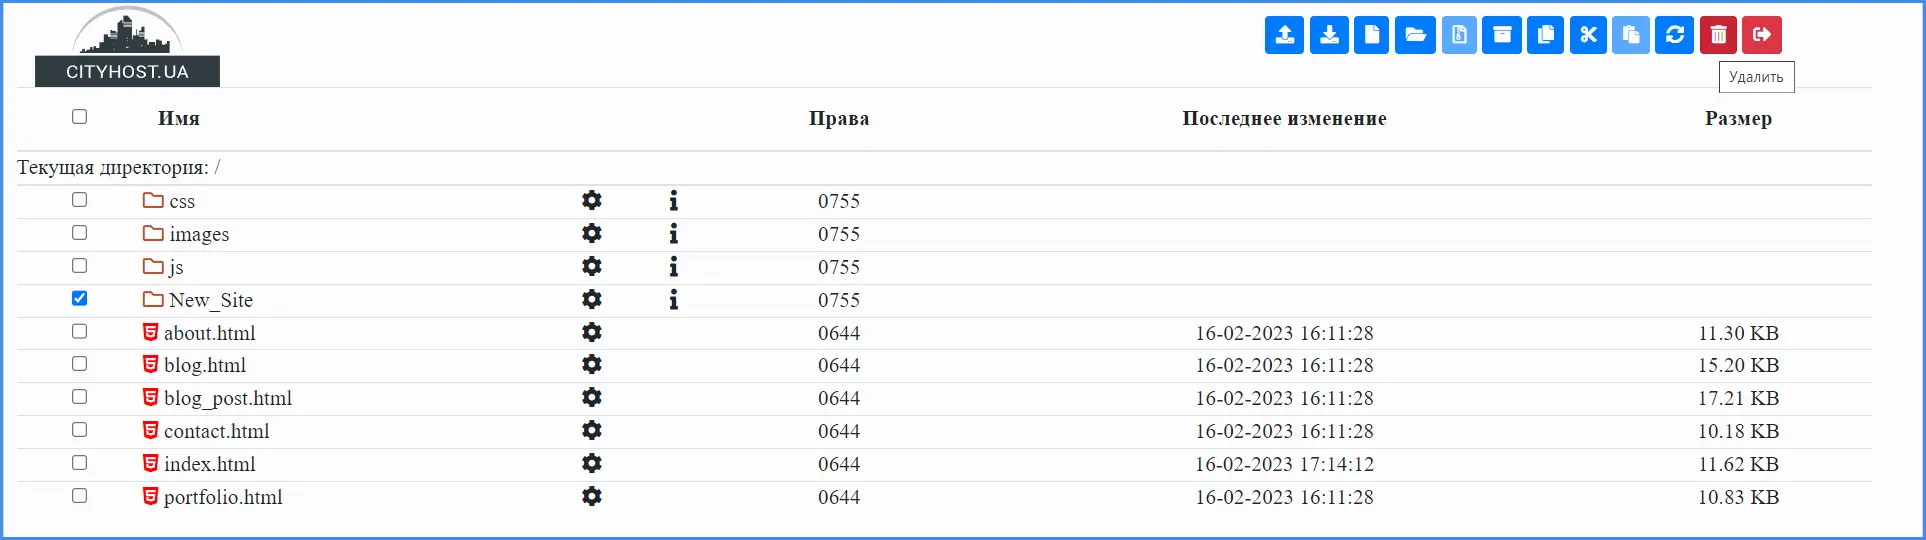
 The next step is to extract all the files from the folder to the root directory using the Cut - Paste procedure. Files, especially index.html, must be at the top level or users will not see them on the domain. After that, delete the main folder, it is already empty.
That's all. The site is already published on the Internet - now you can enter your domain in the search bar of the browser and view the web resource. To edit it, it is enough to open the desired file on the hosting and edit it right there, there is no need to reload the site every time.