- How to know about a website hack
- What to do in the first hours after a website hack
- How to perform technical recovery of a website after a hack
- How to find and close vulnerabilities on a website
- How to restore reputation after a website hack
- How to restore SEO after a website hack
- How to prevent a repeat hack: checklist
A hacked WordPress site does not always look like this: you can calmly log into the control panel, the homepage opens, and the feedback forms work. At the same time, you may see strange pages in the search results and mass redirects to foreign resources, receive complaints from visitors, and a letter from the hosting support service. The first desire in such a situation is to urgently delete something or revert to an old backup, but this is often how traces disappear, and along with the copy, the vulnerability returns. Therefore, restoring a WordPress site after a hack must be done in a clear order—from technical cleaning to returning positions in the search results.

How to know about a website hack
Hacks are most often reported by the hosting provider or Google Search Console. However, a final conclusion is made based on a combination of signs: from foreign pages in the search results to unfamiliar administrators in the control panel.
- What are common signs of a website hack
- What services are available to check for a website hack
- How to check for a website hack using Cityhost tools
What are common signs of a website hack
Hosting providers have the best monitoring systems for web resources and send notifications about possible problems as quickly as possible. However, they cannot physically notice everything, so it is better to regularly check your internet project yourself.
And be sure to pay attention to the following signs of a website hack:
- the browser shows a red screen instead of the site: «Deceptive site ahead» for phishing or «The site ahead contains malware» for infection;
- in Google Search Console, the report «Security Issues» has warnings about hacked content;
- visitors are redirected to third-party resources, such as casinos or pharmaceutical stores;
- there are pages in the search results that you did not create, often in Japanese or with names of medications;
- organic traffic has sharply decreased without connection to known Google algorithm updates or, conversely, has sharply increased;
- unfamiliar administrators appeared in the control panel, or plugins and themes that you did not install;
- the hosting provider reported suspicious activity, spam being sent from your account, or suspended the web resource;
- users complain about strange behavior of the site that you do not see yourself—malicious code often only activates for transitions from search;
- CPU load has sharply increased without visible reason—check the graphs in the hosting panel;
- files with the .php extension appeared in the wp-content/uploads folder, and the editing date in wp-config.php or .htaccess has changed;
- you received an email stating that your site in Search Console confirmed a new owner.
At the same time, not every problem on the site indicates that it has been hacked. Errors 500, 502, 503 are most often related to plugin failures, caching, or hosting overload. With «Error establishing a database connection» it is more complicated: usually, this is also a technical failure, but sometimes it is the result of changing access to the database in wp-config.php. If there is at least one sign from the list along with the error, it is already a reason to conduct a comprehensive check of the site for hacking.
Also read: How to protect a WordPress site and not become a victim of open code vulnerabilities
What services are available to check for a website hack
The main tool is Google Search Console. But there are also several services that check the site in seconds, providing a report on viruses, the presence of the domain and email in blacklists.
To analyze the effectiveness of these services, I checked my site on each:
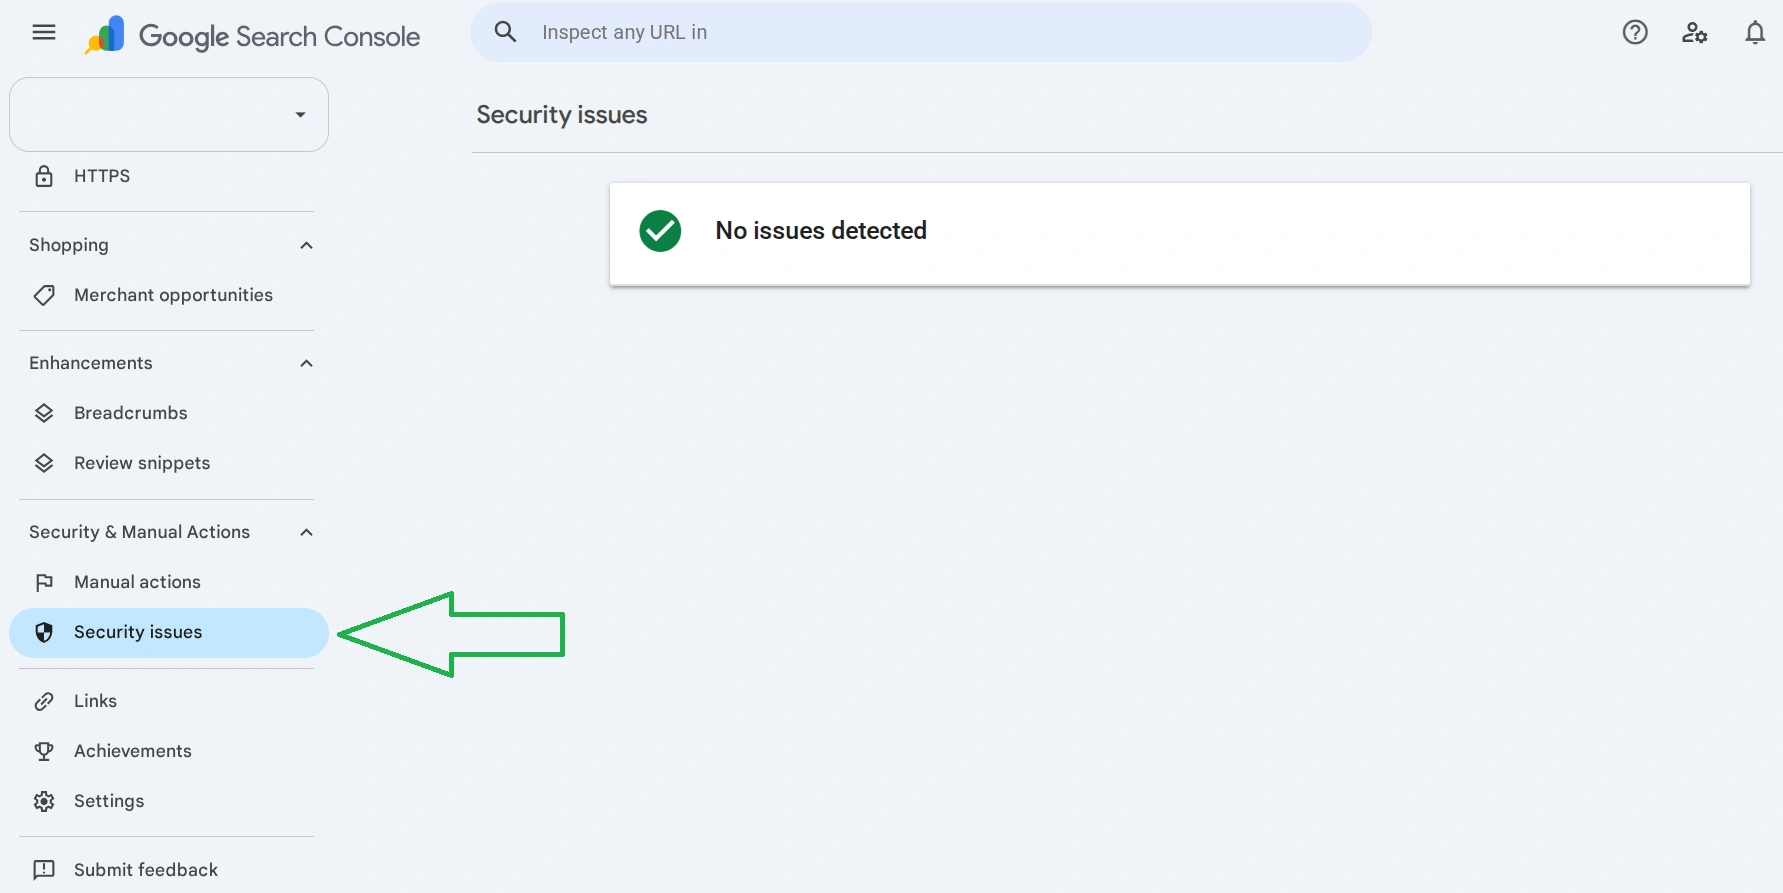
- Google Search Console— in the side menu, go to Security & Manual Actions («Security and Manual Actions») → Security Issues («Security Issues»). If everything is fine, you will see a green checkmark «No problems detected», otherwise— the category of the problem and examples of infected pages.
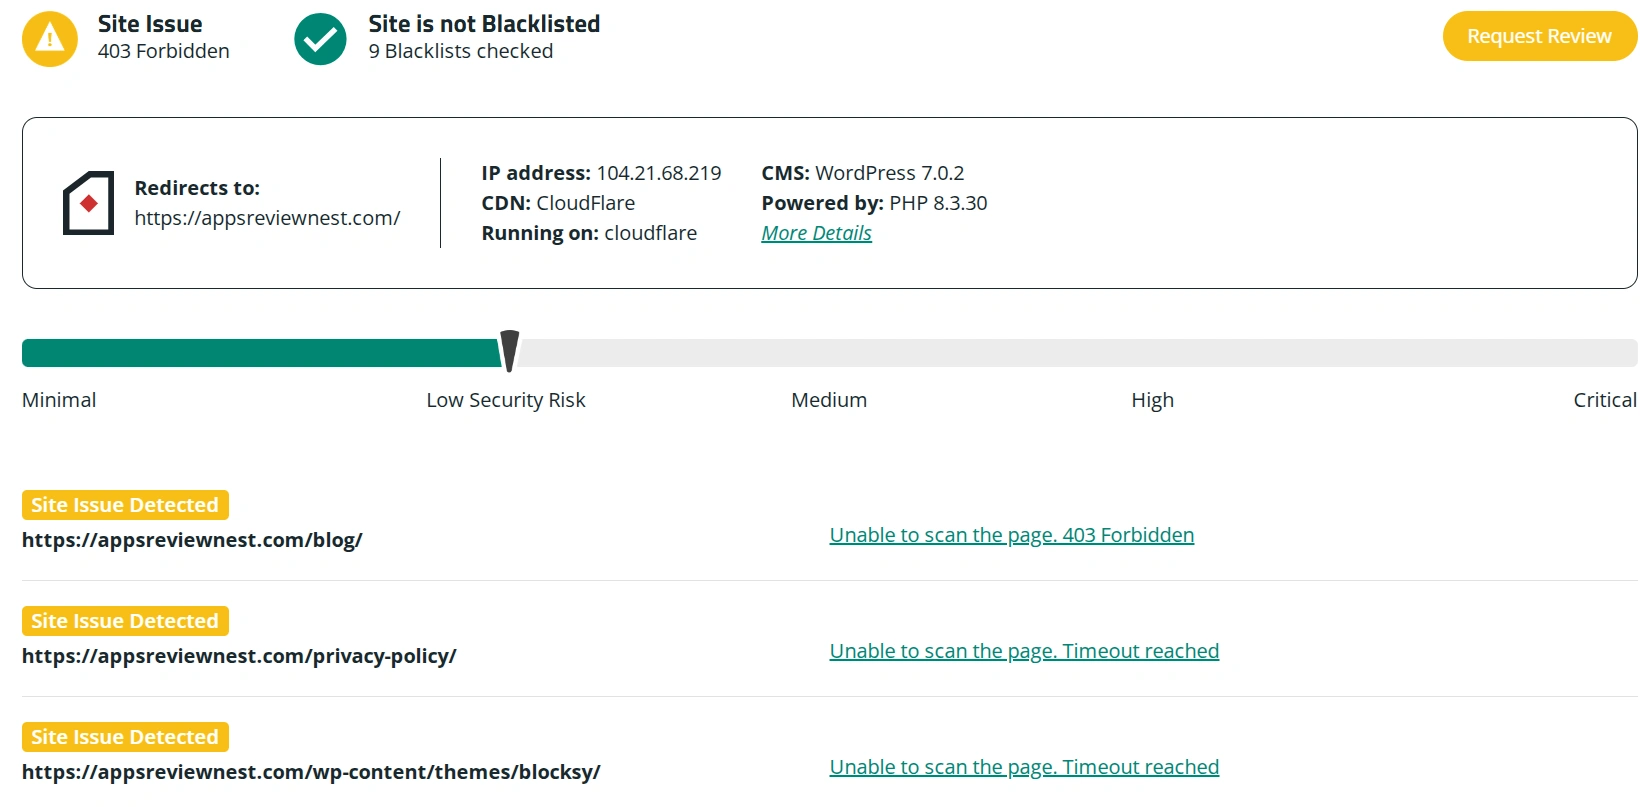
- Sucuri SiteCheck— enter the domain name and click Submit. In 5-10 seconds you will receive a report with the security status and found issues.
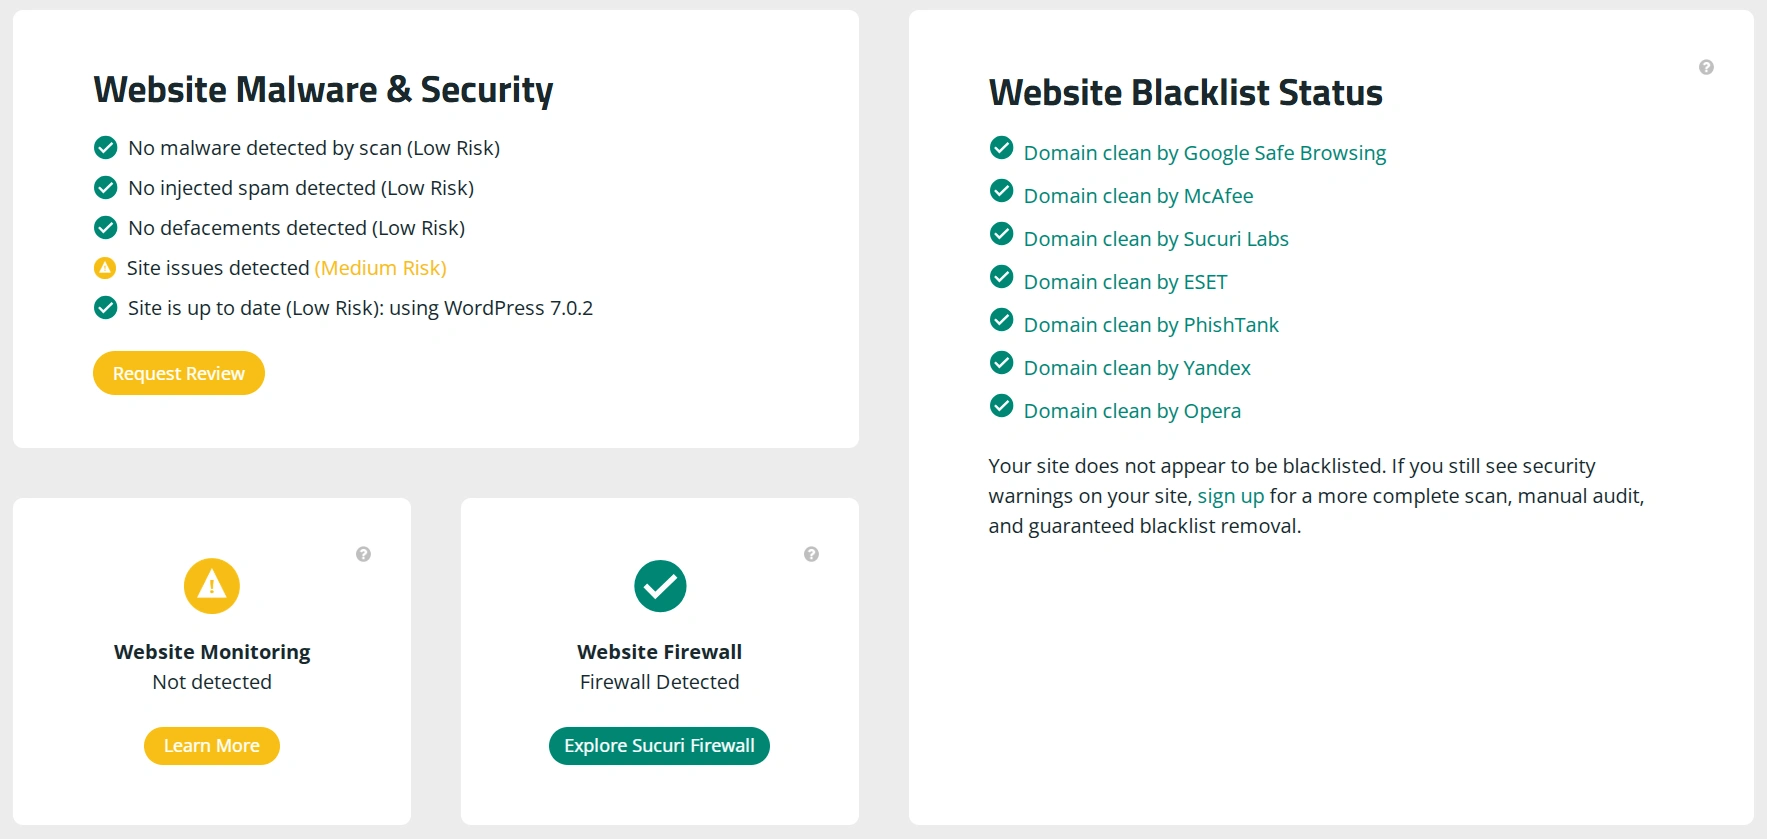
And below you will see if there is any malware on the web resource and if the online project itself is in blacklists.
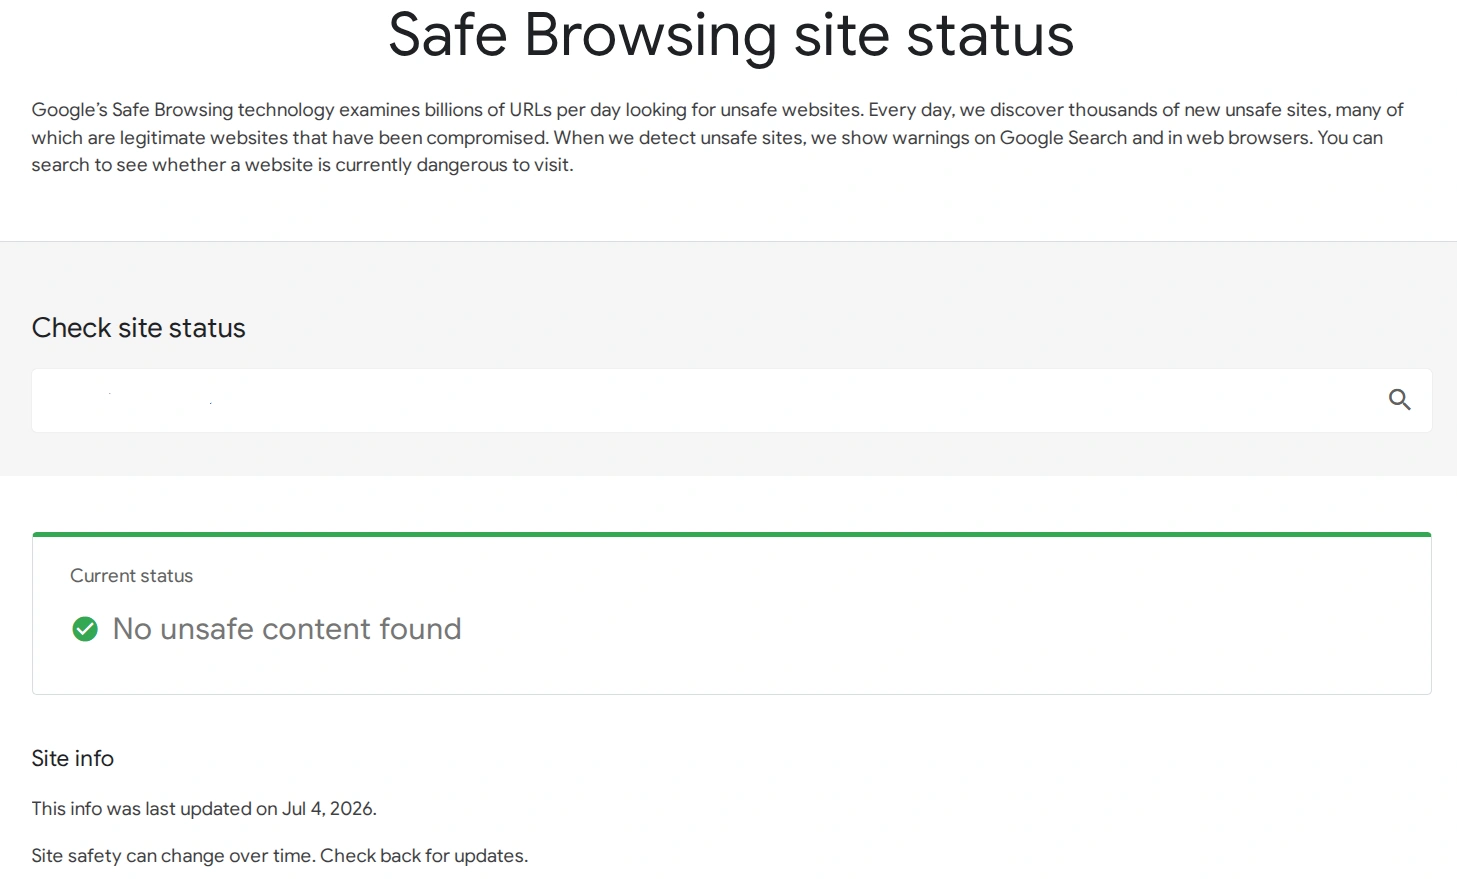
- Google Safe Browsing— go to Transparency Report, enter the site link and click the search icon. For example, in my case, the system showed «No dangerous content found».
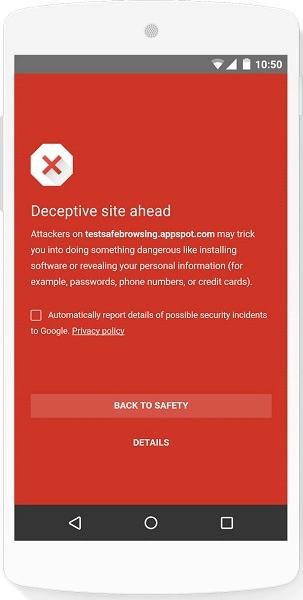
On Safe Browsing, you can also see an example of how users will see the web resource that has been hacked.
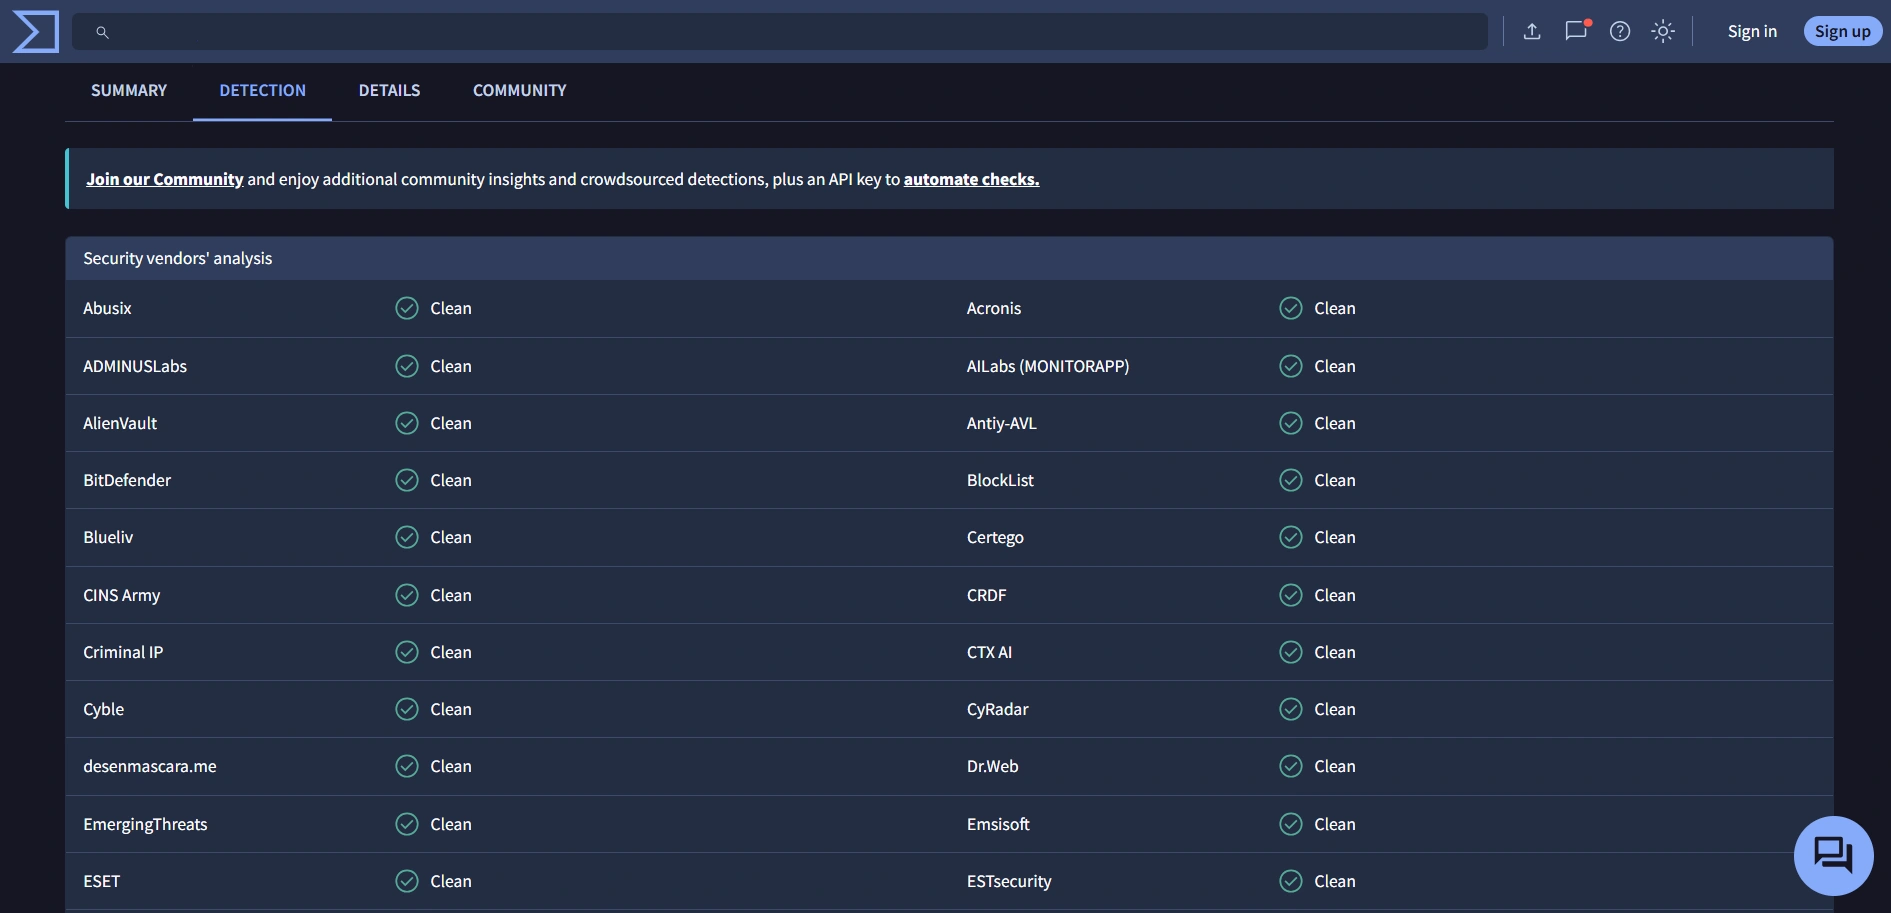
- VirusTotal— go to the main page, enter the site address and click Search. The service will check it with more than 70 antivirus engines and blacklist databases and show the status of your project in each of them.
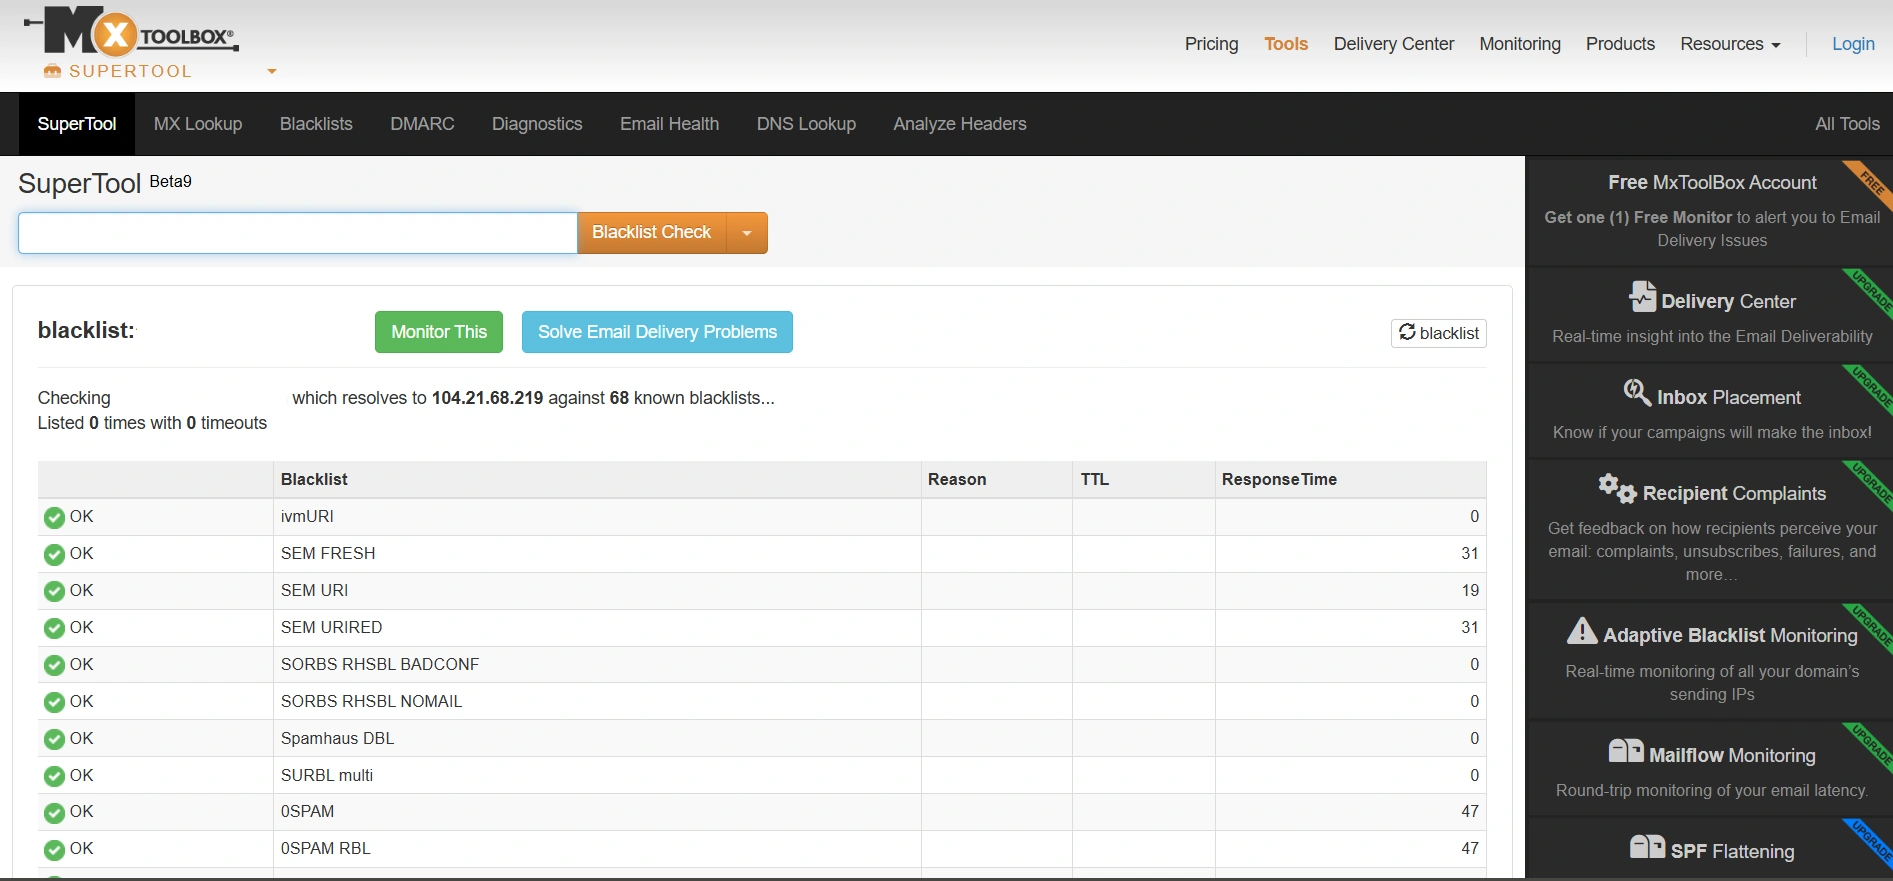
- MXToolbox— go to the Blacklists section, enter the domain and click Blacklist Check. If hackers used your email for spam mailings along with the web resource, there will be red marks next to blacklists instead of green checkmarks with an explanation of the reason.
- Google Search— open the browser in «Incognito» mode, enter site:yourdomain and check the search results. Look for pages that you did not publish: unfamiliar directories, hieroglyphs, names of medications, gambling. Additionally, go to several of your own pages to check for the absence of redirects to suspicious web resources.
Important! External scanners only see what is visible from the visitor's side. Sucuri directly warns that SiteCheck operates at the browser level and does not detect anything on the server side— backdoors, mail scripts, and phishing pages are found only by server scanning. Therefore, «SiteCheck found nothing» is not a guarantee of cleanliness, but just one of the important signals.
How to check for a website hack using Cityhost tools
Cityhost clients can check the logs in the control panel themselves. To do this, go to «Hosting 2.0» → «Resources»— «Requests». Or use an FTP client, such as FileZilla, and find the logs folder.
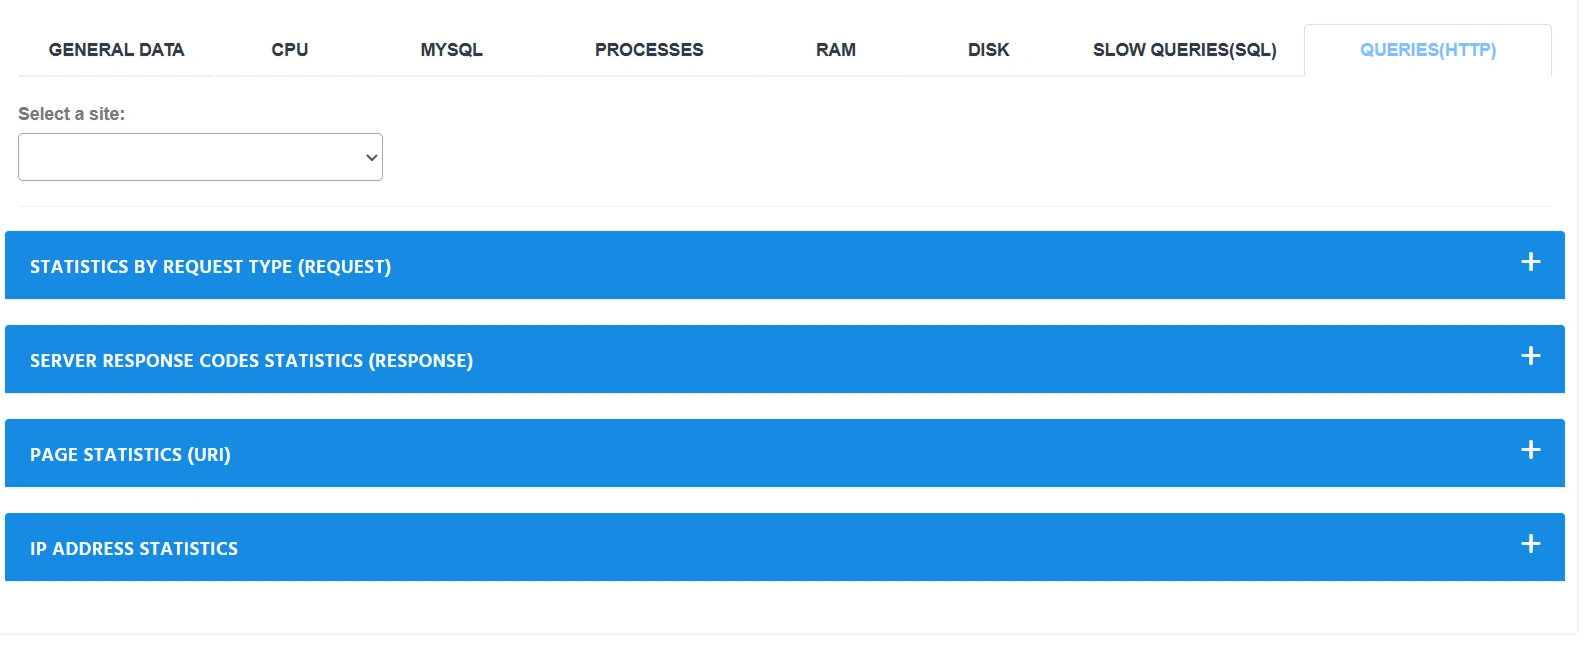
In the «Requests (HTTP)» tab, you can view not the actual log files, but summary statistics based on them. To do this, click «+» next to the desired section:
- by server response codes— helps find errors: 200 means successful loading, 404— page not found, 500, 502, or 503— there was a problem with the site or server;
- by pages (URI)— shows which pages and files were most frequently accessed;
- by IP addresses— allows you to notice excessive activity from bots or suspicious visitors;
- by request types— shows the number of GET, POST, and other requests to the site.
You can also suspect a website hack due to unusual changes in resource usage. In the «Hosting 2.0» → «Management» → «Resources» section, check the CPU, RAM, disk, processes, and MySQL load graphs.
For example, a sharp and prolonged spike in CPU usage without a noticeable increase in traffic may indicate that a malicious script is running on the site, a hidden miner is working, or a large number of automated requests are coming in.
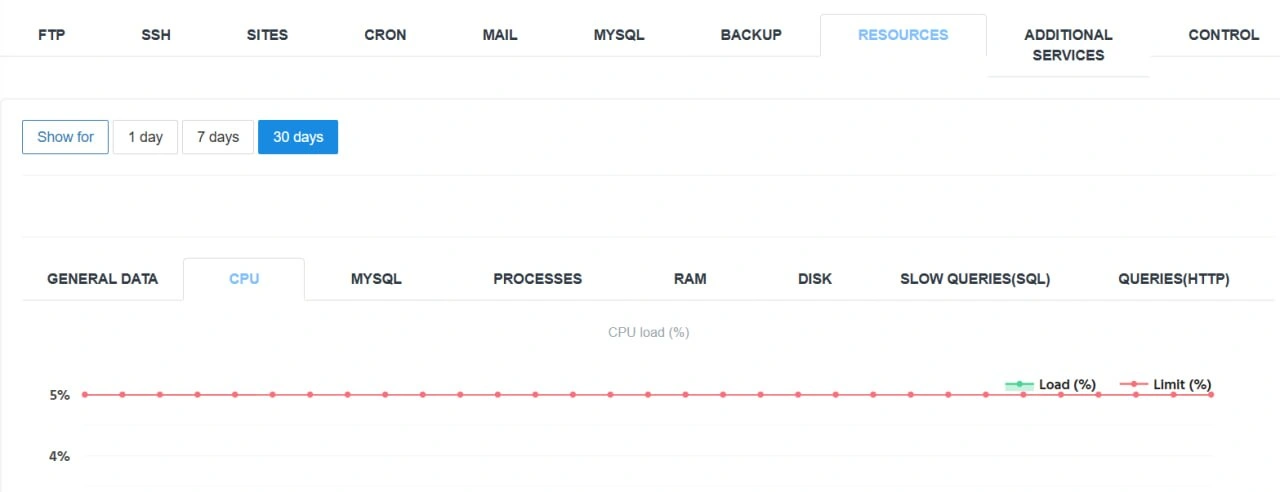
At the same time, high load does not always indicate a hack: it can also be caused by updates, backups, plugin errors, or a regular influx of visitors.
What to do in the first hours after a website hack
In the first hours, the main task is not to clean the site, but to stop the spread and document the state. You need to enable maintenance mode, preserve evidence, change passwords, and terminate foreign sessions. Only after that can you proceed with technical cleaning.
Important! When a website is hacked, there is not always the ability to log into the WordPress admin panel, so you have to work on the hosting side. You can access it through the file manager in the hosting control panel (the «Files» section or File Manager) or through an FTP client like FileZilla with the access provided by the provider. The project files, including wp-config.php, .htaccess, and the wp-content folder, are located in the public_html or www directory.
A step-by-step guide on what to do in the first hours of a hack will help you avoid chaotic actions, new problems, and deepening existing ones:
- Gather facts. You may have learned about the hack from a mark in the search results, the «Security Issues» report, a letter from the host, or noticed foreign pages— take screenshots of everything. Be sure to document the date and time of each discovery to later conduct an analysis and correctly format a request to the provider and Google.
- Isolate the web resource. Switch the site to maintenance mode with code 503. The 503 Service Unavailable simultaneously protects visitors from infection and informs search engines that the site is temporarily unavailable, so they do not index malicious content and do not lower positions for it. If you still have access to the admin panel, use the SeedProd or WP Maintenance plugin; if not, do it in the personal account of the hosting provider.
- Create a backup. It sounds strange for an already hacked site, but this copy will allow you to document the state at the time of the hack. The easiest way to do this is in the hosting panel: archive the site directory and separately export the database via phpMyAdmin (select the database → the «Export» tab → «Export»).
- Change passwords. Start with the hosting account and FTP/SSH access. Then change the database access: in the hosting panel, find the MySQL DB management section, change the user password, and then immediately open wp-config.php and enter the new password in the DB_PASSWORD line. Then change the passwords of all WordPress administrators, and finally— the email associated with these accounts.
- Change authentication keys. In wp-config.php, there are eight lines with long sets of random characters— WordPress uses them to recognize everyone who has logged into the site. Take new lines from the official key generator and replace the old ones with them. After that, the site will no longer recognize anyone until they enter their login and password again.
- Contact the provider. Technical support sees all access logs, server scans, and file change history. They can tell you if your other projects on the same account were affected.
Follow this instruction, avoiding chaotic, thoughtless decisions like instant deletion of suspicious files or reinstalling the site. You do not yet know if these files are indeed the cause of the infection and what the scale of the hack is. Right now, the main thing is to prevent the spread of the problem and document the data.
In practice, the sixth point is often ignored, with attempts to do everything alone. But the company from which you rent virtual hosting, VPS server, or dedicated server sees what no external scanner shows: access logs to establish the exact time and method of penetration, server antivirus checks to detect redirects, file change history at the file system level. Write to support, describe the signs of hacking, indicate the time of detection, and request access logs— this will save hours of independent searches and help determine more accurately how the intruder got onto the site.
Why simply changing the password is not enough
Changing your password does not affect the intruder who created a separate administrator for themselves. I tested this on a test site: I created a second administrator with the login hacker-test, logged in under it in another browser, and then changed the password in my main account.
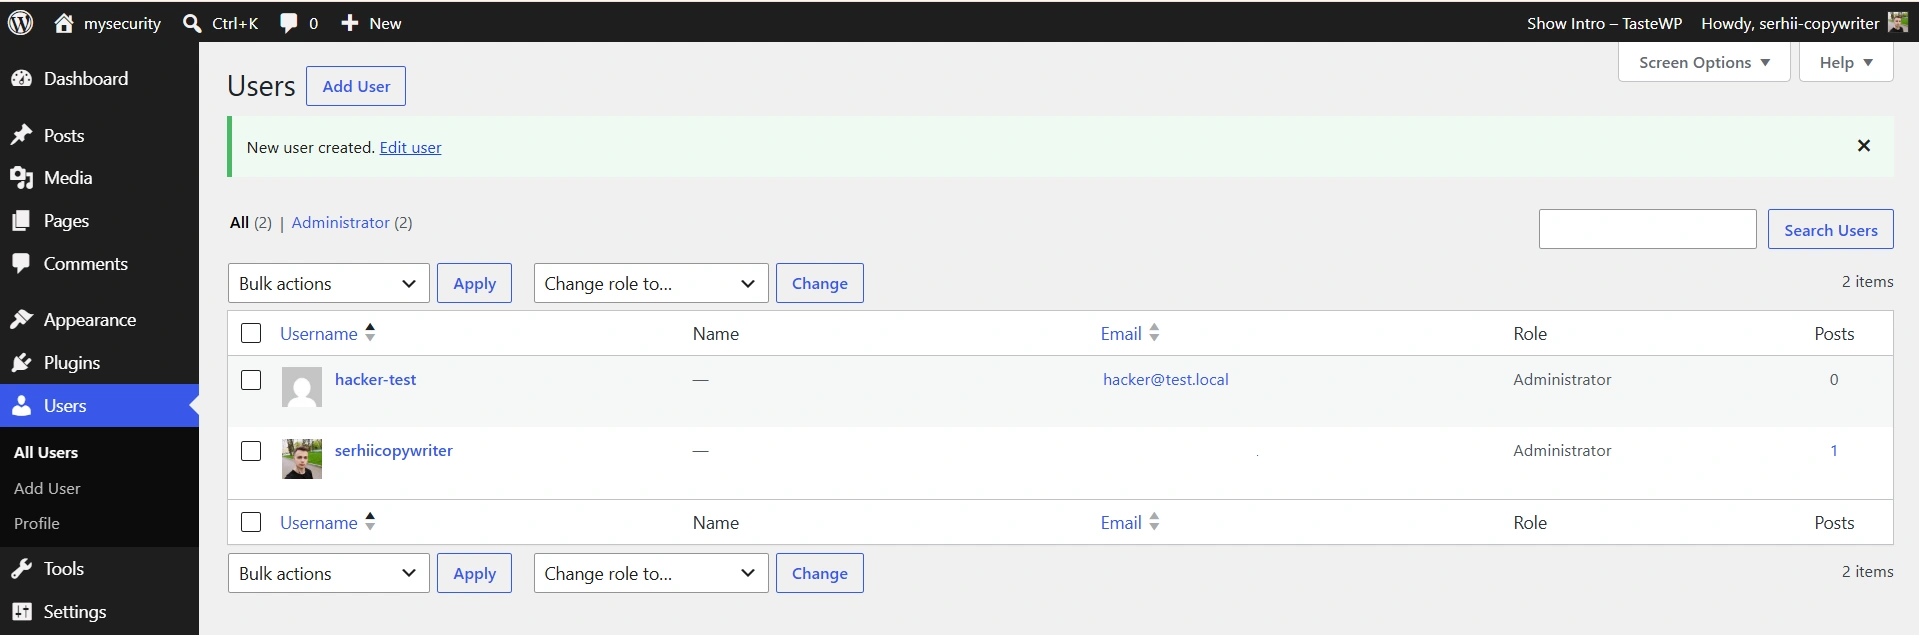
The screenshot shows the Users section with two administrators: my account and the one created for the test hacker-test.
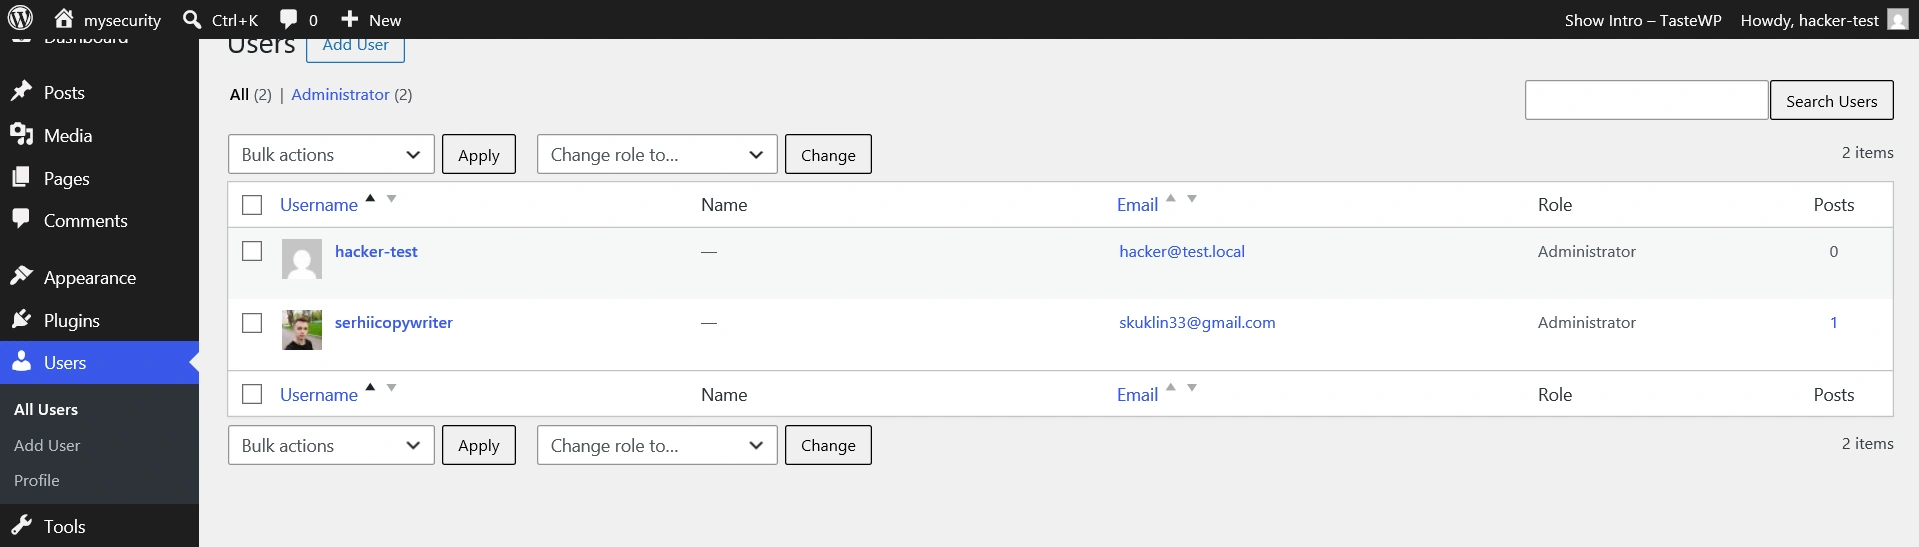
The screenshot shows the same control panel opened in another browser under the hacker-test account after I changed my password. The hacker-test session continued to work as if nothing had happened— no re-login was required.
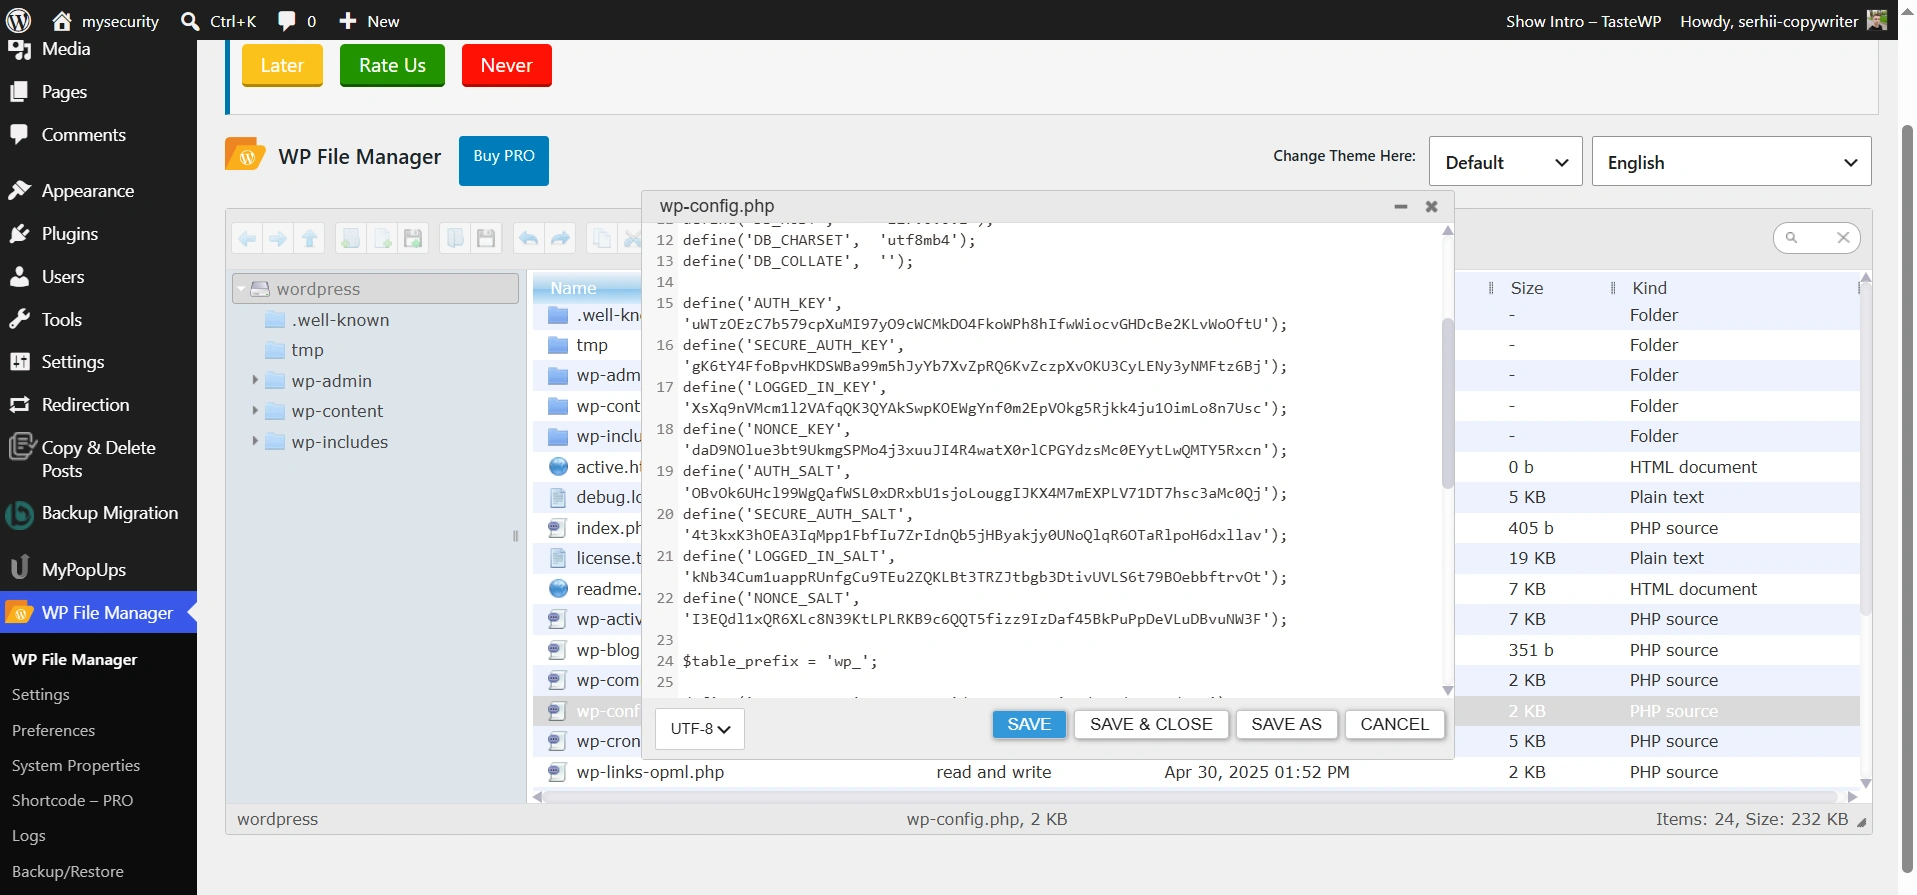
Next, I replaced the eight lines with keys in wp-config.php. Direct access to TasteWP files is not provided, so I used the WP File Manager plugin: I opened the root folder of the site, found wp-config.php, and edited the necessary block directly in the browser.
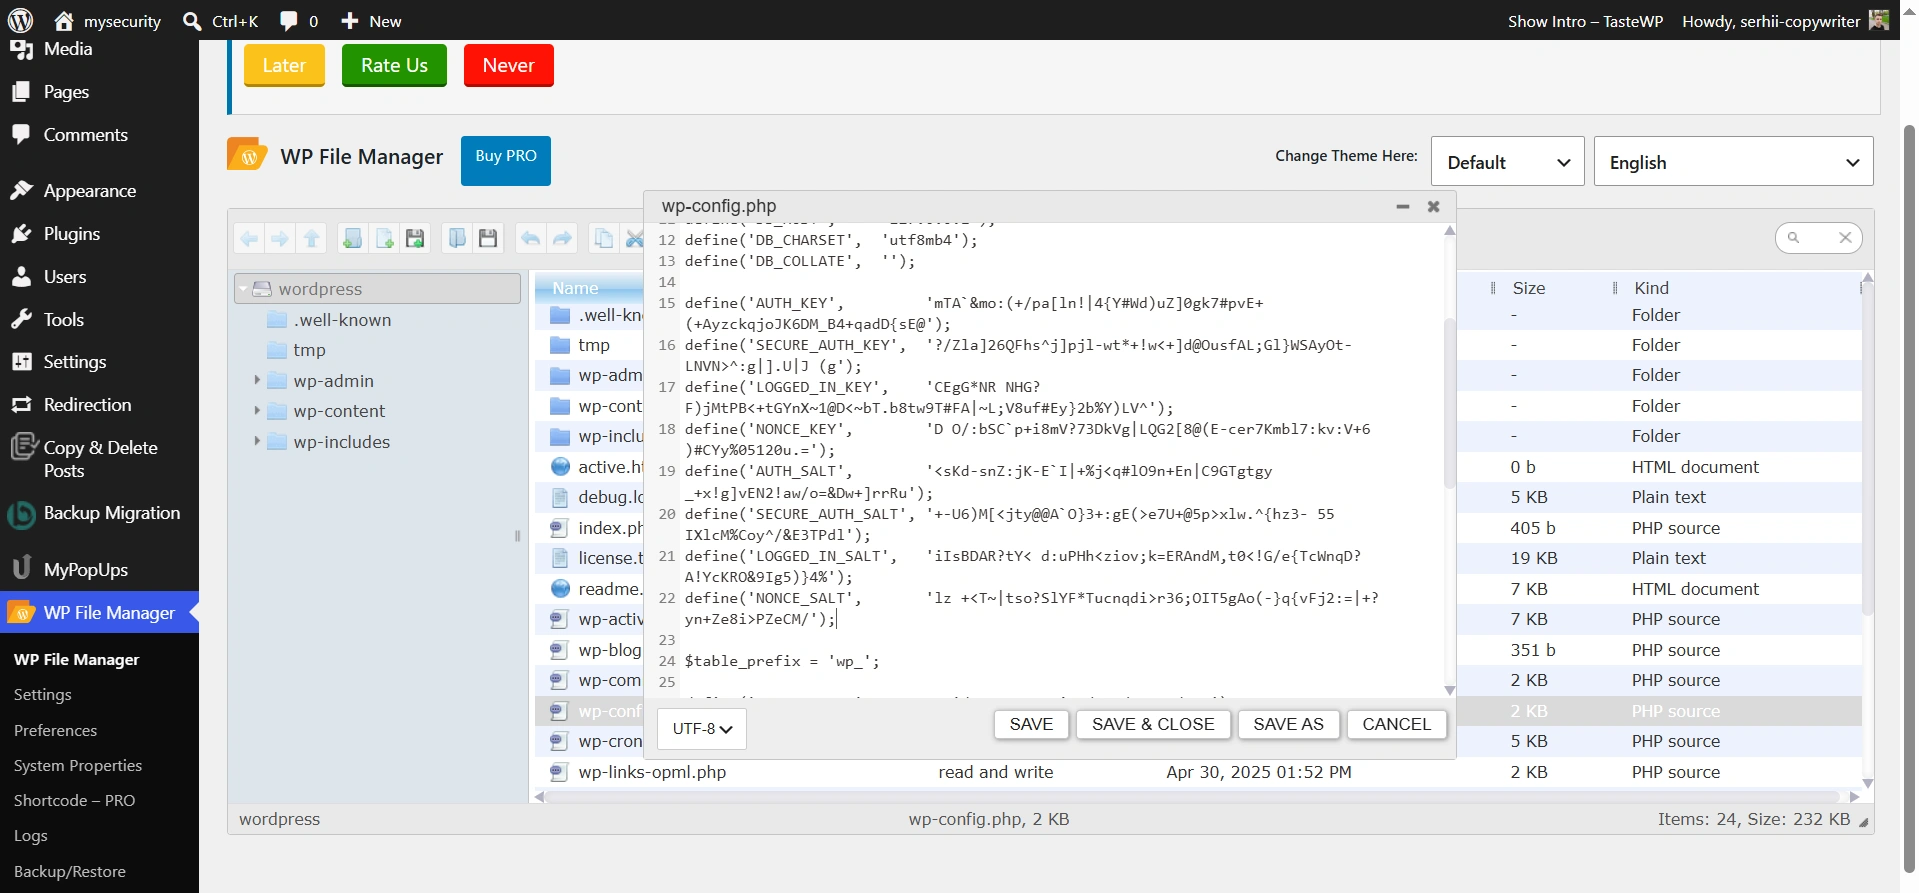
As soon as I saved the file, both accounts were logged out of the control panel: both hacker-test and myself. So this is an effective way to get rid of an intruder who has already added themselves as an administrator of your internet project in the WordPress control panel.
How to perform technical recovery of a website after a hack
The general principle: replace everything that can be replaced with clean copies from official sources, and manually check only what cannot be replaced— content, settings, database. And be sure to separately look for backdoors even after successful technical cleaning, as they are often what brings back the infection.
- Comprehensive scanning using various methods
- Manual and automatic cleaning of the site
- How to close backdoors on the site
Comprehensive scanning using various methods
Conduct a repeated external scan through Sucuri SiteCheck and VirusTotal. They look at the site from the visitor's perspective, so they find redirects and substituted pages. But they do not see anything in the actual files on the server.
So perform a second check from the inside. Install Wordfence or MalCare: both plugins scan files directly on the server for free and show which of them differ from the official versions. This is how hidden code fragments that external services miss are found.
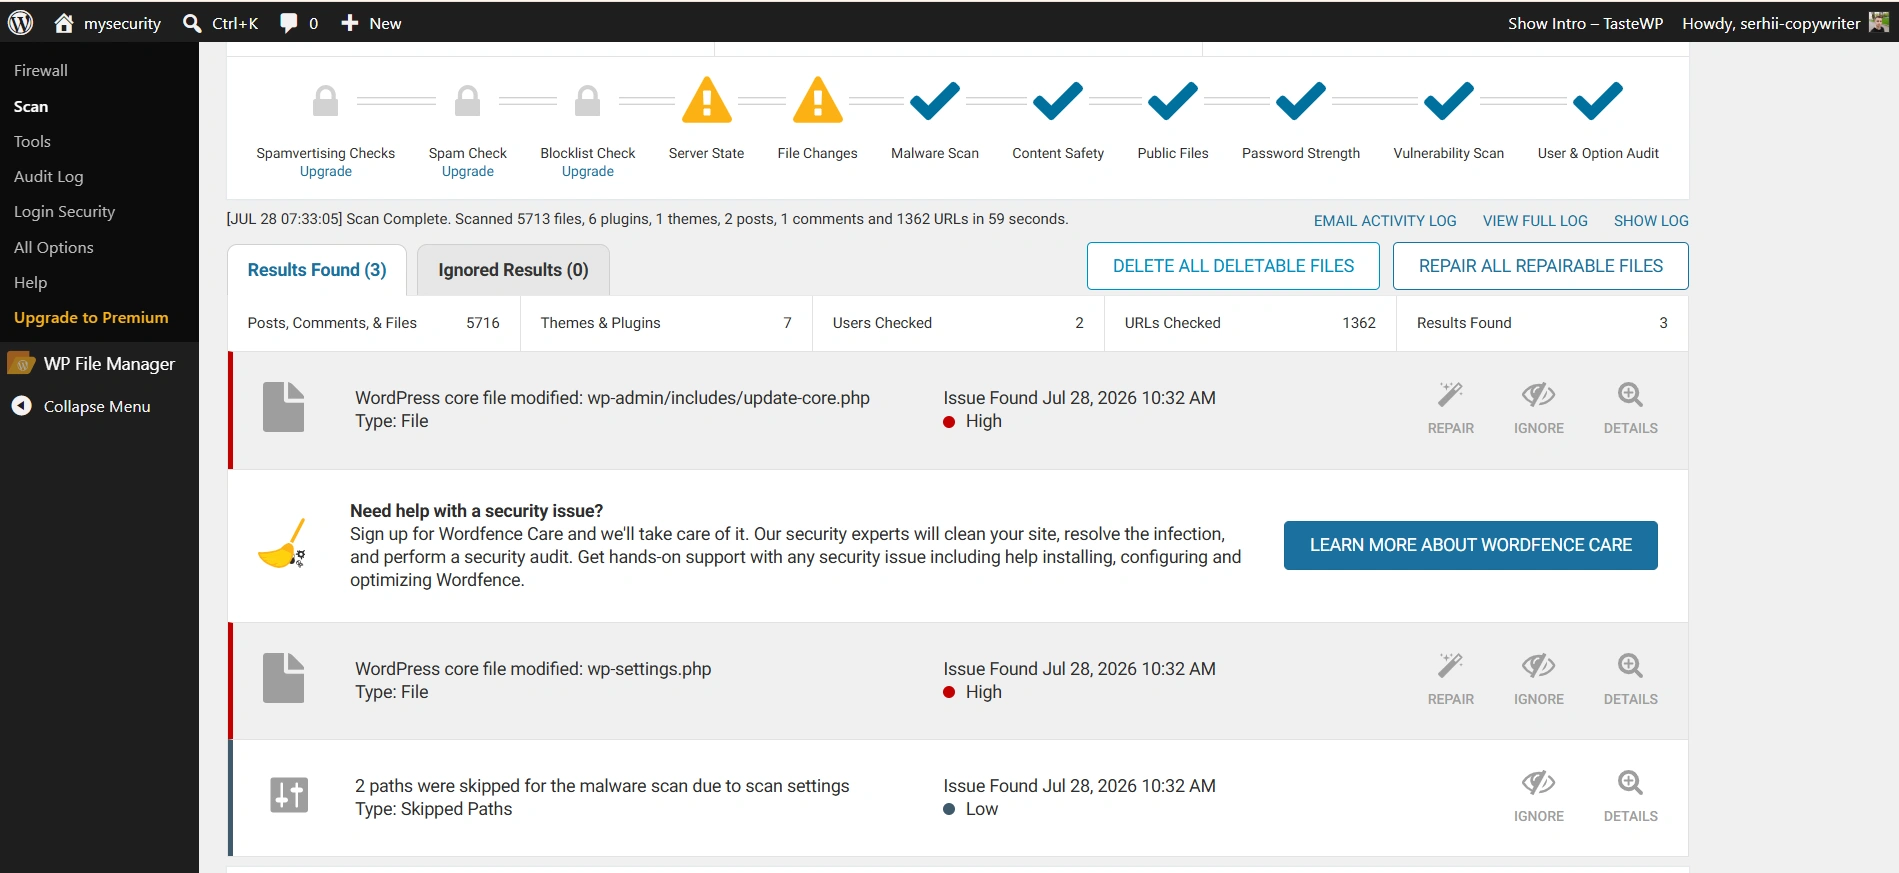
I checked the scanning speed on a test site: the free Wordfence scanned 5,713 files, six plugins, a template, and 1,362 addresses in 59 seconds.
Immediately consider the limitations of the free version: checks for spam mailings, spam content, and presence in blacklists are only available in the paid plan, and malicious signature databases are updated with a 30-day delay. For a one-time cleaning after a hack, this is sufficient; for ongoing protection— only as an additional method.
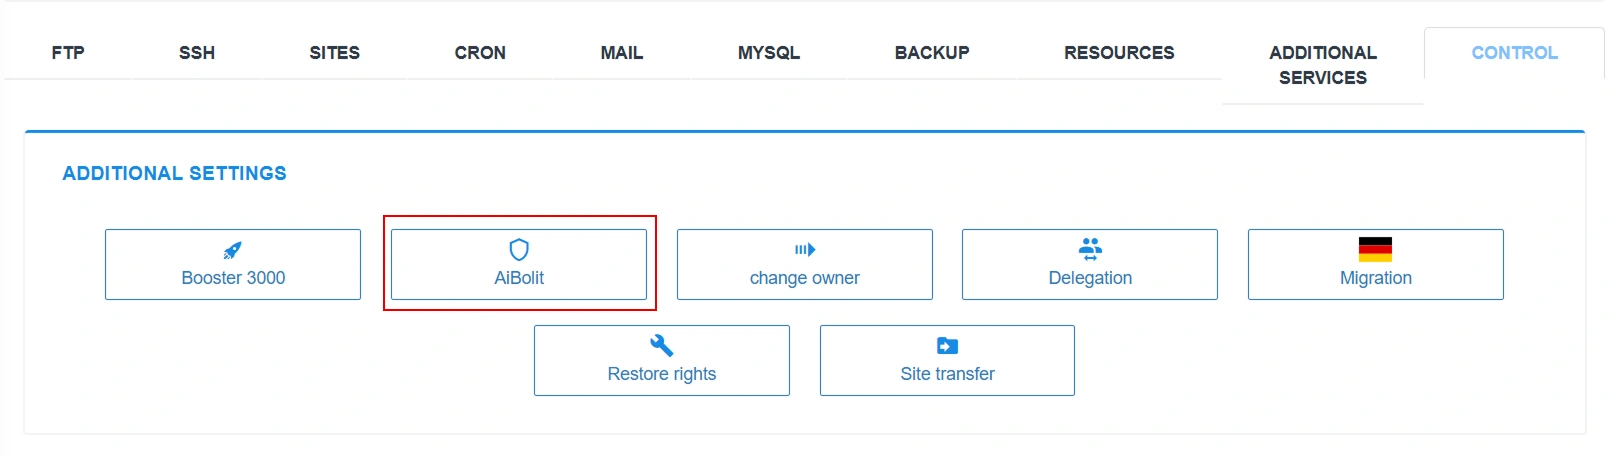
Additionally, run an antivirus check in the hosting panel— it operates at the account level, not just one site. If your site is hosted at Cityhost, go to «Hosting 2.0» → «Management» → «AiBolit» → «Run scan».
Manual and automatic cleaning of the site
Automatic cleaning looks attractive but has its nuances. I tested it with the Wordfence plugin: I added a foreign line to the core file wp-blog-header.php and ran a repeated scan. The plugin immediately marked the file as changed and offered a Repair button; the restoration took a second, and the added line disappeared.
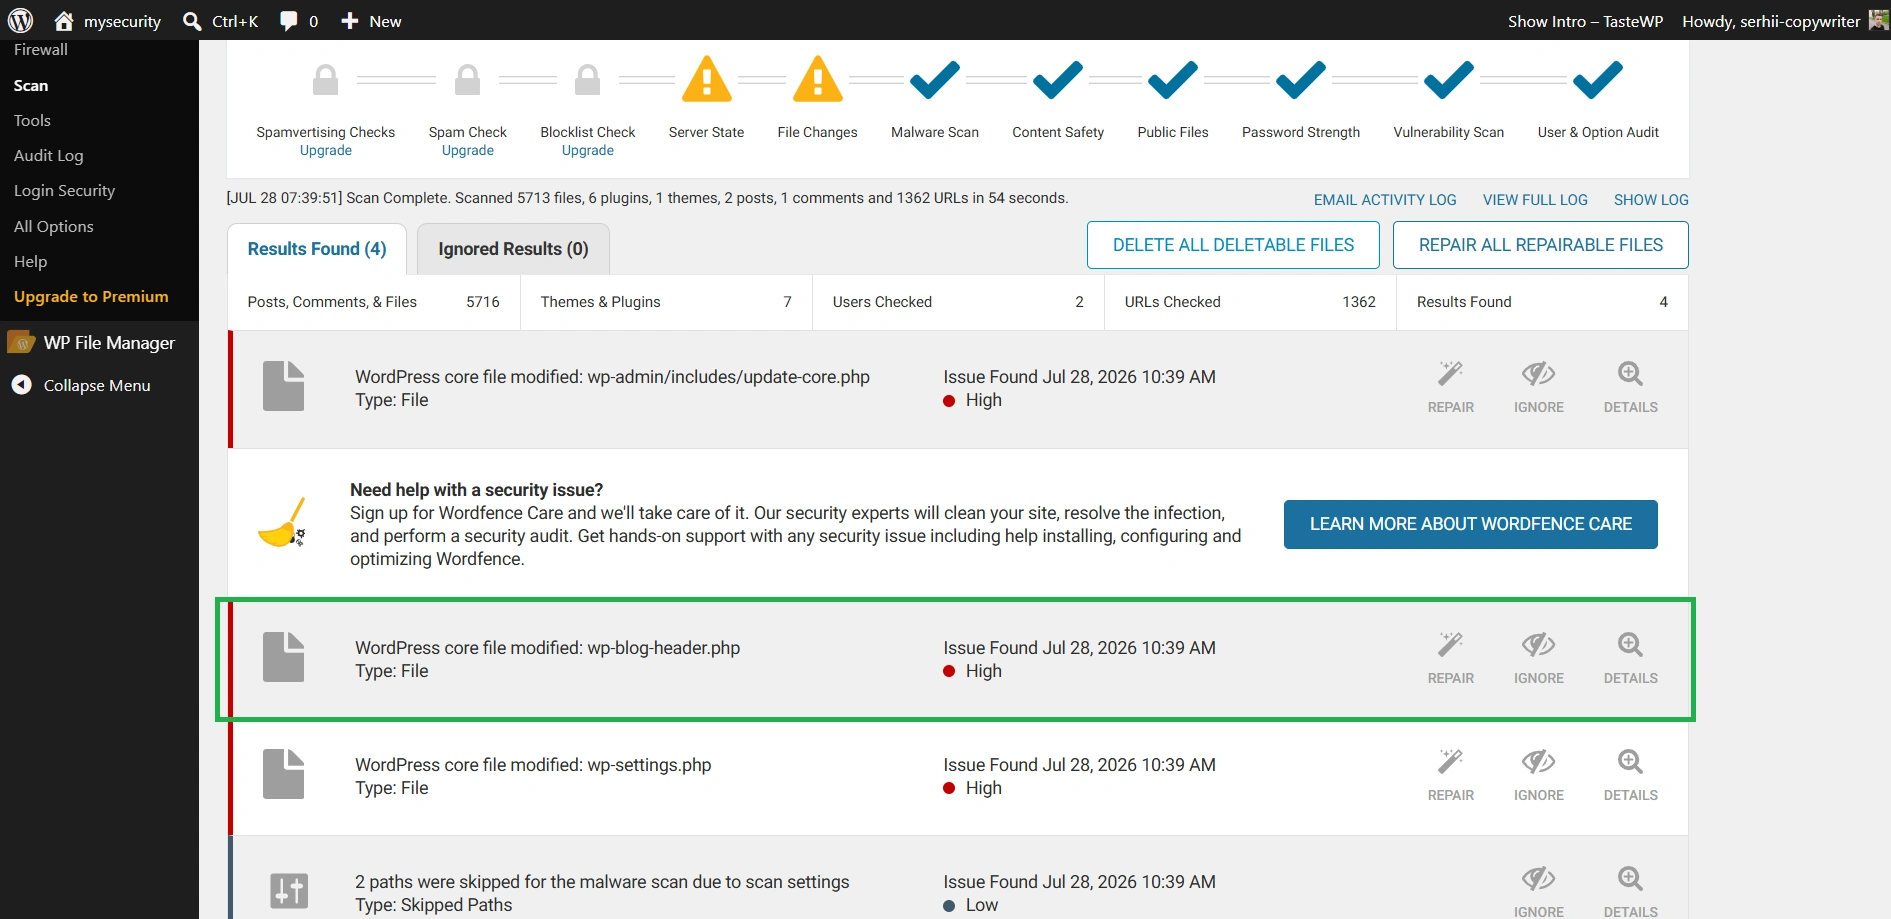
The screenshot shows the result of the repeated scan, where Wordfence found the changed core file.
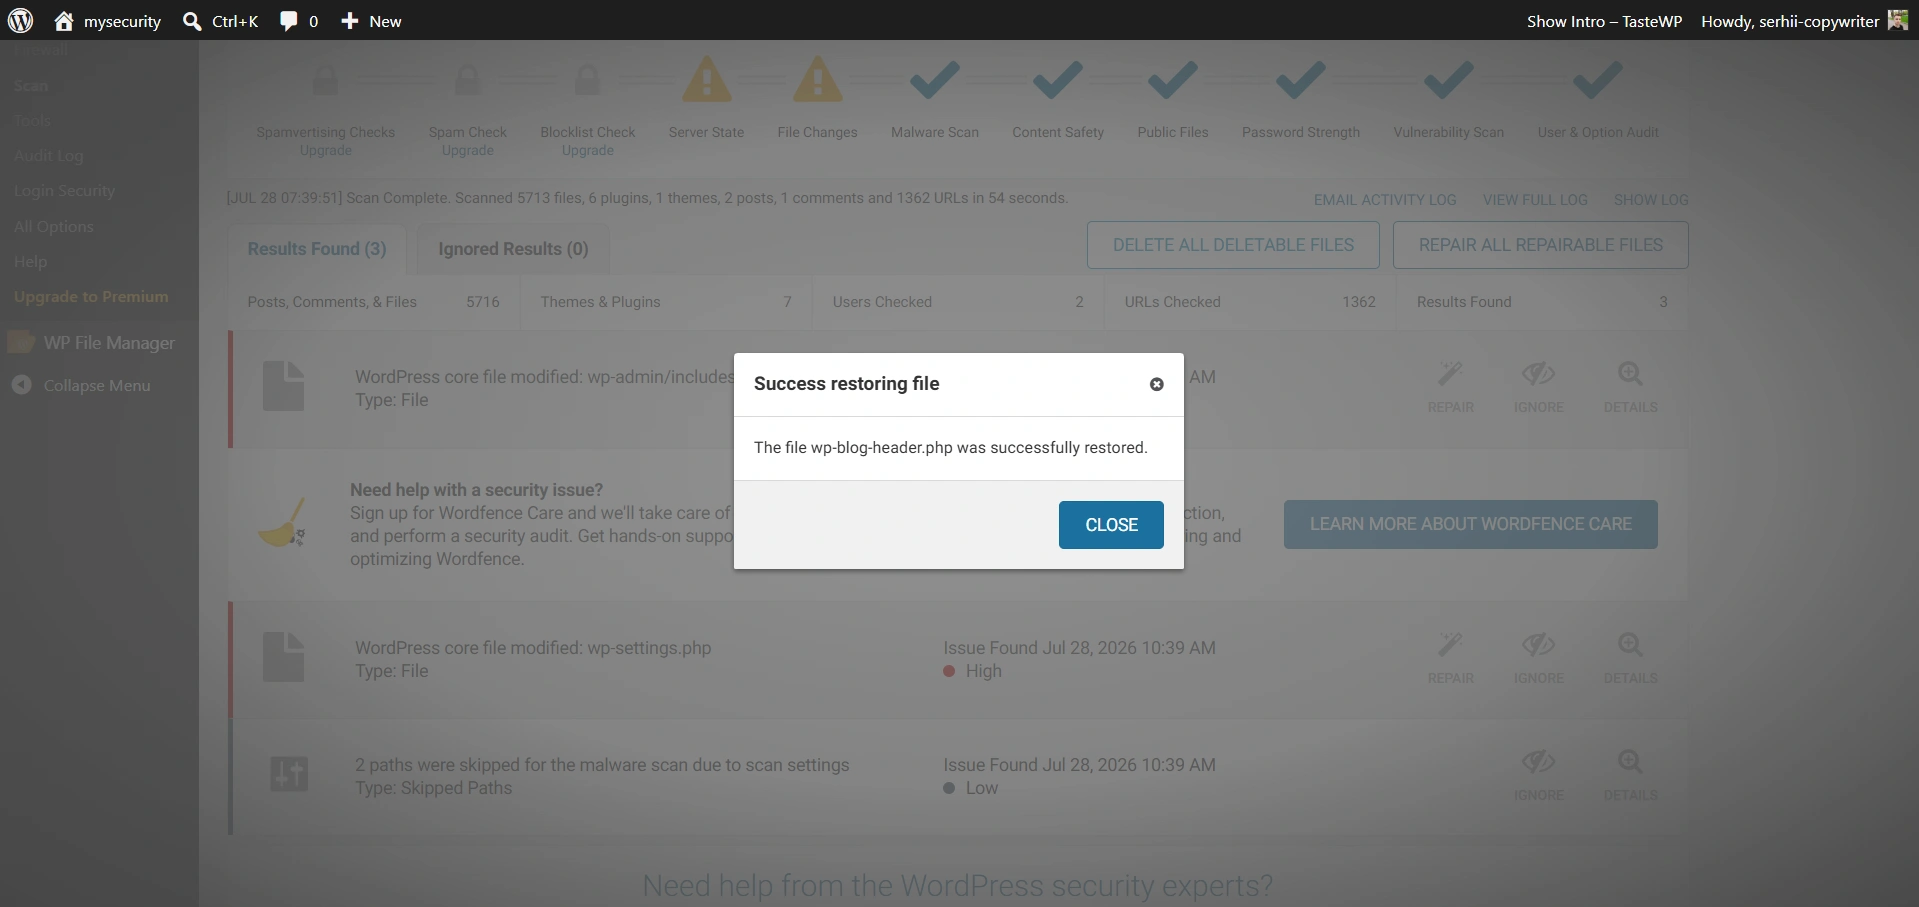
The screenshot shows a message about the successful restoration of the file.
However, there are two limitations to automatic cleaning. The first is financial: in MalCare, infection removal works only with a paid plan; the free plan only reports findings.
The second is more serious— the scanner does not know which code on your site is your own. On a newly created test site where I had not done anything yet, Wordfence marked two core files as changed with a High danger level— update-core.php and wp-settings.php. This is not an infection: most likely, they were adjusted by the sandbox platform itself for its needs. But an owner who clicks «restore all files» may break the site without even realizing what they did.
Therefore, it is wise to apply automatic cleaning selectively: to a specific file you are sure about. It is better not to touch the button that restores everything at once.
In other cases, it is more reliable to do everything manually:
- Replace the WordPress core. Check your version in the «Dashboard» → «Updates» section, download the archive of the same version from wordpress.org, and unpack it on your computer. Then, in the hosting file manager, delete the wp-admin and wp-includes directories, and upload new ones from the archive in their place. Do not touch the wp-content folder, as it contains your images, themes, and plugins.
- Check the files in the root of the site. In a clean WordPress on my test site, the file manager showed exactly 24 items, including folders, and almost all start with wp-, except for index.php, xmlrpc.php, license.txt, readme.html, and .htaccess. Although some plugins also sometimes add their data here, in general, a file with a random name should be checked additionally. Open wp-config.php separately: it should start with <?php and contain only settings, without long incomprehensible lines.
- Regenerate .htaccess. The easiest way to get a clean file is to delete the existing one and go to «Settings» → «Permalinks» → «Save changes». WordPress will create it anew. Also check subdirectories: copies of .htaccess with foreign code often lie not only in the root.
- Reinstall plugins and themes. Do not try to clean their files manually: completely delete the plugins and reinstall them from the official catalog. Just delete anything you haven't used for a long time.
Pay special attention to the database. First, make a copy of it via phpMyAdmin («Export» → «Export»), as any mistake here breaks the entire site. Then use search in tables and check fragments that almost always indicate foreign interference: <script, <iframe, eval(, base64_decode, gzinflate, as well as unfamiliar domain names. Look primarily in the wp_posts, wp_options, and wp_users tables. If you find malicious code inside your own article— only delete the foreign fragment, not the entire entry. If you are not sure what exactly you are facing, it is better not to touch anything and show the find to technical support.
Also read: What is a database and what is it needed for
How to close backdoors on the site
A backdoor is a hidden fragment of code, sometimes literally a few lines, that gives the intruder repeated access to files and the database even after all passwords have been changed. It is the main cause of repeated infections, so searching for backdoors should be done immediately after scanning and initial cleaning.
To find backdoors on the site, follow these steps:
- Review the list of users in the control panel and delete all administrators you do not recognize.
- Find files modified in the last two weeks: in the hosting file manager, sort the content by modification date.
- Search in files for typical markers of hidden code: base64_decode, eval, gzinflate, str_rot13.
- Check if foreign sitemaps have appeared.
- Open in Search Console the section Settings → Users and permissions and remove owners and users you did not add.
The first and last points may seem too obvious, but this is the essence. Owners rarely check the list of administrators and confirmed owners in Search Console, and intruders rely on this: they still have access to your site even when all files are clean.
How to find and close vulnerabilities on a website
Start by checking plugins and themes. Open the «Plugins» → «Installed» section, write down the names along with version numbers, and do the same for themes in the «Appearance» section. Then check each name in free vulnerability databases:
- WPScan Vulnerability Database— the largest database of WordPress plugins and themes;
- Patchstack Database— convenient search with detection dates and fix status;
- Wordfence Intelligence— provides descriptions of which versions the problem has been fixed in.
You need to look at two conditions: your version of the plugin/theme has a known vulnerability, and it was disclosed before the site was hacked. This is why you need the date and time you documented in the first hours and the logs from the provider.
Then the solution depends on the finding:
- If there is a vulnerability and an update has been released— update the plugin to the latest version and ensure that automatic updates for it are enabled.
- If there is a vulnerability and no update is available— delete the extension and find an alternative. A plugin that has not received fixes for months is not worth the risk.
- If the plugin is no longer in the official catalog— this is the worst scenario, as it is usually removed due to an unpatched security issue. Delete it without hesitation.
If everything is clean in the list, the cause lies outside of plugins and themes. The most common options are:
- a stolen or guessed administrator password, especially if it was reused on other services;
- an infected neighboring site on the same hosting account from which the intruder moved to yours;
- an outdated version of PHP that has not been updated for a long time.
The first two cases are visible in access logs, the third can be checked in the hosting panel in a minute.
How to restore reputation after a website hack
The main advice is to communicate with the audience honestly and first. You need to notify everyone affected directly by the hack and do it before they learn about the problem from other sources. Technical incidents happen even in companies with large IT departments, and people can forgive them. But they will not forgive if they learn about a data leak from fraudsters rather than from you.
- Is it necessary to inform anyone at all
- Should all visitors be informed
- What and where to write after a website hack
Is it necessary to inform anyone at all
The current Law of Ukraine «On the Protection of Personal Data» does not contain a direct obligation to report leaks like the European GDPR— there is no strict «72 hours» rule in Ukrainian law. Instead, the law establishes a general obligation to protect personal data, notify the Commissioner of the Verkhovna Rada of Ukraine for Human Rights about the processing of data with increased risk, and inform the person about the fact of collecting their data.
However, if your site offers goods or services to EU residents or tracks their behavior through analytics and advertising cookies, you are subject to GDPR regardless of where the company is registered. It requires notifying the supervisory authority within 72 hours of becoming aware of the leak, and if the risk to individuals is high— notifying the affected individuals as well. Fines can reach 10 million euros or 2% of the global annual turnover— depending on which amount is higher.
Should all visitors be informed
Personal data includes names, phone numbers, addresses, email addresses, and payment data. If intruders gained access to them, notify all affected individuals as soon as possible. But first, stop the leak and gather facts: a message that needs to be clarified the next day does more harm than silence for a few hours. Delaying the collection of facts for weeks is also not acceptable.
What and where to write after a website hack
The text should answer five questions in a clear order: what happened, what data was affected, what you have already done, what users should do, and where to contact for questions. For example, for an online store, this message could be:
«Dear customers! On July 14, we detected unauthorized access to our site. The intruder may have obtained names, phone numbers, and email addresses that you provided during the order process. Payment card data is not stored on the site, so they were not affected.
We have already closed the vulnerability, cleaned the site, changed all passwords, and provided the logs to the hosting provider for verification.
We recommend changing your password if you used the same one on other services and not clicking on links from emails that supposedly came from our store.
Questions— to support@example.com or by phone. We will update this page as details are clarified.»
Place the message as a noticeable banner or a separate page on the site, send direct emails to the affected individuals, and post a short message with a link to the full version on social media.
How to restore SEO after a website hack
The recovery occurs in three stages: first, warnings about danger are removed, then the index is cleaned of spam pages, and only after that the positions are restored themselves. The recovery time depends on how Google re-crawls your site.
- How to remove Google warnings
- How to remove spam pages from the index
- How long does it take to restore positions
How to remove Google warnings
First, make sure that the site is completely cleaned and the vulnerability is closed. Google directly warns: a request sent before the problem is resolved prolongs the review of the next one, and the web resource may receive a repeat offender mark.
If you have already performed technical cleaning of the site after the hack, then do the following:
- Open «Security and Manual Actions» → «Security Issues» and review all detected issues and examples of URLs.
- Click Request a Review and describe separately for each type of problem what exactly you found and how you fixed it. A good request answers three questions: what the problem was, what steps you took, and what result you achieved.
- Wait for a response without sending repeated requests. Checking phishing pages takes about a day, malware infection— several days, and spam hacks may take several weeks, as they require manual analysis.
Here is how a request text may look:
«In the "Security Issues" section, inserted spam content was recorded. We found that the intruder gained access through an outdated version of the plugin [name] and generated 340 pages with pharmaceutical keywords in the /wp-content/uploads/ directory.
What has been done: the plugin has been deleted and replaced, the wp-admin and wp-includes directories have been replaced with clean copies of the official build, two hidden files with backdoors have been found and removed, all passwords and authentication keys have been changed, and three unknown administrators have been deleted.
Result: all 340 spam pages return a 410 code, repeated scans with Wordfence and Sucuri SiteCheck do not detect infections, and automatic updates are enabled.»
If the site has been added to other blacklists, including McAfee, Norton, and Bing, submit separate review requests to each of them.
How to remove spam pages from the index
- Delete all spam addresses and ensure they return a 404 or 410 code. The status 410 Gone directly tells the search engine that the page has been permanently deleted, so the index is cleaned faster. You can set this up through SEO plugins, such as Rank Math.
- For urgent hiding, use the Removals tool in Search Console— it temporarily removes addresses from the results while Google re-crawls the web resource.
- Remove foreign sitemap files that the intruder may have added, and check the list of resource owners in Search Console again.
- Do not send a request for indexing each address manually. Let Google re-crawl the site naturally, and check only priority pages through URL Inspection.
- If the deleted spam pages have managed to gather traffic or backlinks, set up 301 redirects to relevant legitimate pages.
Also read: Main differences between 301 and 302 redirects
How long does it take to restore positions
Removing the warning is the fastest part, and traffic may partially return immediately after a successful review. Full restoration of positions usually stretches over weeks, and in complex cases, longer. Complex cases include thousands of spam pages in the index, manual sanctions, or infections that went unnoticed for months.
Regularly publishing fresh quality content helps speed up the process, showing Google that the site is alive and under control, and recovering lost backlinks through 301 redirects. However, artificial manipulations such as mass link purchases during this period are particularly dangerous, as the project is under close scrutiny by algorithms.
How to prevent a repeat hack: checklist
The best recovery plan is one that you will never have to use again. But the statistics here are not encouraging: as early as 2016, Google reported that 12% of cleaned sites are hacked again within 30 days. This is often because owners addressed the consequences but did not find the real cause.
Therefore, after recovery, it is worth establishing a few permanent rules:
- update the core, plugins, and themes weekly, and install critical security updates immediately without delay;
- keep the minimum necessary set of extensions: each extra plugin is another potential vulnerability;
- keep two-factor authentication enabled and review the list of site administrators and users in Search Console monthly;
- check that automatic backups are created, stored off the site server, and have a depth of at least 30 days— this depth saves when a hack is noticed late, as fresh copies may already contain infections;
- keep an active firewall that blocks attacks before they reach the site. In the free version of Wordfence, it works, but new rules arrive with a 30-day delay, so for sites with payments, it is worth choosing paid solutions.
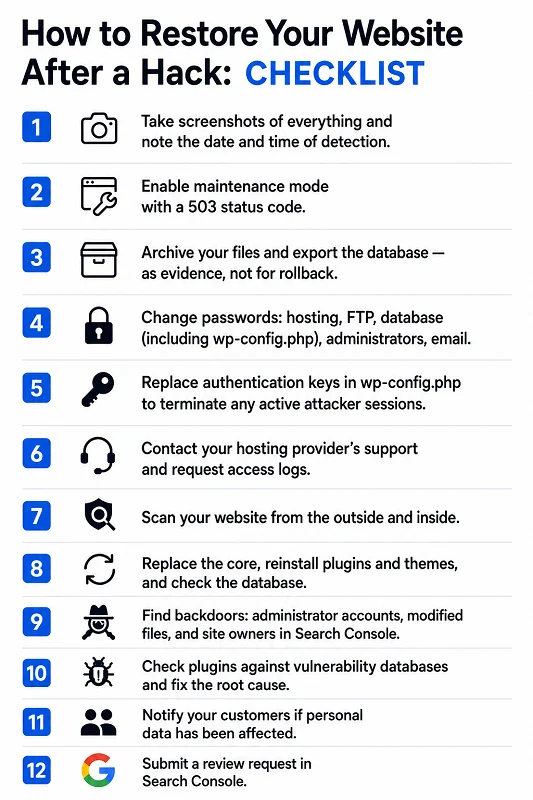
Save this checklist separately so that in an emergency you can act immediately and without panic.
A site that has undergone recovery in a clear sequence almost always comes out of the crisis more secure than it was before the attack: with up-to-date updates, a minimal set of plugins, working backups, and an understanding of where the problem came from. The next step is the simplest and the hardest at the same time— do not postpone updates and spend ten minutes once a month checking the entire project. This is the prevention that minimizes the risk of a repeat website hack.