
-
What Are the Types of Website Aggregators: Features and Monetization of Each Type
-
How to Create an Aggregator Website: General Step-by-Step Guide
-
How to Create an Aggregator Website: Examples for the Most Popular Types of Aggregators
With each passing year, finding information becomes increasingly challenging — according to Netcraft, nearly 175 internet projects are launched every minute. The websites aggregators help simplify the retrieval of necessary data. They are in high demand: users bookmark them, visit various pages, and spend a significant amount of time on the website. Monetizing an internet project can be done in several ways, diversifying income streams.
The only question — how to create a website aggregator without huge investments and technical skills. Not long ago, this was considered impossible! However, content management systems are evolving, developers are creating new themes and plugins, making it possible for anyone to independently develop a website aggregator. The Cityhost team strives to help everyone interested: we have not only created a detailed step-by-step instruction with examples but also offer reliable hosting and domain at an affordable price.
What is a Website Aggregator and What Are Its Advantages
A website aggregator — a web resource that collects relevant data from different sources. It is designed to simplify the search for information: instead of spending time searching for content by filtering out unnecessary data, users can visit an aggregator and get the information they need. For example, news aggregators gather articles from various sources, while product aggregators allow users to compare prices and characteristics of products from multiple sellers.
The main goal of such websites is to facilitate users' access to diverse information from various sources, providing it on a convenient platform. However, they help not only internet users but also webmasters, who confirm the following advantages of aggregator sites:
-
content savings — you can take data entirely from other sources, eliminating the costs of creating content;
-
content automation — specialized software allows you to partially or fully automate the addition of information to the website, saving a lot of time and minimizing costs for a content manager;
-
quick promotion — aggregators are regularly updated, constantly offering users vast amounts of current data, which helps speed up attracting new users from search engines;
-
improved experience — on one platform, a person can get not only classic information (photo, price, description) about a product but also additional data (reviews, comparisons, ratings, etc.), which makes them stay on the website longer and return to it constantly;
-
more monetization options — earn money through placing advertisements, selling affiliate products or services, paid subscriptions, access to premium content;
-
simplified scalability — flexible architecture allows easy addition of various types of content and expanding functionality.
It is important to separately consider the legality of aggregator sites. Their creation is entirely legal, as they only collect and display information from various sources. However, it is always important to indicate the source of information, including an active link, to avoid copyright infringement issues and ensure honesty towards readers. The obtained content should be presented without distortion or alteration of its content. Additionally, we recommend adding information that you are a content aggregator and do not bear responsibility for the content of the sources.
How Much Can You Earn with a Website Aggregator
You can start monetizing your website aggregator 3-6 months after its creation. This period is needed to demonstrate to advertisers your serious approach to the project and provide comprehensive statistics. Advertisers also look at the number of visitors. The minimum requirement is considered to be 500 users per month, although the final requirements depend on the specific advertising network.
We recommend not rushing into monetization but immediately considering available earning methods for your website aggregator to develop a successful strategy:
-
display advertising — various banners. You can connect your project to Google AdSense or work with advertisers directly. There are two payment models: pay-per-click (CPC) - you receive a fixed amount every time a user clicks on an ad on your website, or cost per thousand impressions (CPM);
-
affiliate marketing — payment for specific actions. The CPA model is used for sending data through a contact form, messaging app, or call through the website, registration, ordering a service, adding a product to the cart, etc. For example, you place a link to a specific product from an advertiser, a user clicks on it, makes a purchase, and you receive a commission;
-
direct advertising — any way of earning without third-party networks. In addition to the already mentioned CPM, CPC, and CPA models, you can charge for higher positions in the directory. This method is often used by job aggregators: they offer many options for job seekers/employers, but only put forward offers for which a person/company has paid;
-
sponsored content — users pay for access to exclusive content. This includes the best information from other sources and your own content, such as original articles.
How much can you earn with a website aggregator? Earnings under the CPM model can range from $0.5 to $2.5 per 1000 views. To calculate earnings on AdSense using the CPM model, use the formula: Daily Pageviews * CTR (%) * Cost per Click. For example, let's take a small website with average metrics: 100 * 2% * 0.5 = $1 per day or $30 per month. However, the final data depends on the website itself, as the number of views, click-through rate, and their cost can be much higher.
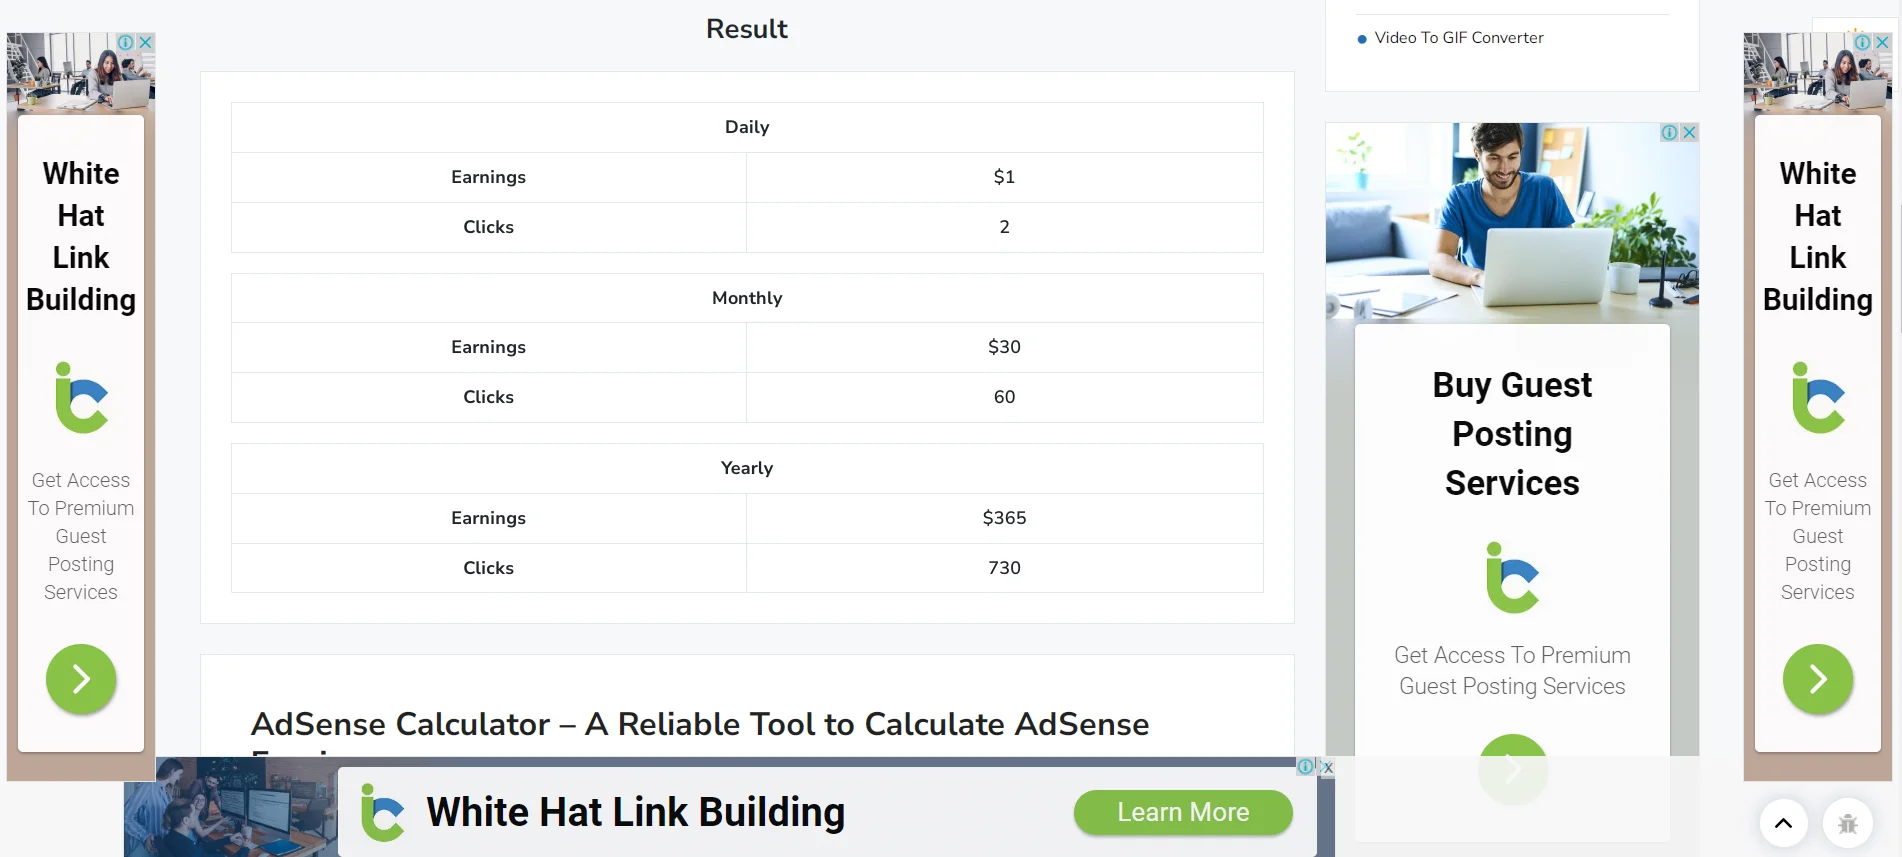
On the Small SEO Tools website, there is an AdSense income calculator. By the way, you can immediately see a bad example of banner placement — due to their large number, the web resource loads very slowly.
If you plan to monetize your aggregator using affiliate programs, we recommend joining one of the networks and checking the commission for specific actions. For example, let's take the Admitad platform, which has a popular program for the AliExpress online store (suitable for price aggregators). They pay 2-6% for classic products and 3-69% for "hot products".
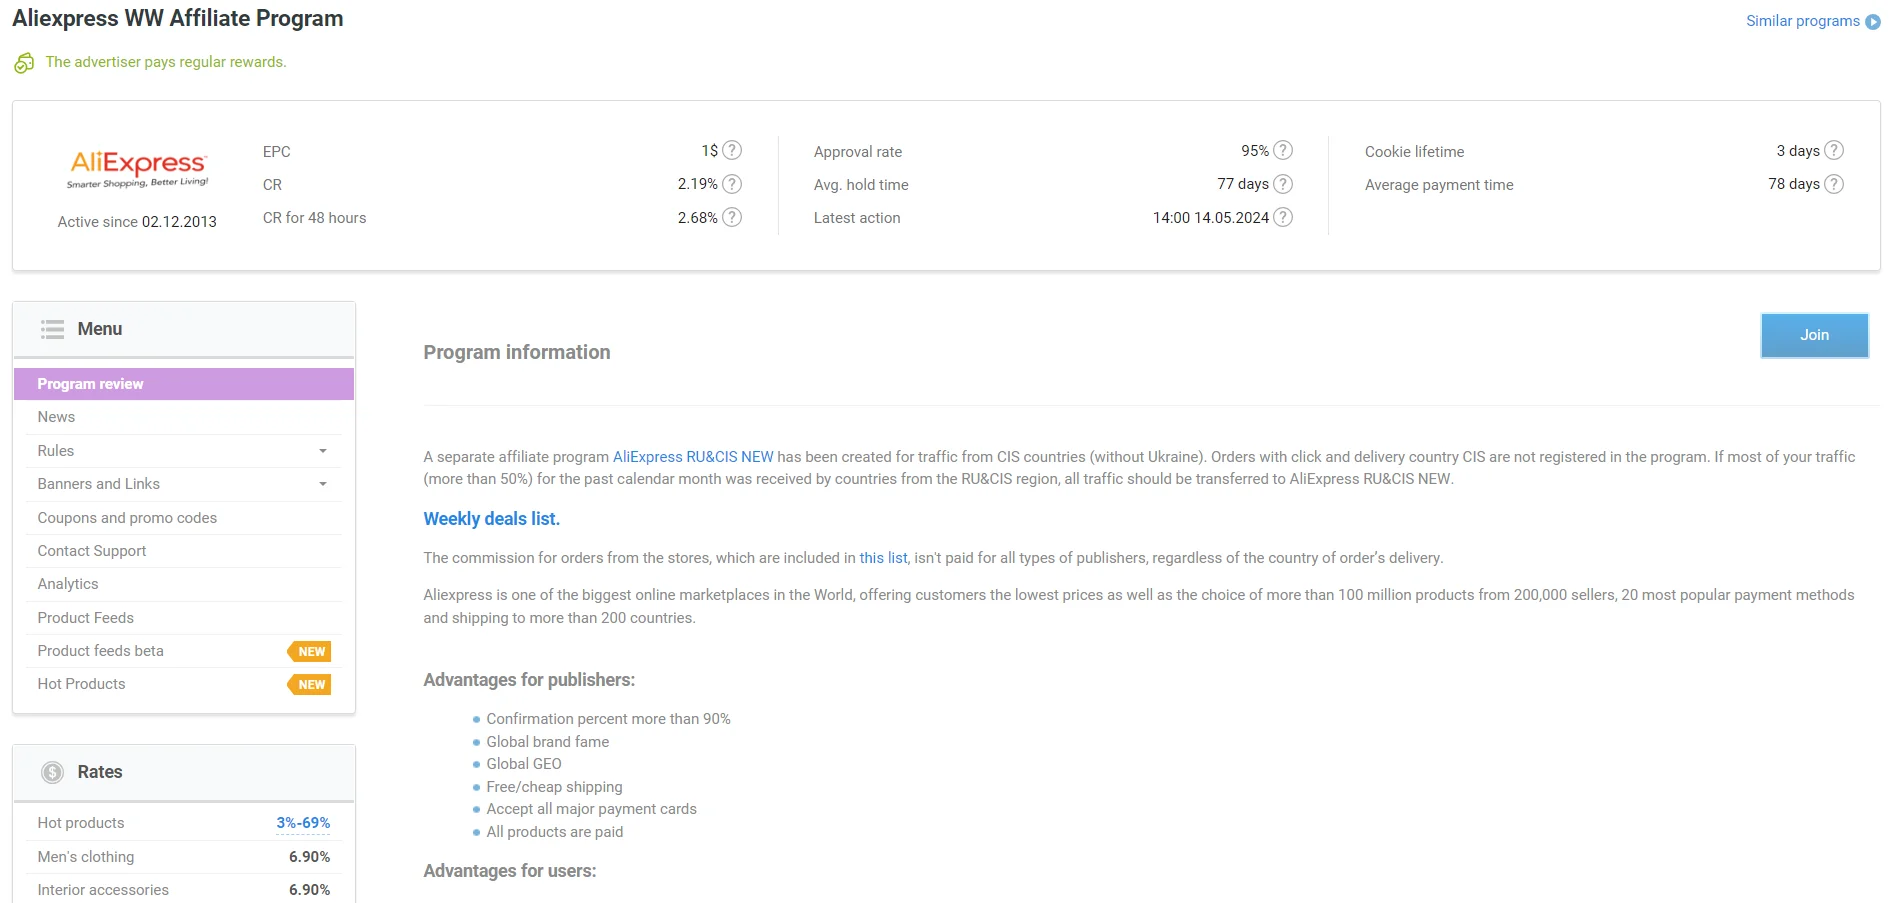
Admitad is a good choice for monetizing aggregators. You can also find other networks (for example, Impact) or search for affiliate programs individually (for example, Fiverr).
What Are the Types of Website Aggregators: Features and Monetization of Each Type

One of the most popular types of aggregators is news aggregators (e.g., Ukr.Live, Afishar, AllTop). Considering the number of news resources, such platforms significantly save the user's time. To collect information, webmasters use RSS technology: they first find the necessary websites, then specify specific categories in the plugin or service settings, and the system collects the data.
The website can be partially or fully automated, and this can even be done using free WordPress plugins. For monetization, Google AdSense, direct advertising (banners, guest posts), and access fees are used.

Recently, there has been a growing demand for price aggregators (CheapShark, Kelkoo, Hotline, Price.ua). Currently, in the global market, there are dozens of online stores in one niche, so finding a specific product takes more and more time. "Collector" sites are beneficial for both sellers, who advertise their store for free, and buyers, who can compare products from several sellers in one place.
Populating a price aggregator can be partially automated using paid plugins. You need to manually add content, and the list of stores with this product in stock will be pulled through the system. For monetization, price aggregators use affiliate marketing, and plugins support easy addition of offers from various affiliate systems.
Read more about this in the article: Price aggregators – how to increase sales at the expense of others

In Ukraine, financial aggregators (e.g., Financer, Finance.ua) are in demand, gathering information about financial products (loans, microloans, bank cards, deposits, insurance) from various sources for comparison. They can be automated using plugins to import and export the necessary data. It is better to monetize such a site using affiliate programs.

Tourism aggregators (Booking, TripAdvisor) are websites that gather travel offers (hotels, flights, tours) from various sources for comparison. You can fully automate the content population process — many platforms use APIs from tour operators and service providers. Monetizing the website can be done through contextual advertising networks, but it is more profitable to do so through affiliate programs and direct cooperation with companies.
How to Create an Aggregator Website: General Step-by-Step Guide
There are two main ways to create an aggregator website: use the services of a web developer or develop the website yourself. The first option allows you to get a project with maximum functionality without technical skills and time investment, but it will cost thousands of dollars depending on your requirements. Creating an aggregator website on your own depends entirely on your knowledge and skills, requires a lot of time, but allows you to minimize financial investments.
Our team wants to help novice webmasters, so we have developed a basic instruction on how to create an aggregator website on a CMS (content management system):
Registration of hosting and domain
At the first stage, you need to find a "home" for the platform, that is, rent hosting — a place on the server and its capacities. Right now, go to the main page of Cityhost, choose a tariff, register a user account, and pay for the service. You will get an intuitive control panel, a free SSL certificate, a reliable protection system, 24/7 support, and of course, access to creating an unlimited number of websites/subdomains and mailboxes. If you need more resources, then we recommend renting a virtual server, which is suitable for large-scale internet projects.
When registering hosting, you will receive a free domain for 1 year. Available zones depend on the selected tariff. Or you can go to the page and register a domain in the desired zone yourself, for example, .ua or .com. After registration, you will receive a notification of payment and will be able to connect automatic renewal to not lose the domain.
By the way, it should be noted that registering a domain in the UA zone requires a trademark. To learn more about this, read the article How to properly register a trademark to get a UA domain.
Choice and installation of CMS
We move on to the most complex process — choosing a content management system. It helps to create a website aggregator from scratch and manage it conveniently without programming skills. For beginners, the best choices are WordPress and Joomla because they have a large number of plugins and themes to easily create almost any type of website aggregator. If you are looking for more advanced CMS, we recommend Drupal: it has a wide selection of modules for importing and processing data.

For the following examples, we have chosen WordPress — a free content management system with many available templates and extensions, which is as simple and understandable as possible. If you have basic programming skills, you can completely customize any theme, creating a website from scratch with the desired look and functionality. And installing WordPress takes just a few clicks thanks to our installer — instructions with screenshots.
Choice and installation of a theme
In the admin panel, go to "Appearance" → "Themes". You can choose one of the available themes, quickly install it, and activate it. Another option is the WordPress repository, which has more than 12,000 free themes. Moreover, there are many specialized templates specifically for aggregators, such as Bayside, WP Drudge, Newspaper, Magazine, and others (basic versions are very limited, paid ones cost around $89 per year).
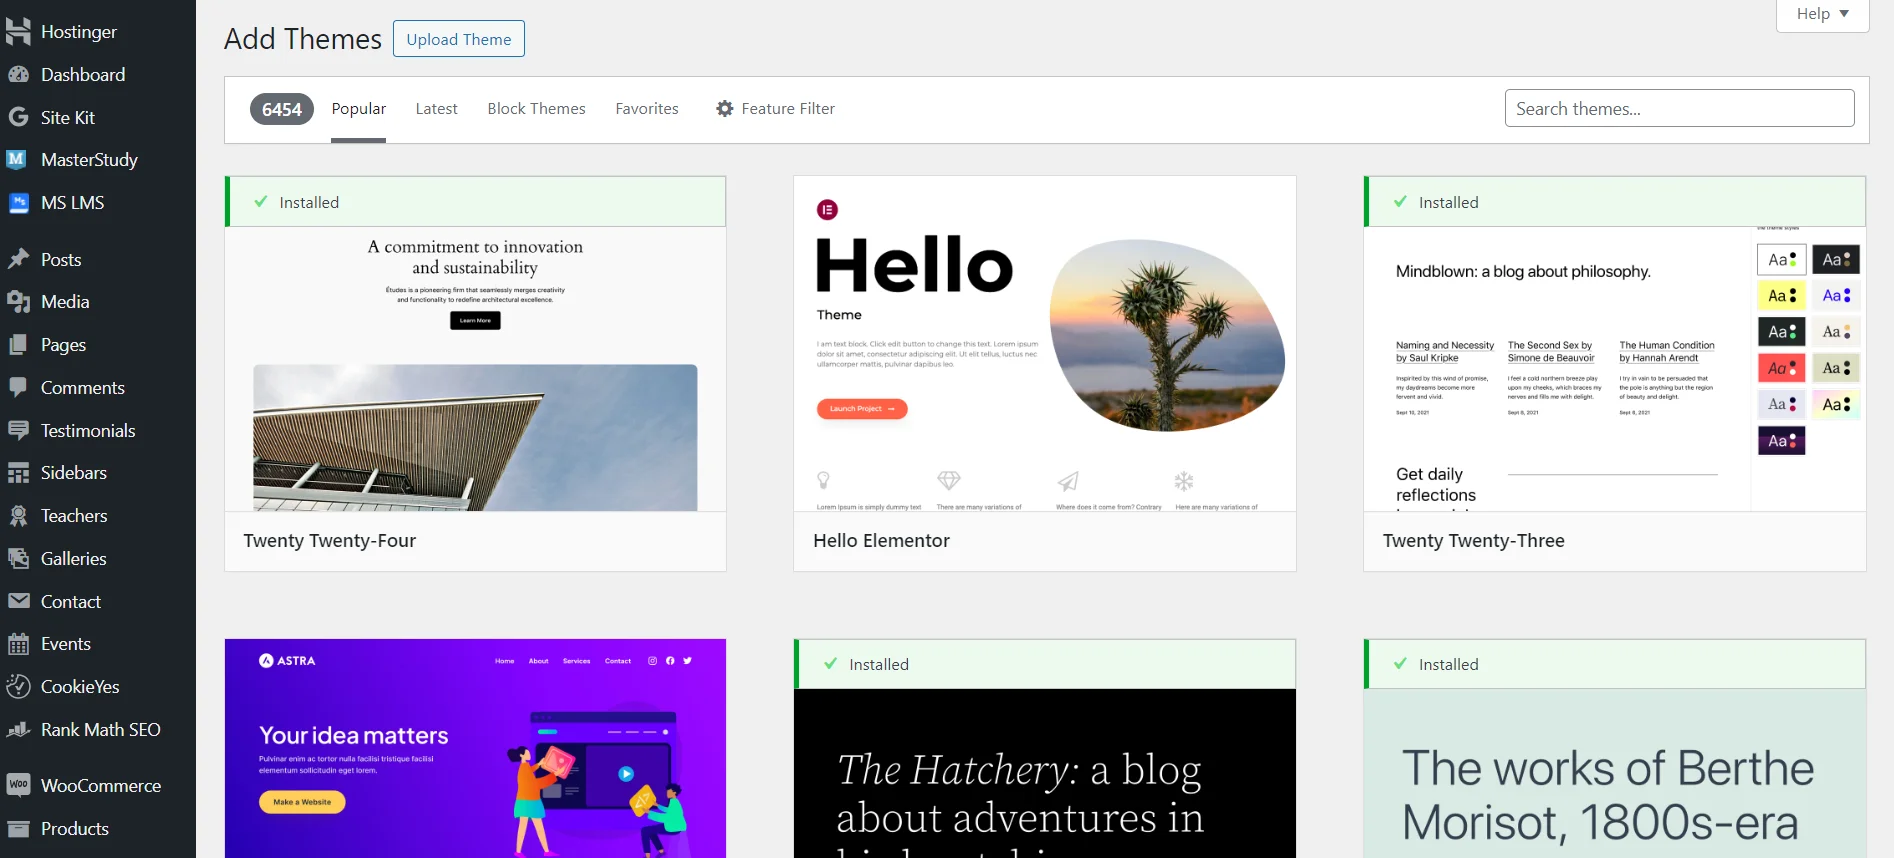
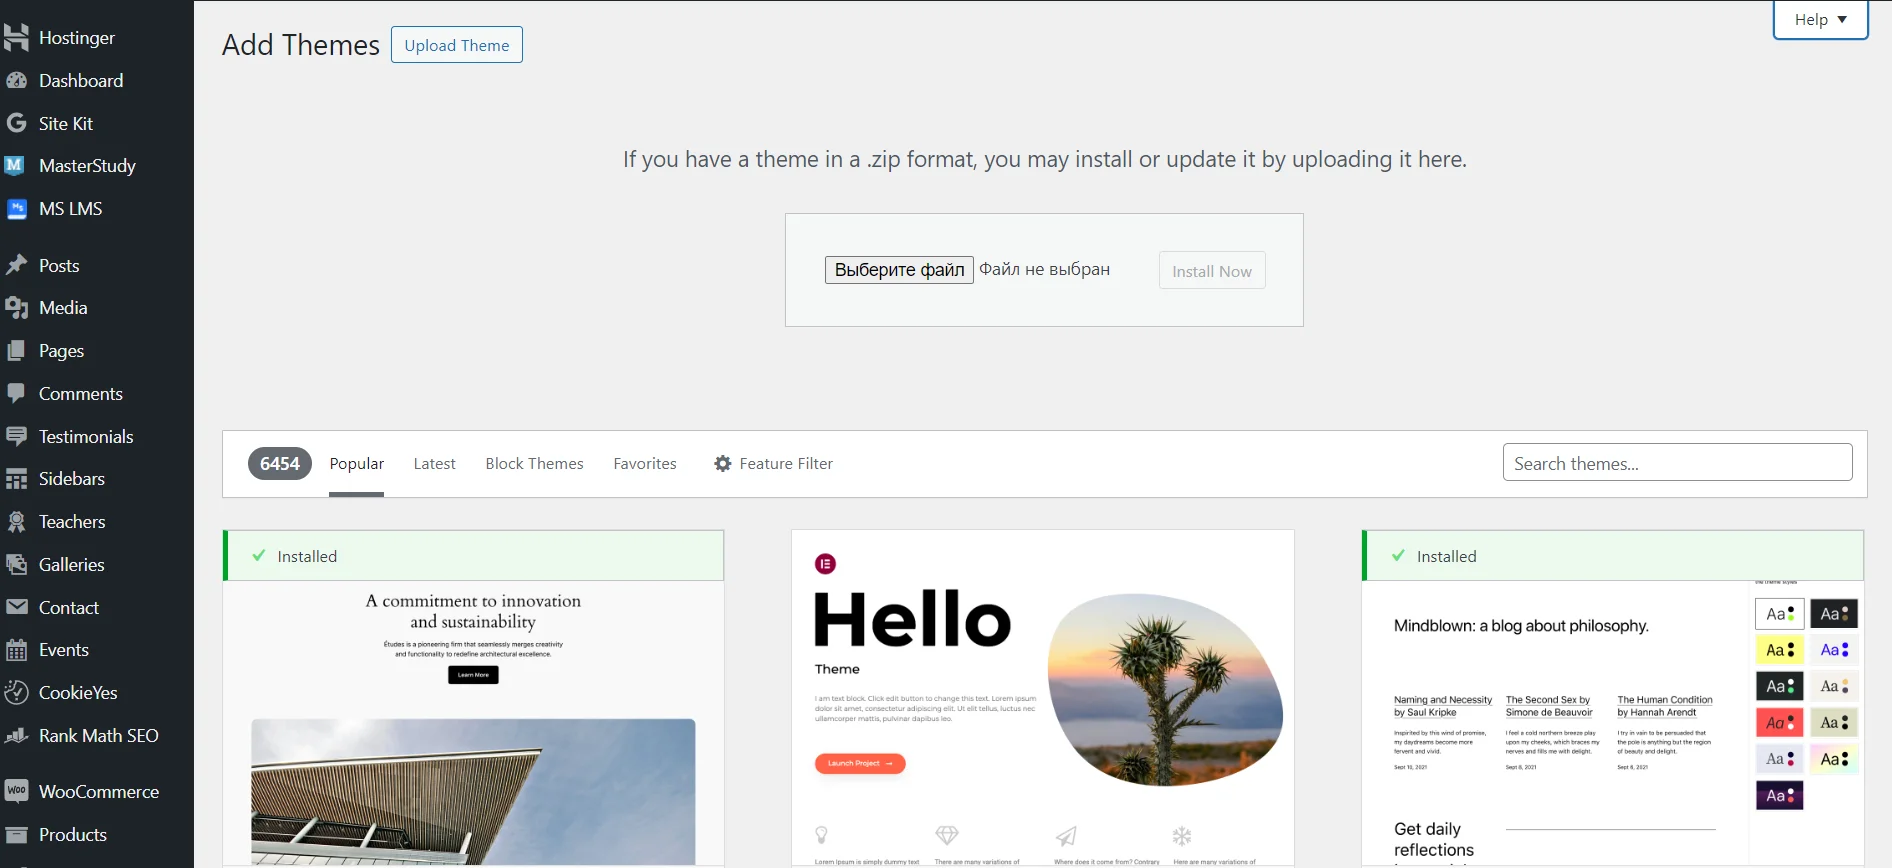
When you find a theme separately, simply download the archive, then go to the "Themes" section, click "Add New Theme" → "Upload", select the archive, upload it to the site, and activate it.
After installation and activation, you may be offered a basic setup instruction (usually comes with paid themes). Or you can go to "Settings" where you can specify the site's title and description, add an icon, language, date and time format. We recommend going to the "Permalink Settings" section right away and specifying the desired link format, for example, "/%category%/%postname%/", which means category → post name.
Installation of essential plugins
In WordPress, the functionality of the site depends entirely on the extensions. To add them, go to the "Plugins" → "Add New" section. WordPress offers many plugins, but you need to be careful because each one to some extent burdens the website, so we recommend installing only the necessary ones.
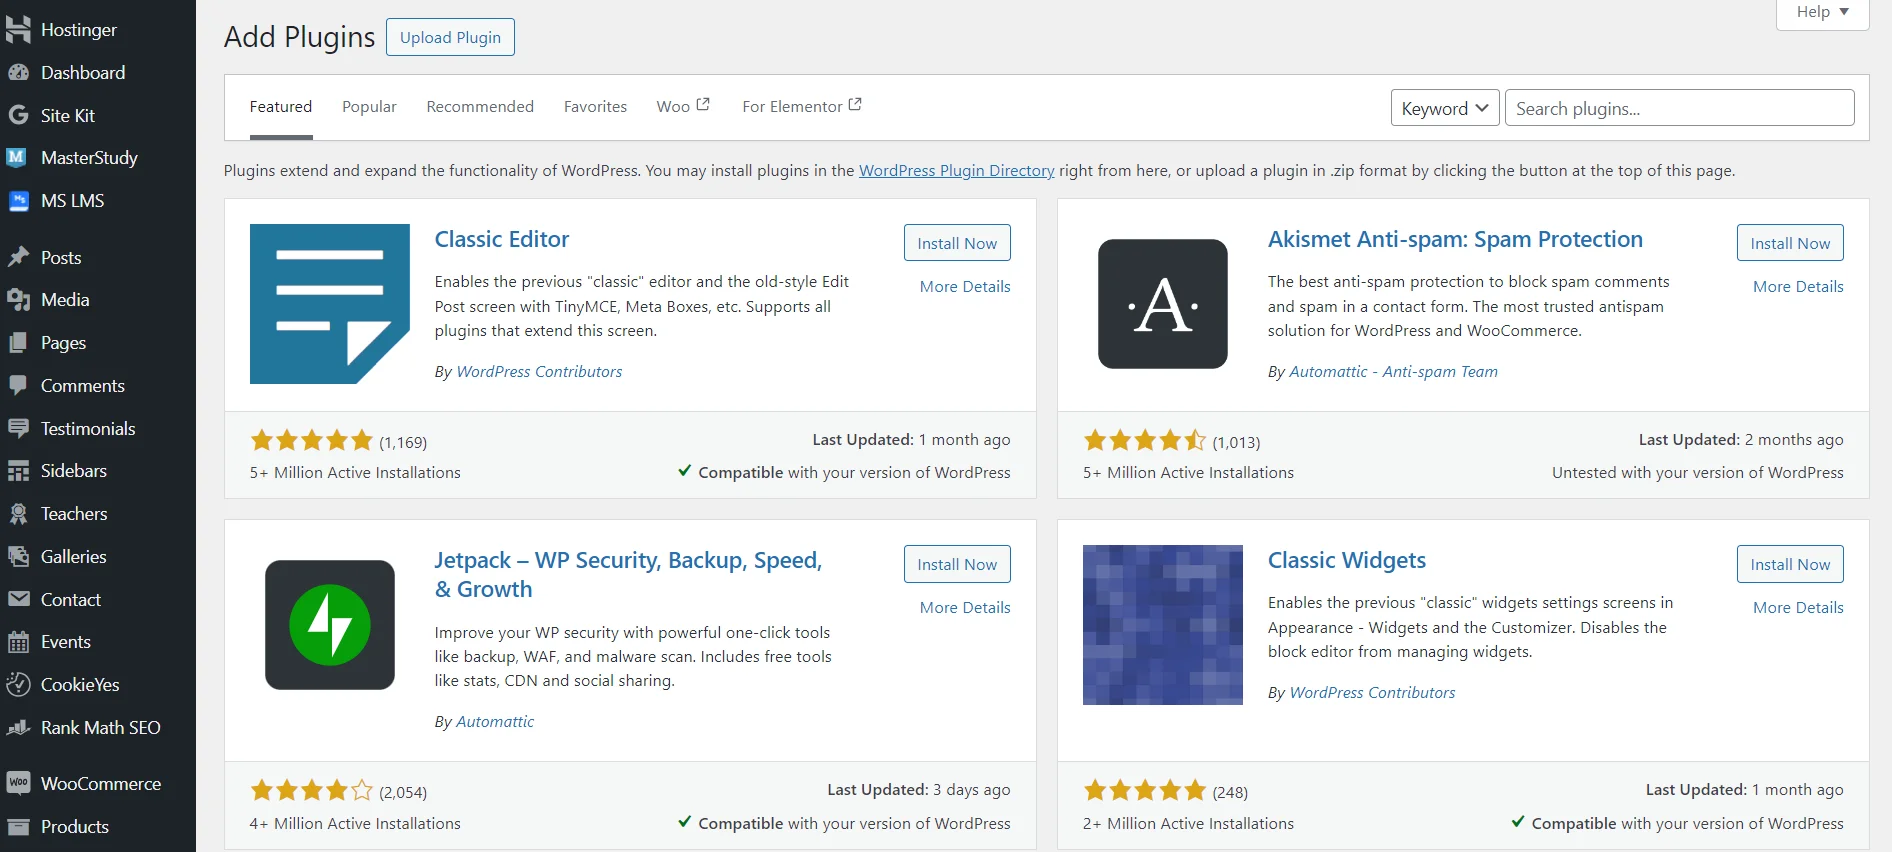
Basic WordPress plugins include:
-
Yoast SEO — a free search engine optimization plugin. It allows you to easily create a sitemap for search engine robots, conduct SEO optimization for each page, make redirects, etc. You may also consider other alternatives, such as Rank Math SEO;
-
Contact Form — creation of various types of forms. For example, a form for contacting the site team;
-
Elementor — a convenient drag-and-drop page editing tool with pre-designed blocks;
-
Akismet Anti-Spam — filtering unwanted comments and spam;
-
WP Super Cache — caching pages to improve site loading speed. An alternative is LiteSpeed Cache.
We have listed only basic plugins that will help you set up and optimize your new website. However, you can easily find and add other extensions to improve the functionality of your platform. Here are some plugins specifically useful for various types of aggregators:
-
WooCommerce — a free plugin for online stores that, together with extensions, is ideal for creating a price aggregator;
-
WP All Import — a free WordPress plugin for importing data in any format;
-
Content Egg — a paid plugin ($55) that adds content blocks to your site with products from affiliate networks and supports automatic price updates;
-
WP RSS Aggregator — a free plugin for quickly aggregating news from different sources and displaying them in one place on your site;
-
Feedzy RSS Feeds — a free WordPress plugin for a news aggregator that can gather the best content in a specific niche from across the internet.
We have listed only the most popular plugins for aggregators. However, you can visit Envato Market (ThemeForest) and find many extensions for websites of any type and niche.
Content Management
The main pages to include are "Home", "Blog", "About Us", and "Contact". To create them, go to the "All Pages" section and click "Add New." Then, add the information and fill in the meta tags (all necessary fields will already be created thanks to the SEO plugin).
The method of adding information depends entirely on the selected aggregator plugin. Usually, after activation, the system creates a separate section in the administrative panel where you can add content from other sources.
How to Create an Aggregator Website: Examples for the Most Popular Types of Aggregators
Domain and hosting registration, WordPress installation and setup, themes, basic extensions — these are the fundamental steps in creating a website. To develop and manage a specific type of aggregator, specialized applications are required. You can easily find numerous free and paid plugins tailored to specific types of content or use universal tools like WP All Import or Content Egg.
For better understanding, we've broken down the process of content creation and management for two of the most popular types of aggregators:
How to Create a News Aggregator on WordPress
A news aggregator on WordPress is one of the simplest types of sites, which can be fully automated with the help of free extensions. The FEEDZY RSS Feeds plugin can automatically convert elements of an RSS feed into WordPress pages. You can collect an unlimited number of RSS feeds from an unlimited number of sources. And the appearance of the content can be easily edited, for example, displaying all the data of the original publication or leaving only key fields, such as author, date, time, brief description. And of course, each publication is fully adapted for different platforms!
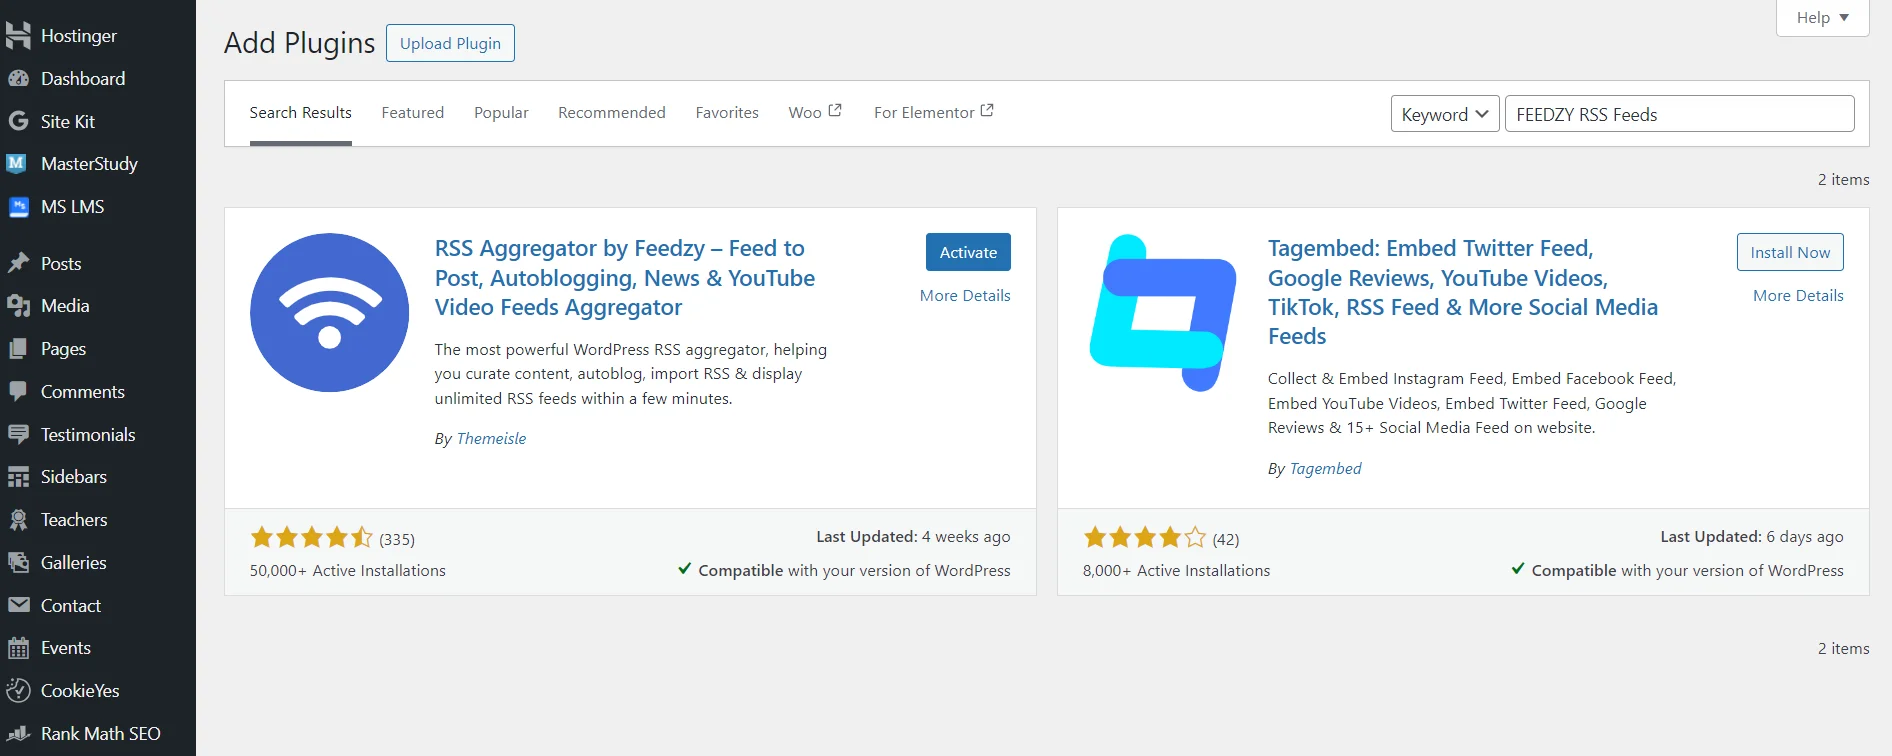
The plugin for creating a news aggregator can be found in the WordPress catalog and on the official website of the content management system. The first option is usually simpler: go to the admin panel, section "Plugins", find, upload, and activate FEEDZY RSS Feeds.
Next, find sites with the necessary information. For example, let's take Kyiv Independent. Just go to the website and select a category, and then add "feed" to the link (https://kyivindependent.com/tag/opinion/feed).

Now go back to the admin panel, Feedzy RSS → Feed Categories section. Add a new category by first specifying the name and RSS (you can add several web resources at once).
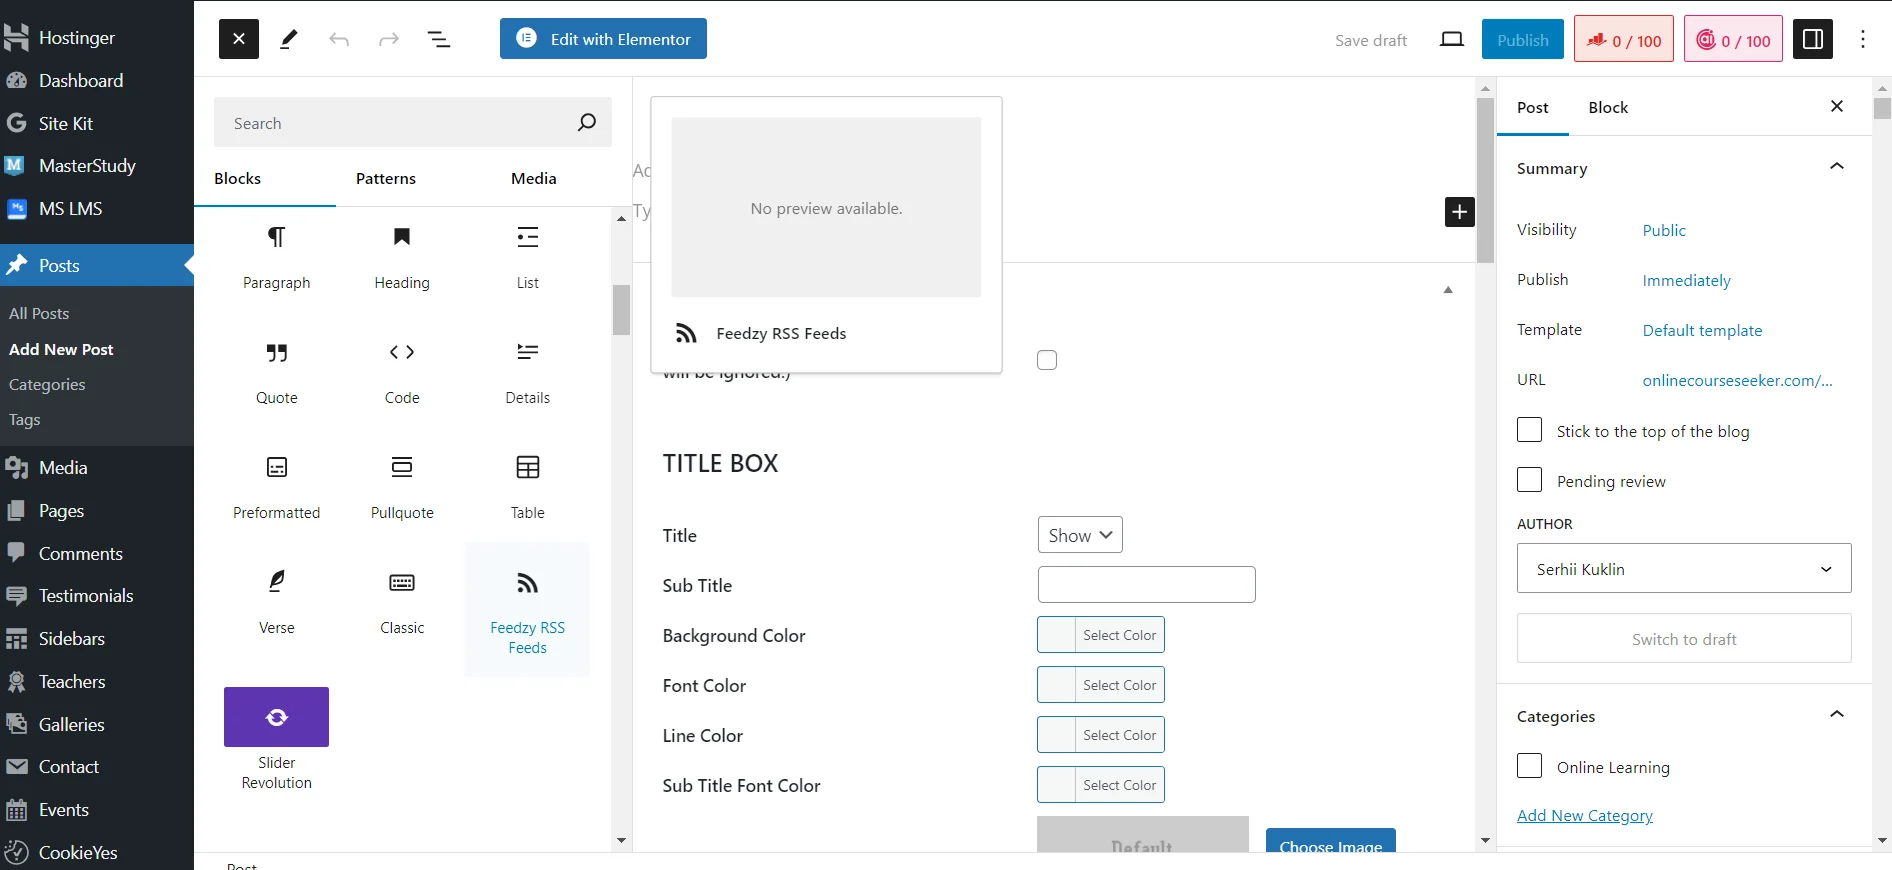
Now add a new publication: Posts → Add New Posts. On the page, click the blue plus sign and select Feedzy RSS Feeds.
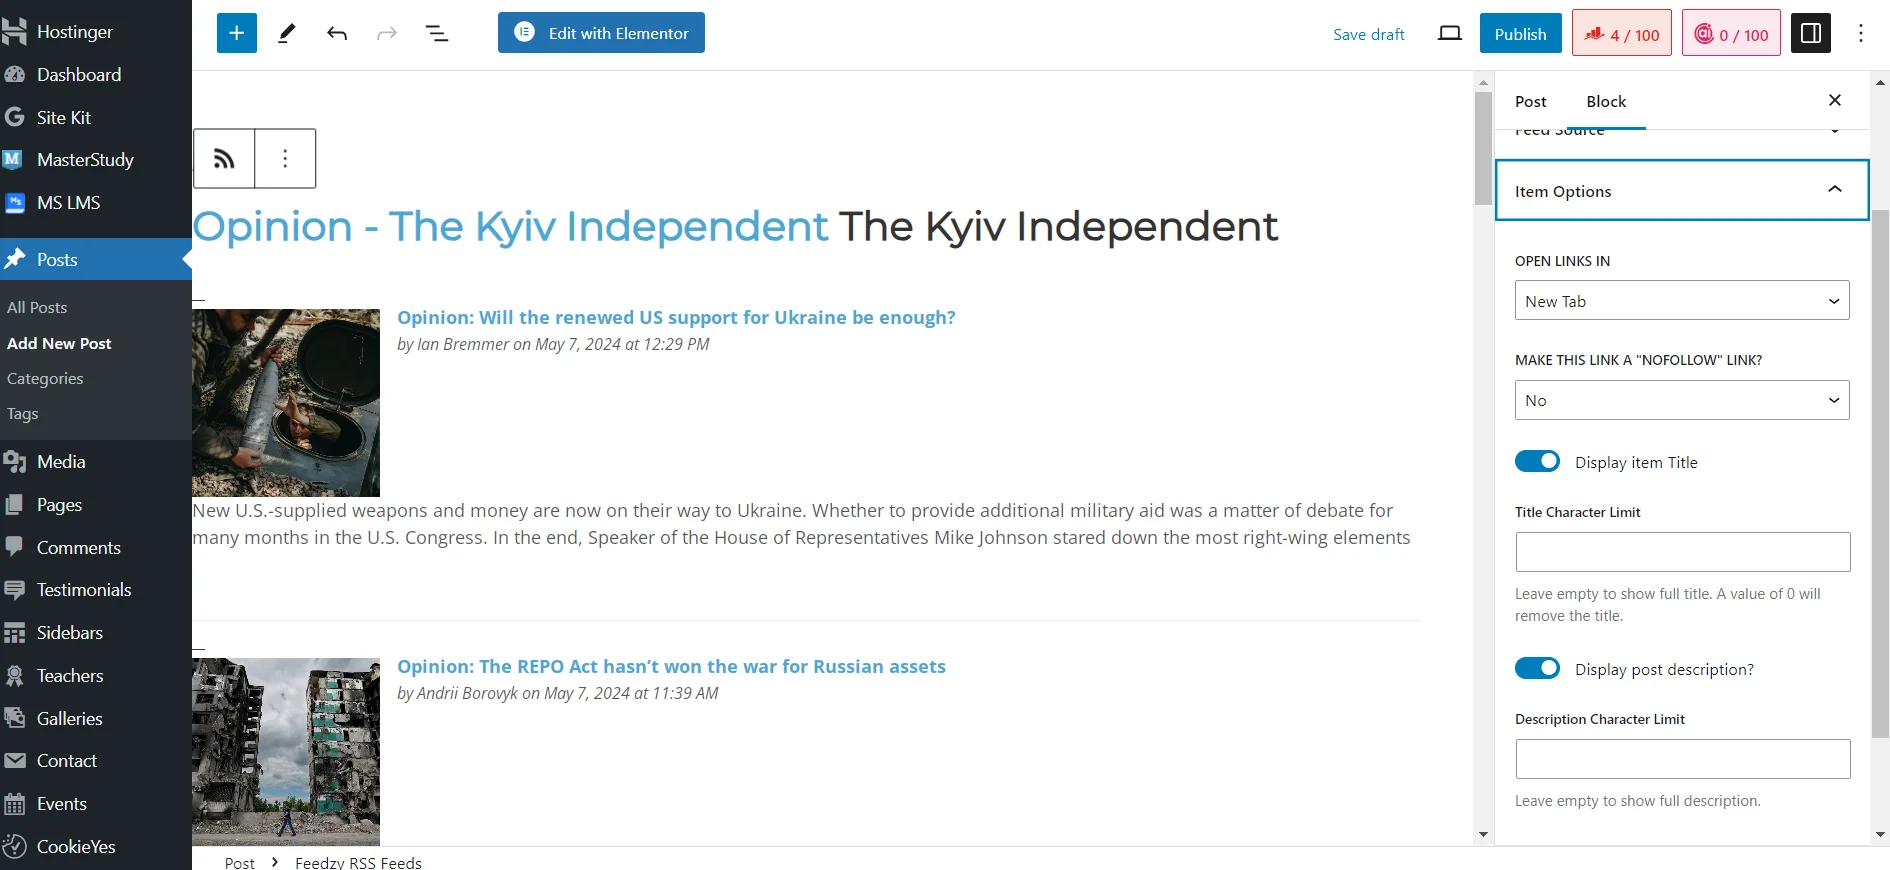
Select the previously created category and click Load Feed. In the Block section, you can configure any parameters, including the number of posts, their display order, image size, meta tags (author, date, time), etc. In Advanced, you can activate Lazy Load to increase page loading speed. You can even make the link nofollow to not pass the site's weight to the web resource from which you are taking information.
Read also: What are nofollow and dofollow links and why both types are needed for SEO promotion of the site
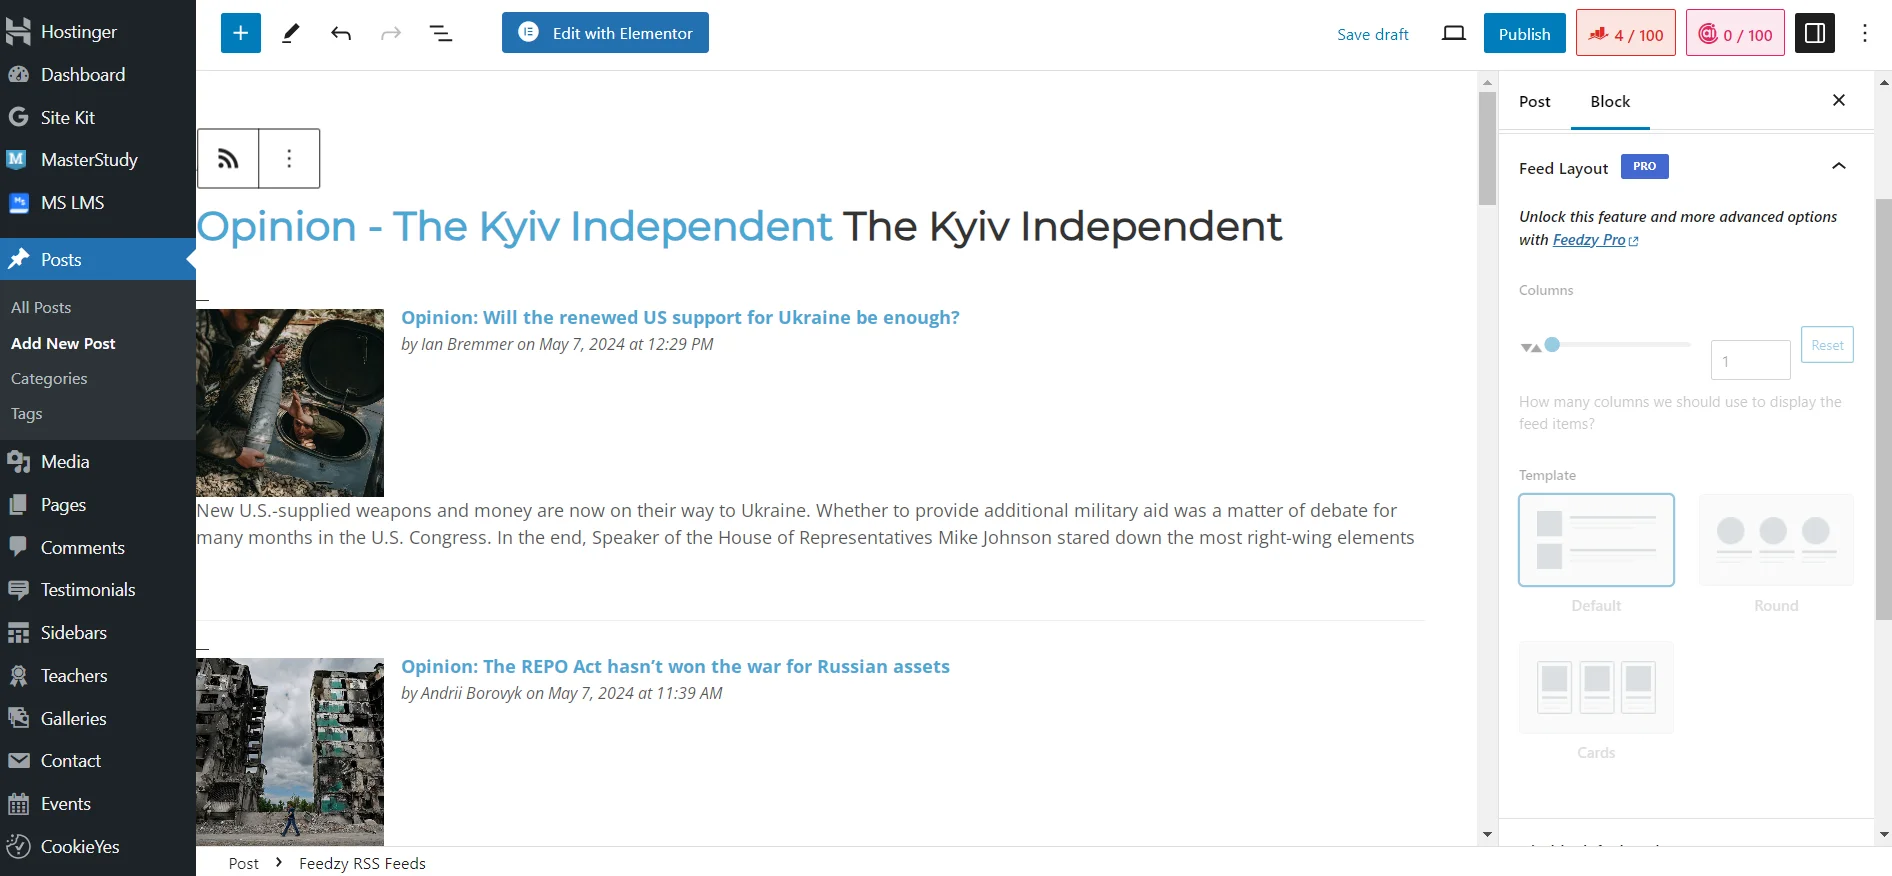
In the free version, you cannot customize the page layout. However, by default, the theme layout of the site is activated, so you can achieve the desired look by choosing a WordPress theme specifically designed for news websites. Alternatively, you can upgrade to the PRO version for $99 per year.

Just look at the result! It took just a few minutes to create and populate the category, and it's all free. And of course, this is a simple example using the Free version without a corresponding WordPress theme. But you can make the site much more beautiful and informative.
How to Create a Price Aggregator on WordPress
When your budget is significantly limited, you can partially automate this type of website. First, install the Google Web Scraper extension, activate it, and reload your browser. Then, go to a page, for example, a product page, activate the Developer Tools, select the extension section, create a database, and add the necessary information to it. Web Scraper offers detailed video instructions and documentation, plus there is plenty of information on YouTube, which can help you quickly understand its functionality.
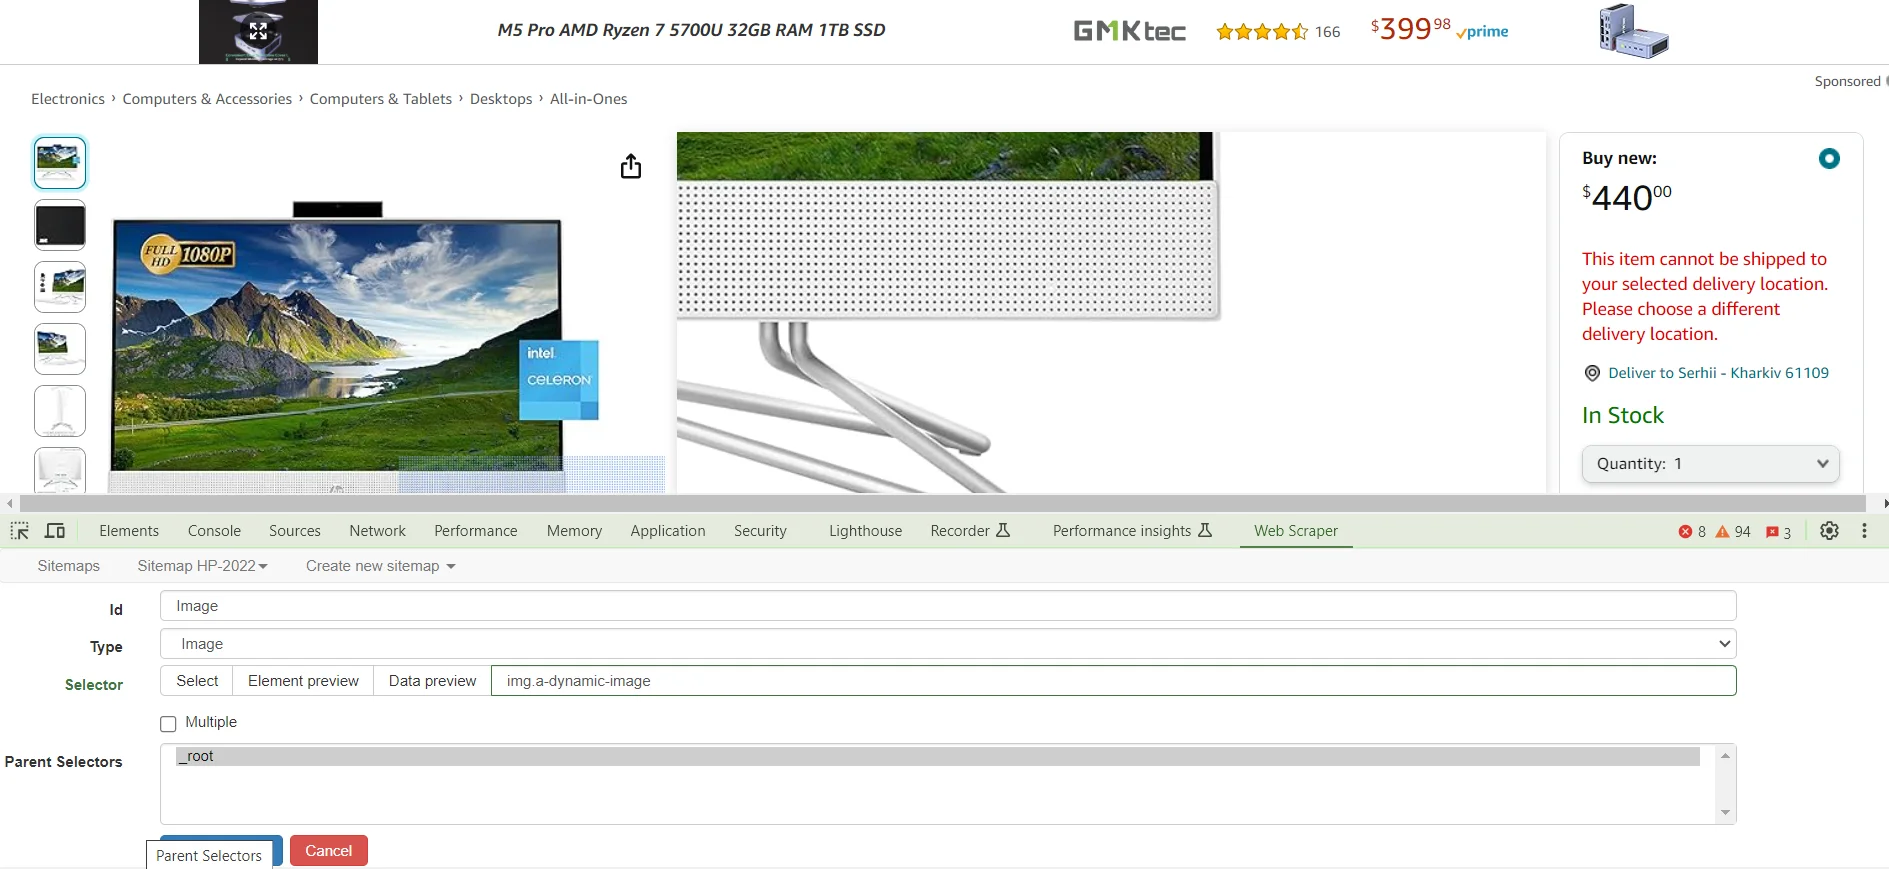
For simplified creation of a price aggregator on WordPress, WP All Import is suitable — a plugin for importing data from any source. You can use the free version or purchase WP All Import PRO, which allows for automatic data updates and importing images from anywhere. Additionally, you'll need the WP All Import – WooCommerce Add-On plugin.
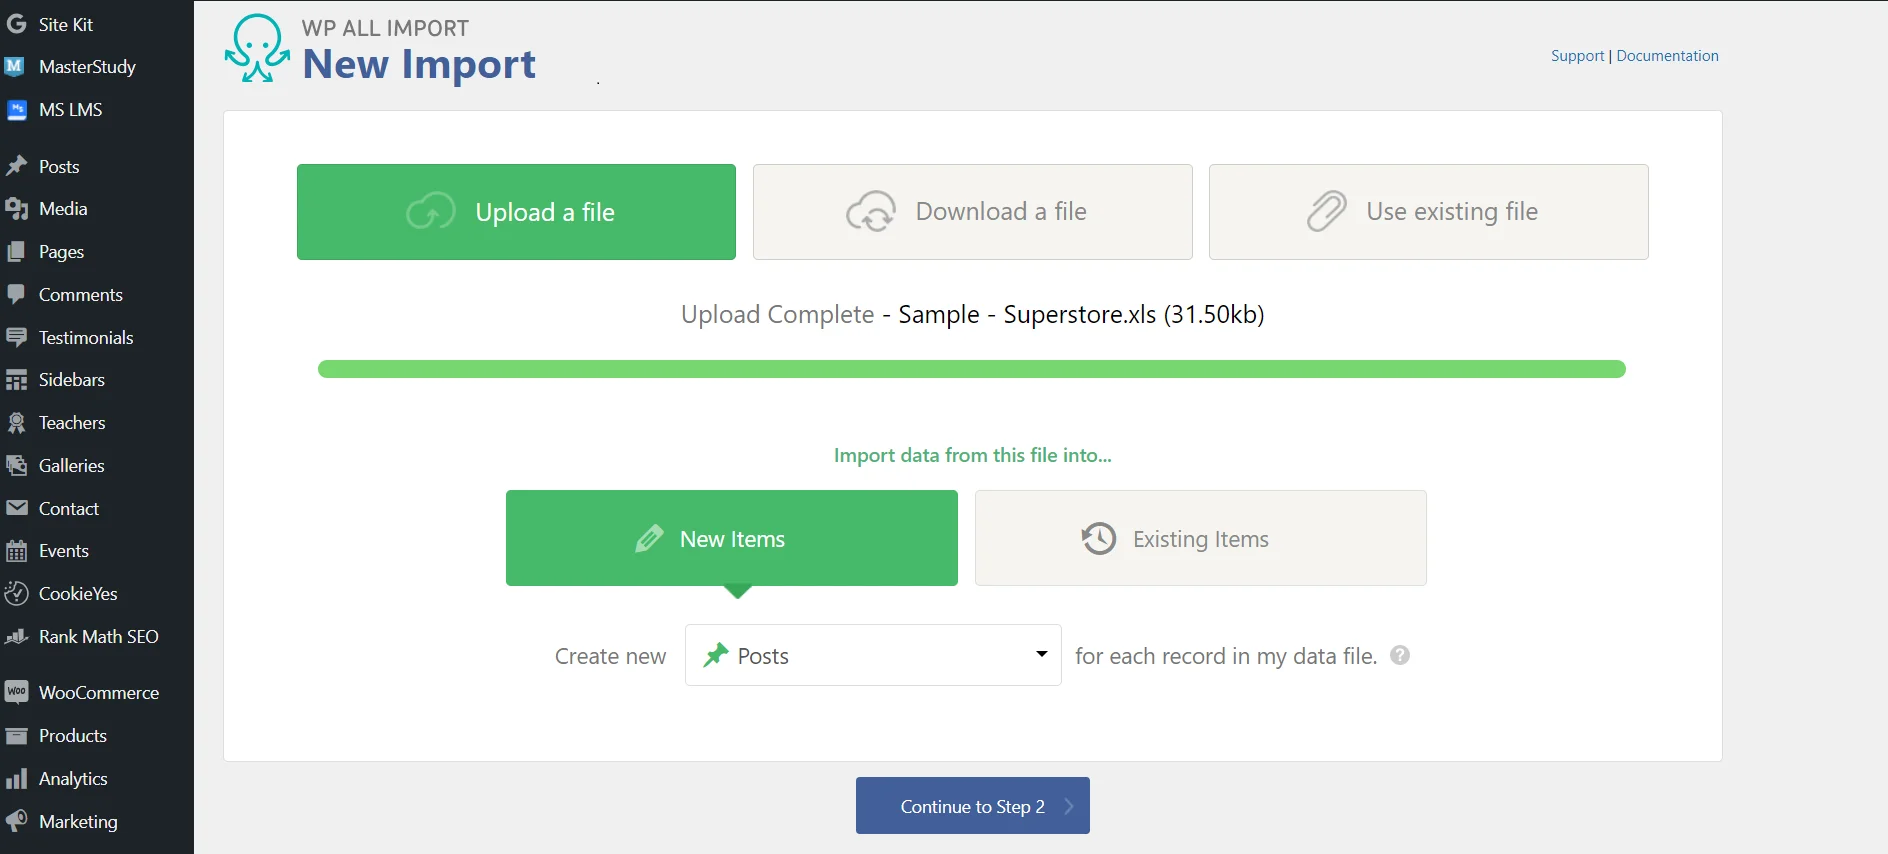
When the plugins are installed and activated, go to the All Import section. To add data, click on "Upload a file" and choose the file you need. We uploaded a .xls file filled with test data. You can fill in the information yourself or gather it from different websites using the Chrome Web Scraper extension.
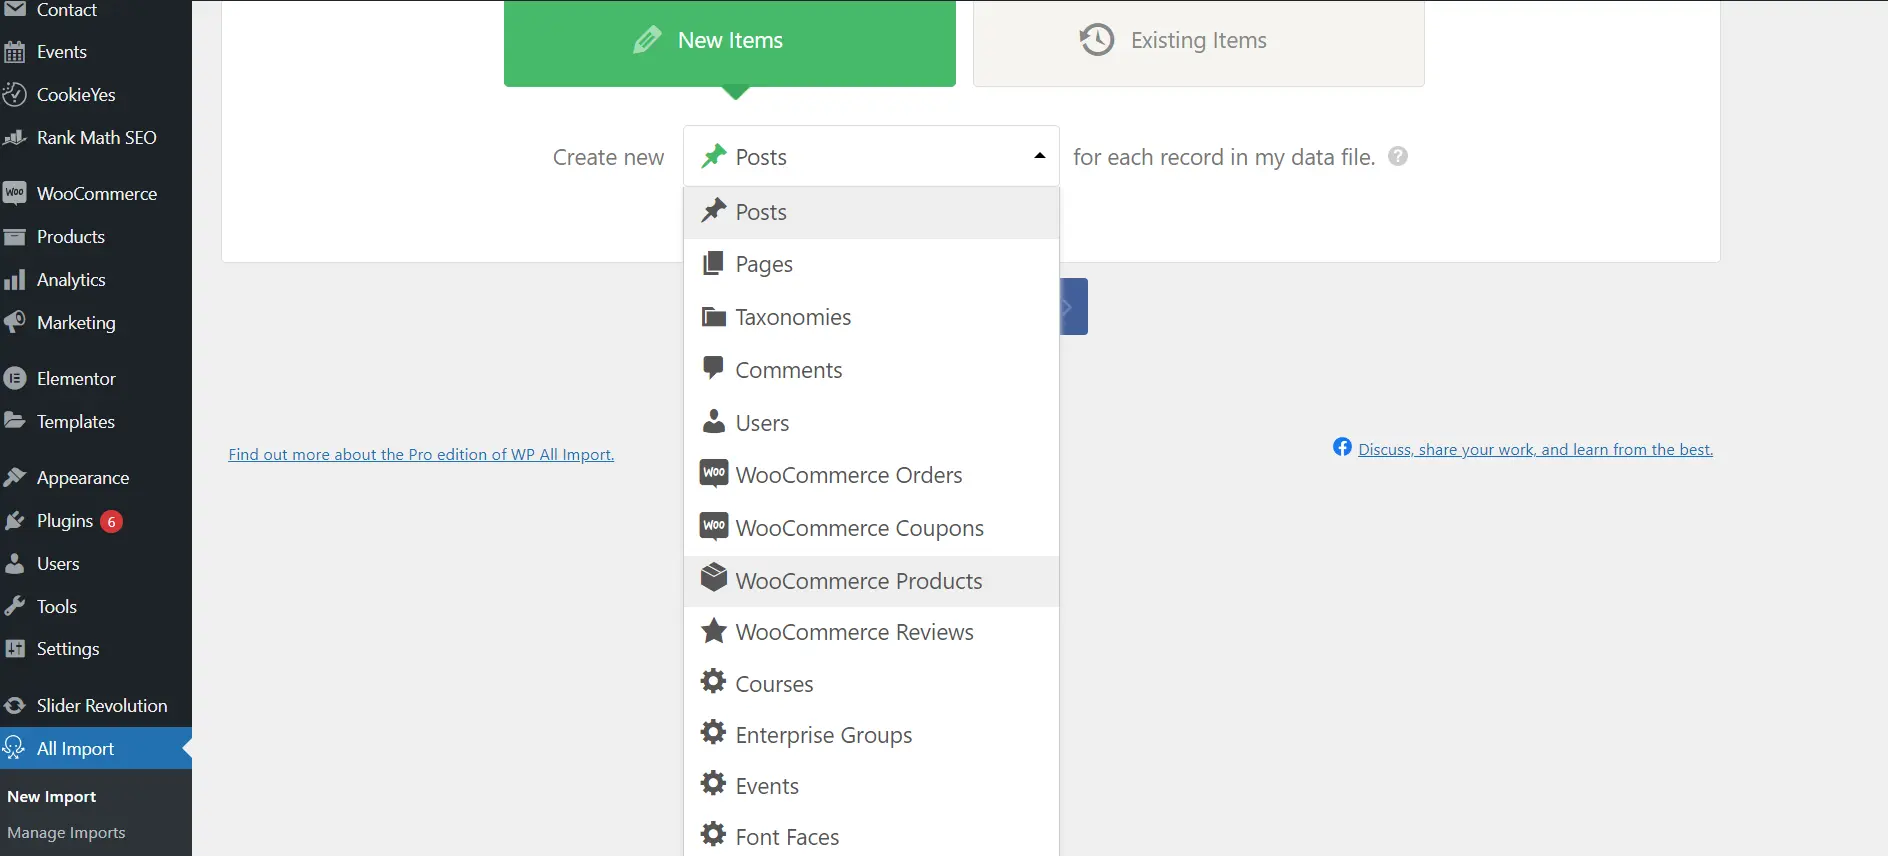
Since we are adding new information, we need the "New items" section, where we select the data type. WP All Import supports all possible information types, so you can add posts, news, courses, even comments. But since we are creating a price aggregator, we choose WooCommerce products.
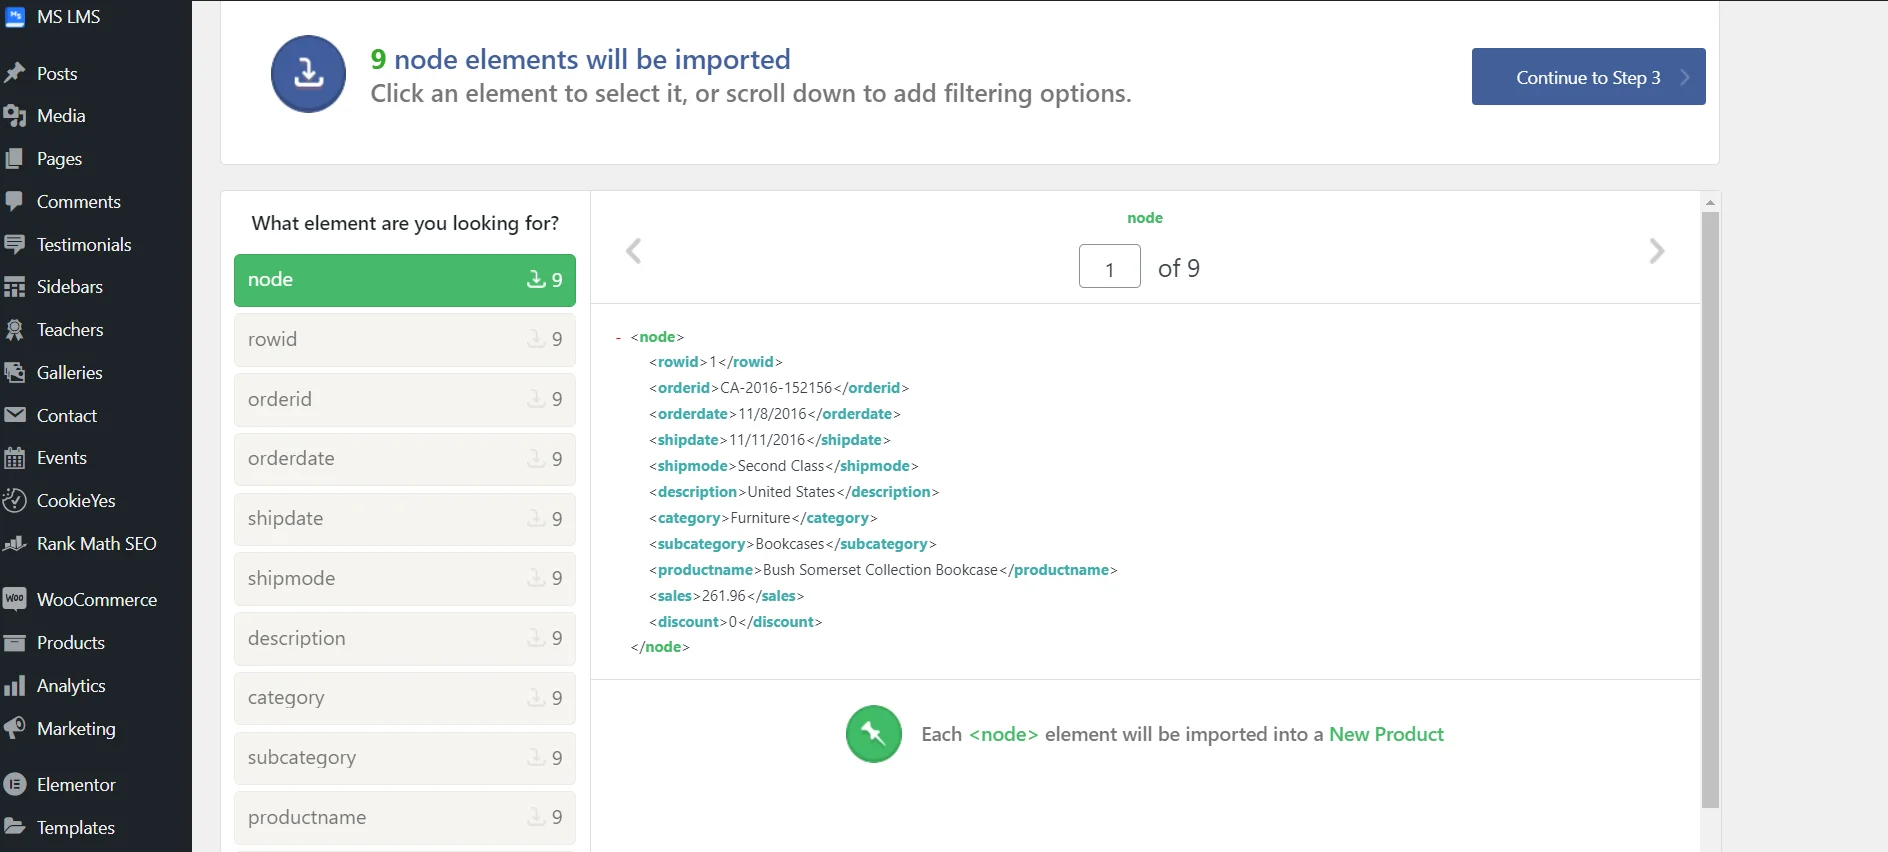
Next, just check the data. The system automatically parses the information from the file into the corresponding categories, allowing you to quickly transfer the data directly to the product page.
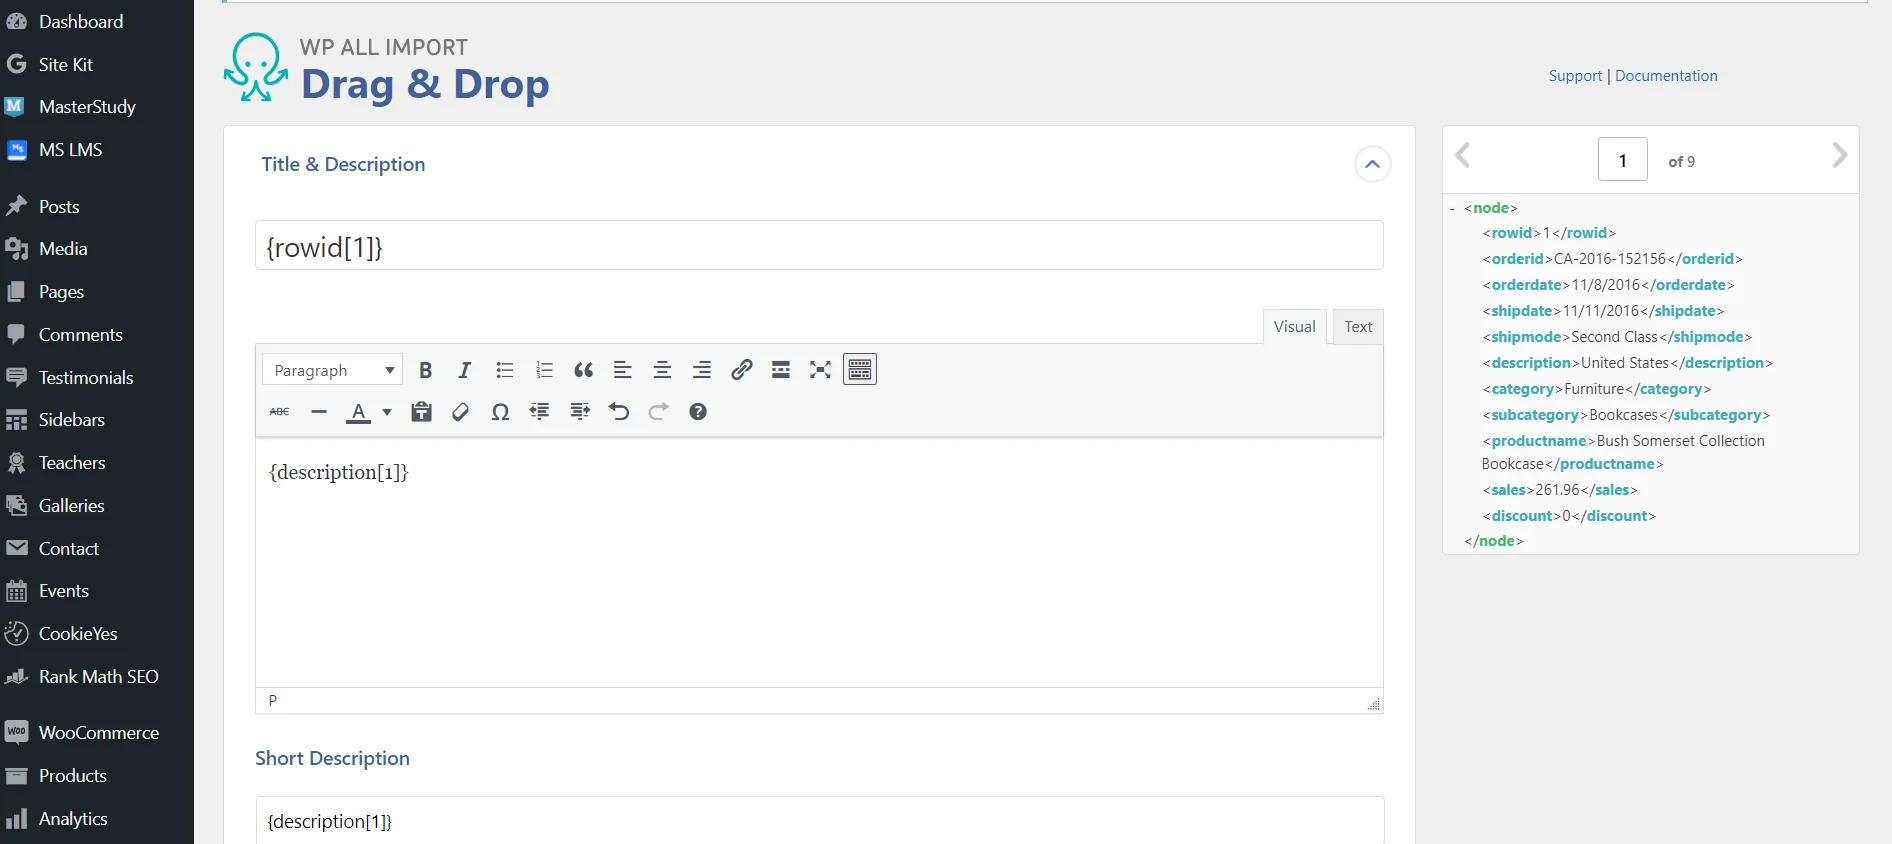
Fill in all the fields by transferring data from the prepared form of the plugin to the corresponding fields.
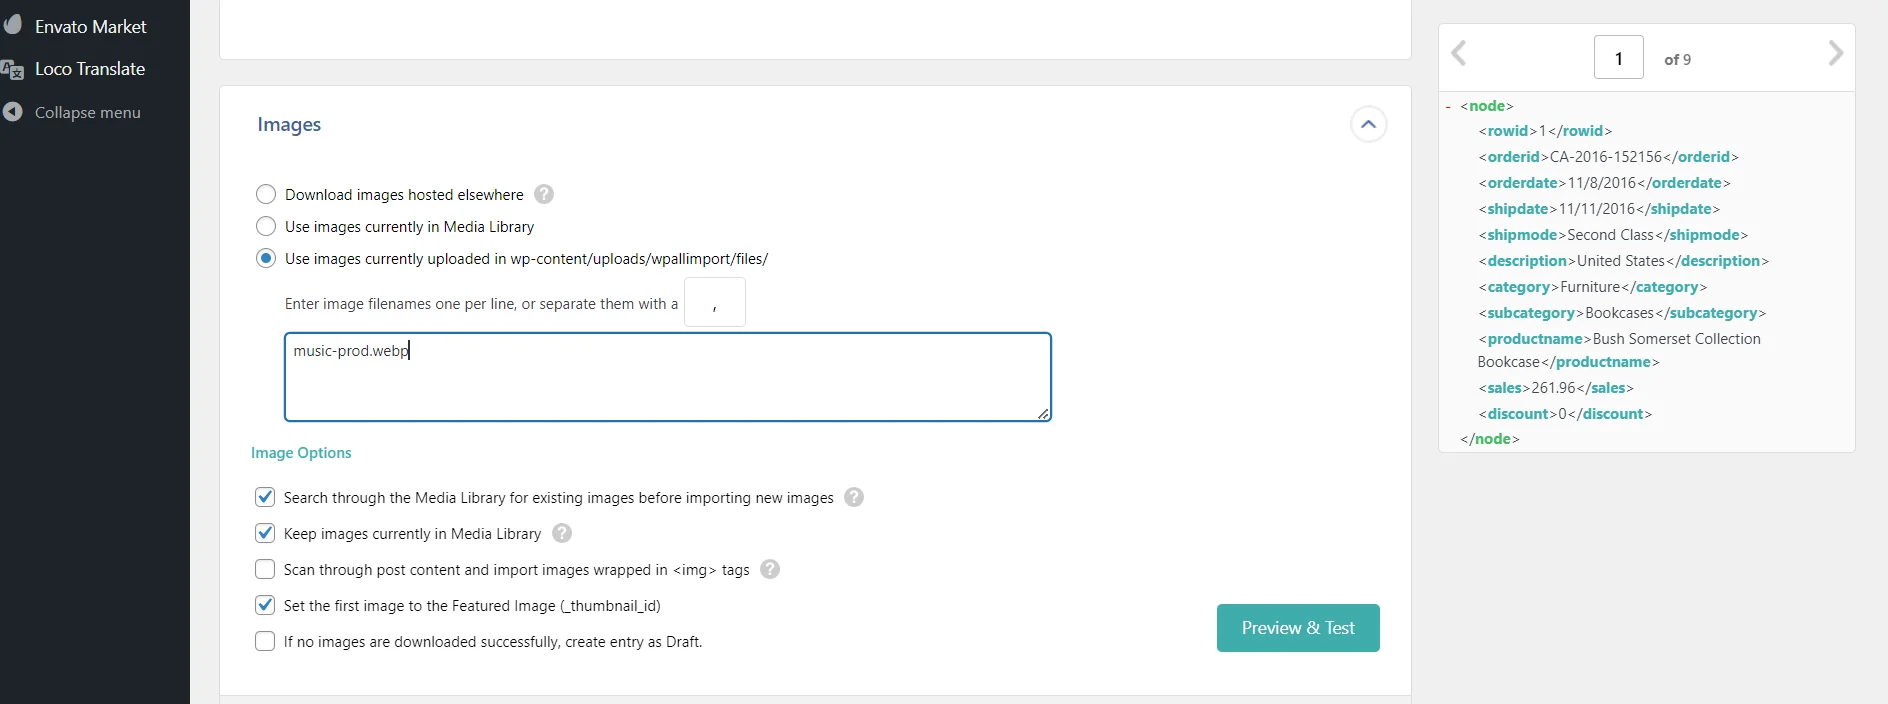
Pay attention to adding images. The best way is to take them from the library: go to Media, upload the prepared photos, then copy the name with the image format. Go to the plugin settings and choose "Use images currently uploaded in wp-content/uploads/wpallimport/files/", specify the names separated by commas or each image on a new line.
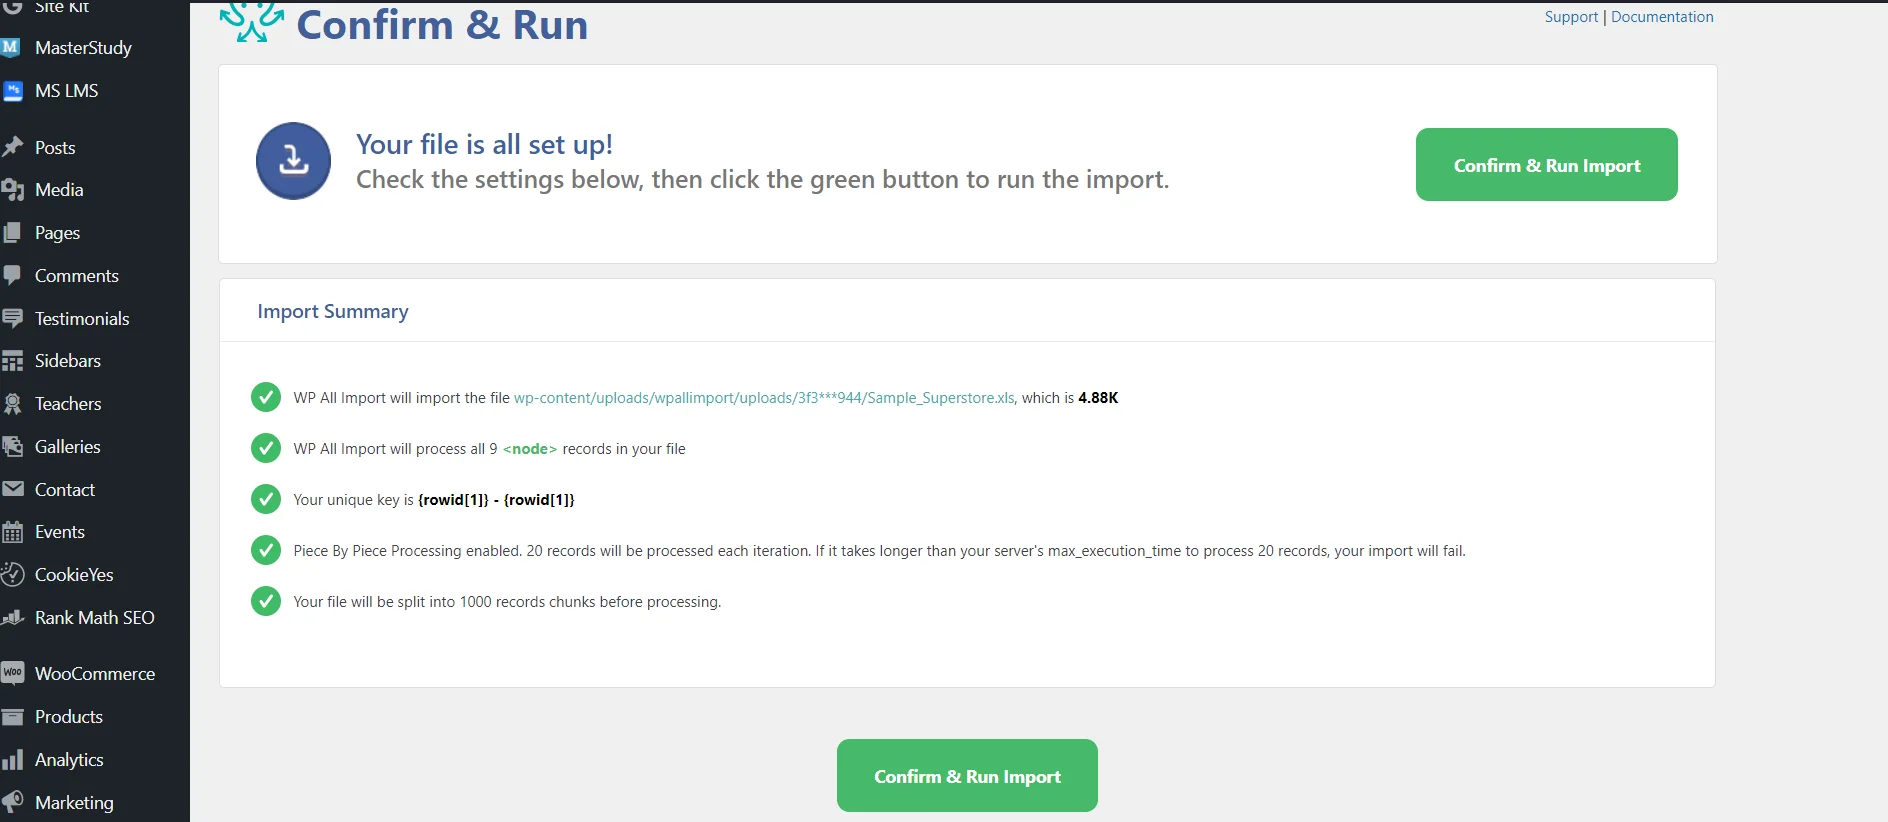
In the final step, review the information and click Confirm & Run Import.
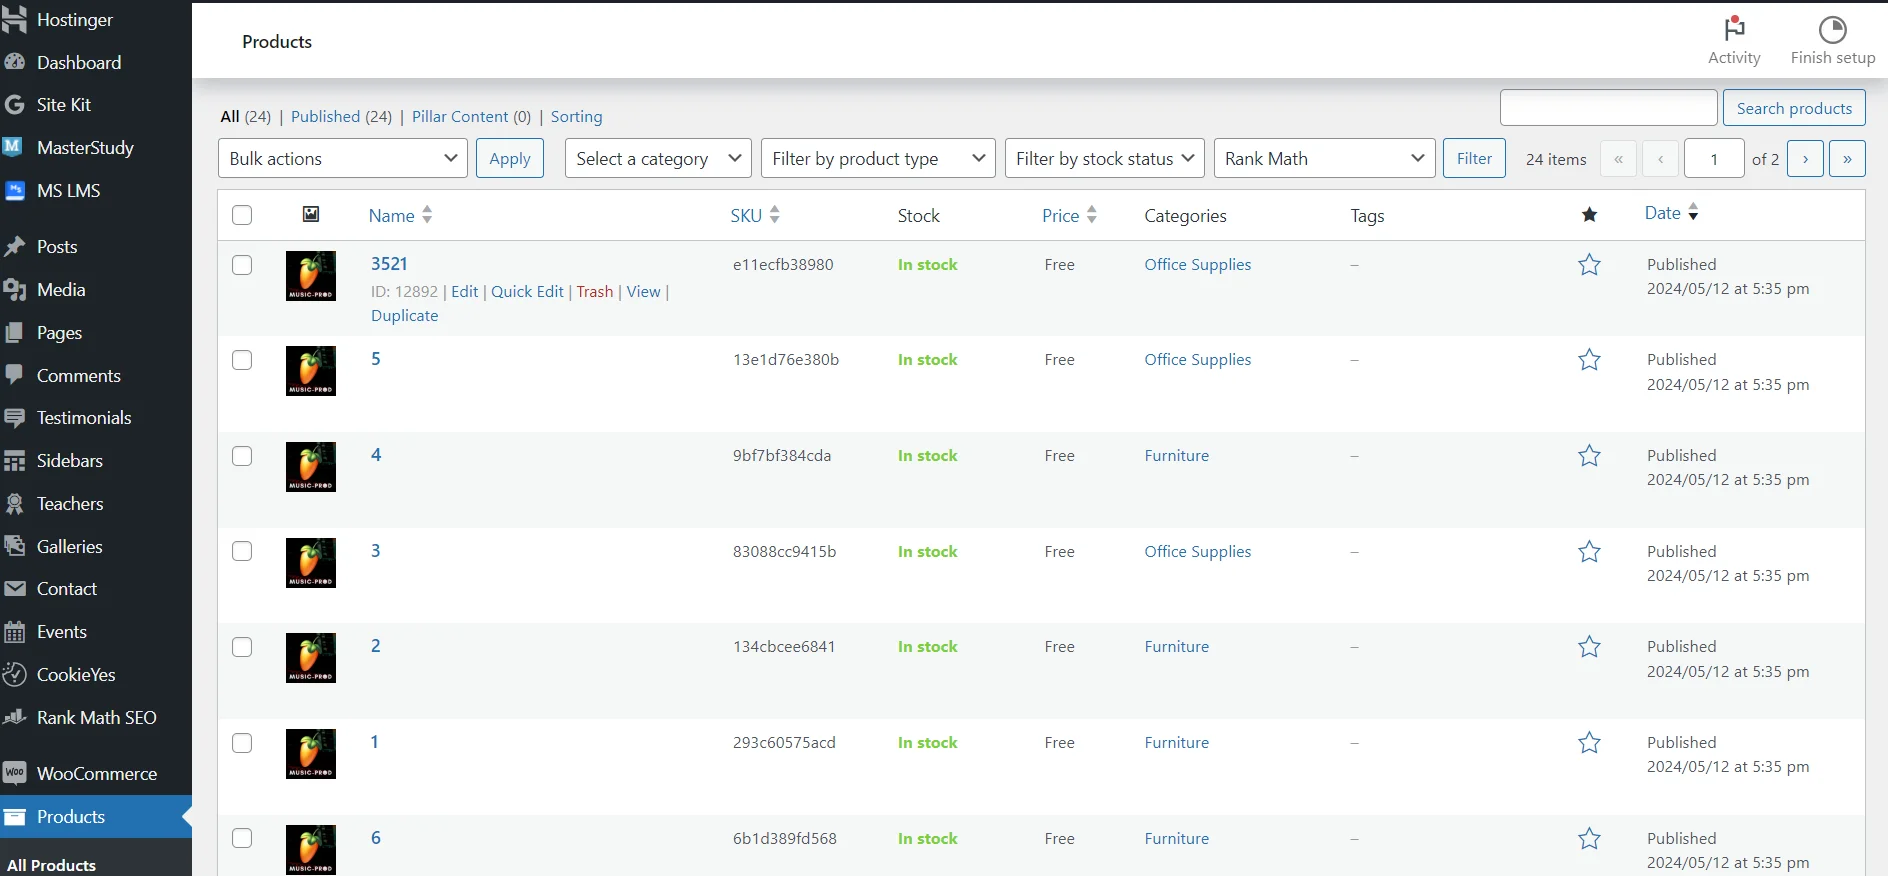
All products will appear in the Products section of the WooCommerce plugin. You can go to the page of the product you need at any time and edit the information: from the name and description to discounts and SEO.
Please note that the appearance of the page itself depends on the theme of the site, so the plugin only simplifies adding information, and you take care of the design yourself! You can either take a basic theme and improve it yourself (Gutenberg, Elementor), or use a fully prepared thematic template.
The WP All Import plugin has many professional features. We have only talked about the basic capabilities that help create the foundation of the page. You can go to the official website and view a detailed instruction with screenshots on setting up the plugin for WooCommerce.
An aggregator is an ideal type of website that allows users to quickly find the information they need, and webmasters to earn money without large investments. By following advice on the legal use of content and detailed instructions, you can create a website aggregator on the WordPress CMS yourself. Just always care about users, so don't just take data from other websites, but also provide additional value. This way, you will be able to promote your site faster in search engines, find a loyal audience, and create a source of constant income.
