
The ability to comment on publications on the site gives several advantages at once. Readers are more willing to return to resources where you can express your attitude to what you have read, and for new visitors it is an indicator of a live site where materials are actively discussed. It's also good for SEO — Google trusts web resources that have comments more.
The commenting option will be useful not only for a blog with articles, but also for any site in general - whether it is an online store or a corporate business card. Users are always willing to leave reviews about products and services or general impressions about interaction with the company.
Most site owners do not have the resources to order their own widget with comments, so the most optimal solution is to use already existing platforms.
Read also: TOP-4 online chats for the site: LiveChat, HelpCrunch, Tawk.to, KwizBot
The main property that should be inherent in a widget is ease of use for readers. Few people are excited about the prospect of filling out a cumbersome registration form or going to the post office for confirmation. Therefore, the procedure should be as simple as possible and be carried out in a couple of clicks.
Let's consider the simplest and most convenient widgets for commenting, which will be relevant for use in Ukraine in 2023. Especially for this, we installed several different services on test sites to show you how to add a widget to your site.
Facebook comments widget
The developers of the Facebook social network have created their own widget that allows users to leave comments under materials without registering. In this case, the name and avatar from the account are uploaded to the site. The form for commenting visually resembles the interface of a social network, thanks to which users feel "at home" and willingly write comments, can communicate with each other and leave favorites.
The widget has the ability to moderate comments and leave spam reports, add forms to all pages at once or only to selected ones. Other users can also be assigned as moderators by creating a team. Sorting options and spam complaints are also available for readers — just like on Facebook.
Advantages of the Facebook widget:
This is a completely free tool.
You can post comments from the site on your wall in the social network — this increases visibility.
Accustomed to lengthy discussions, Facebook users willingly leave replies to each other's comments, creating activity on the site.
Comments are indexed. True, sometimes Google defines the user account as the source, not the site.
Fewer spam comments from bots, because first you need to register an account on the social network. In addition, comments for the purpose of receiving links lose their meaning - Facebook does not provide backlinks from comments.
Disadvantages of the Facebook commenting widget:
It doesn't cover people who don't use Facebook. You need an account to post comments.
Customizing the design consists only in adjusting the height and choosing a dark or light theme. In everything else, you will see the classic "Facebook" interface. On the one hand, this is a plus, because users feel more free, and on the other hand, the widget may not fit into the design of the site at all.
Facebook collects data from the widget for advertising campaigns.
How to install a Facebook comments widget on a site
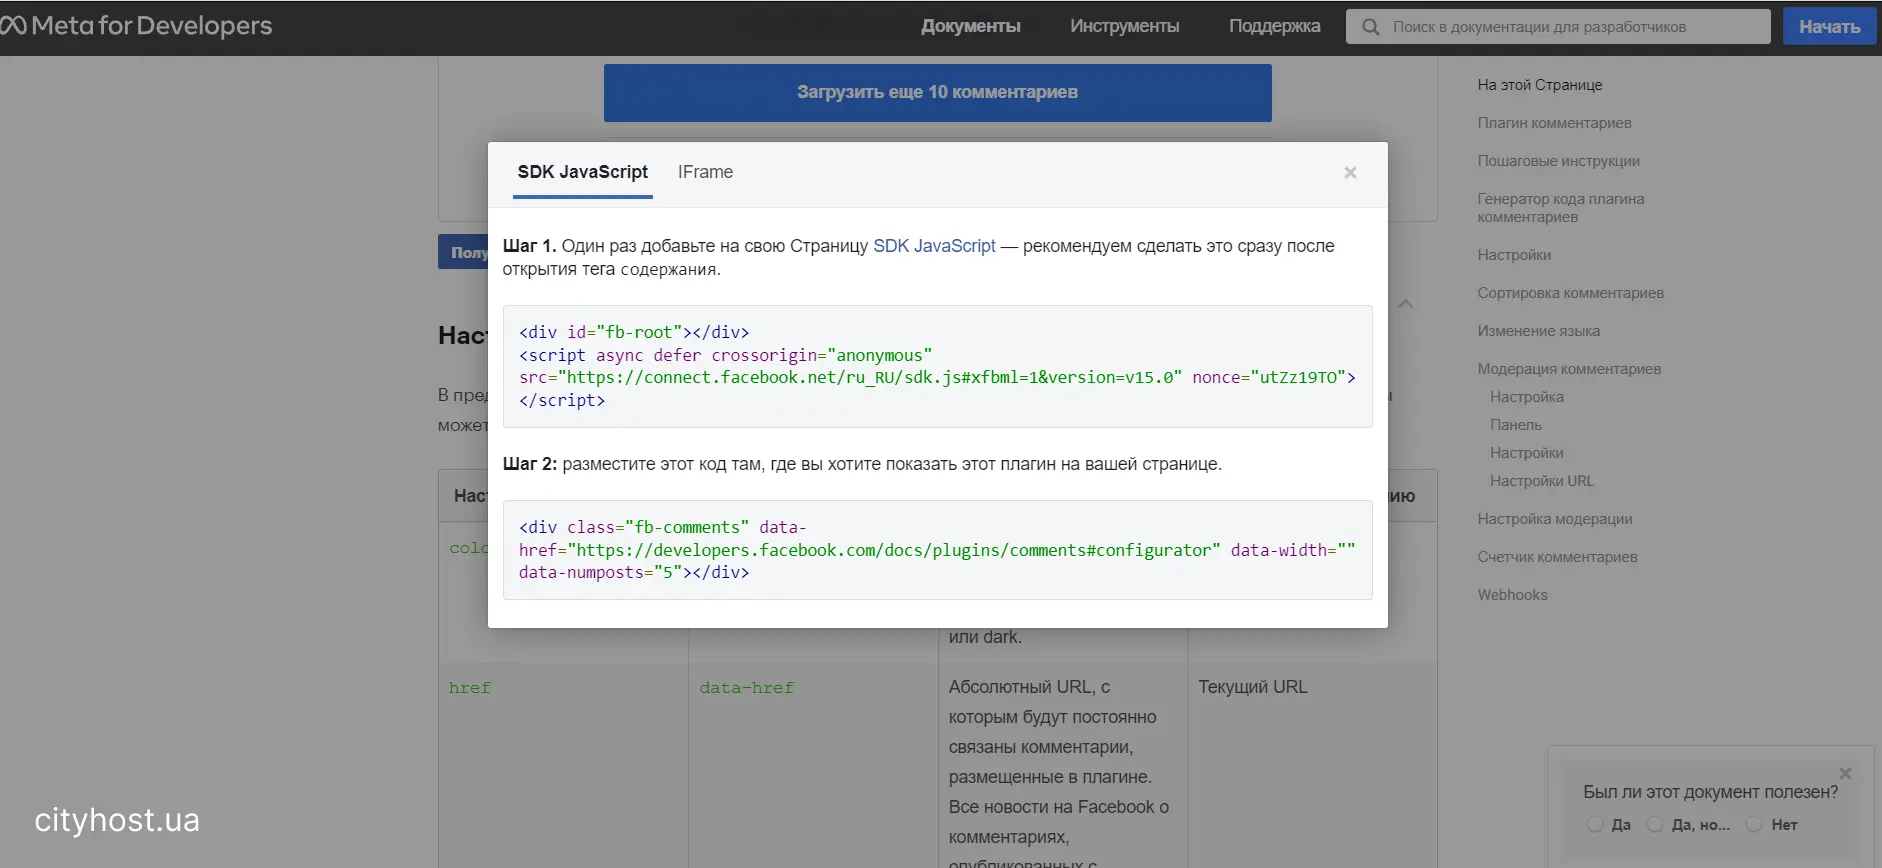
This procedure is described in detail in the step-by-step instructions for installing the Facebook comments plugin . It is enough to simply generate the code of the widget and insert it into the code of the site: the first block at the beginning, immediately after the opening of the body tag, the second - in the place on the page that you have chosen for integration. You will also find a description of all possible settings in the instructions.
How to Install Facebook Comments Widget on WordPress
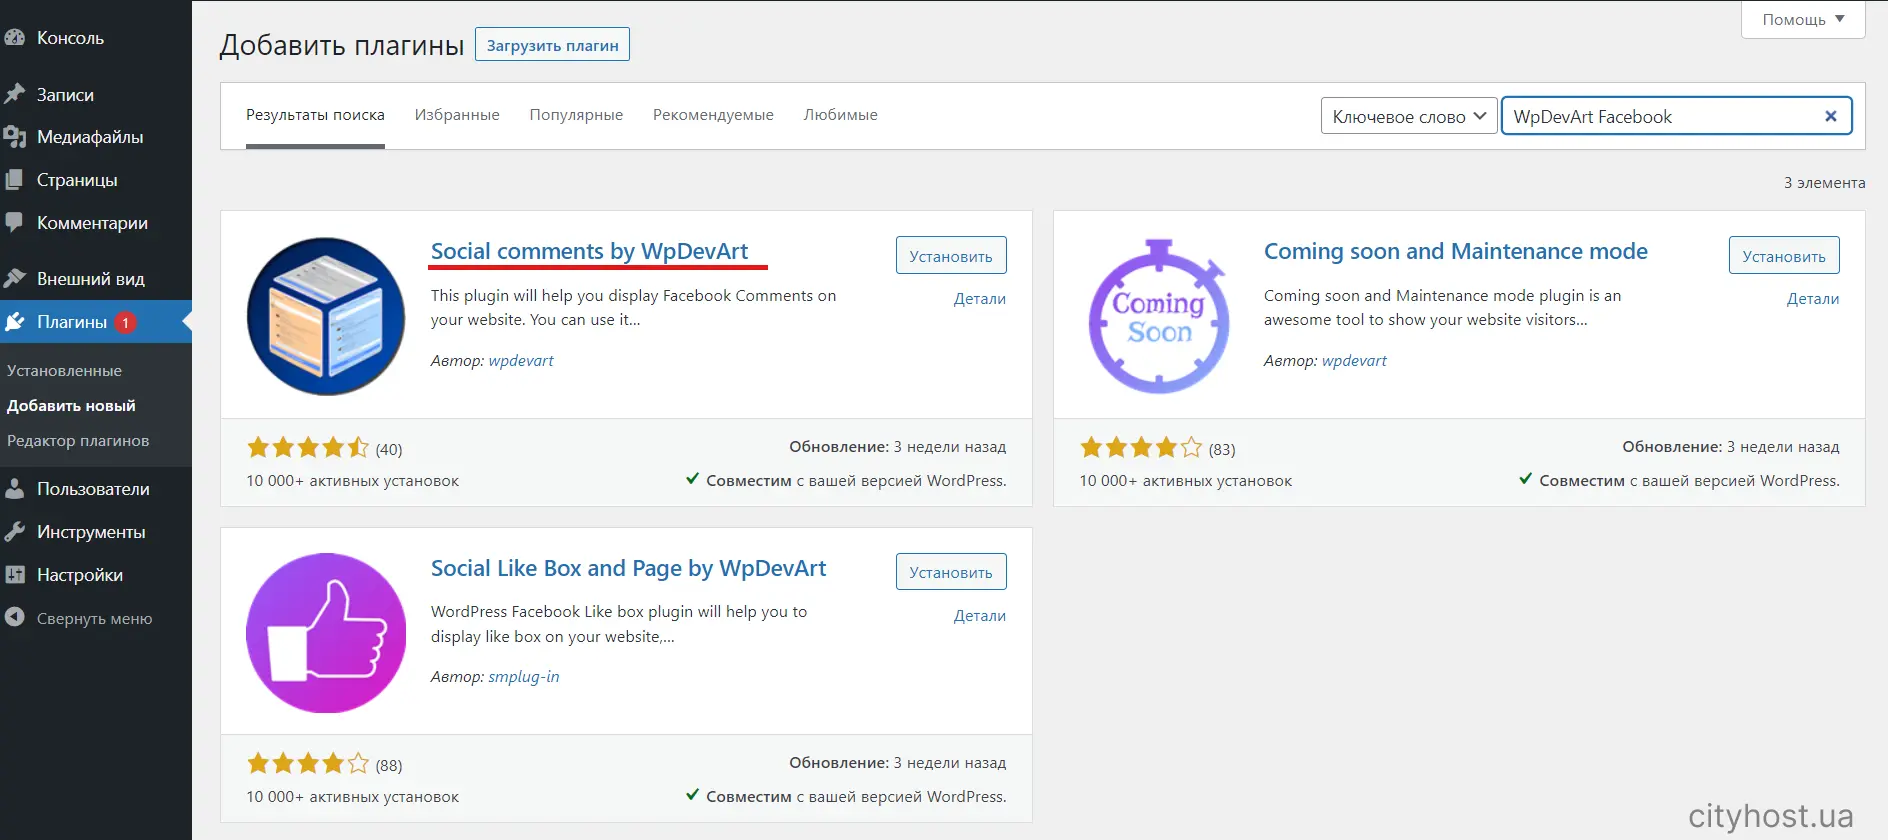
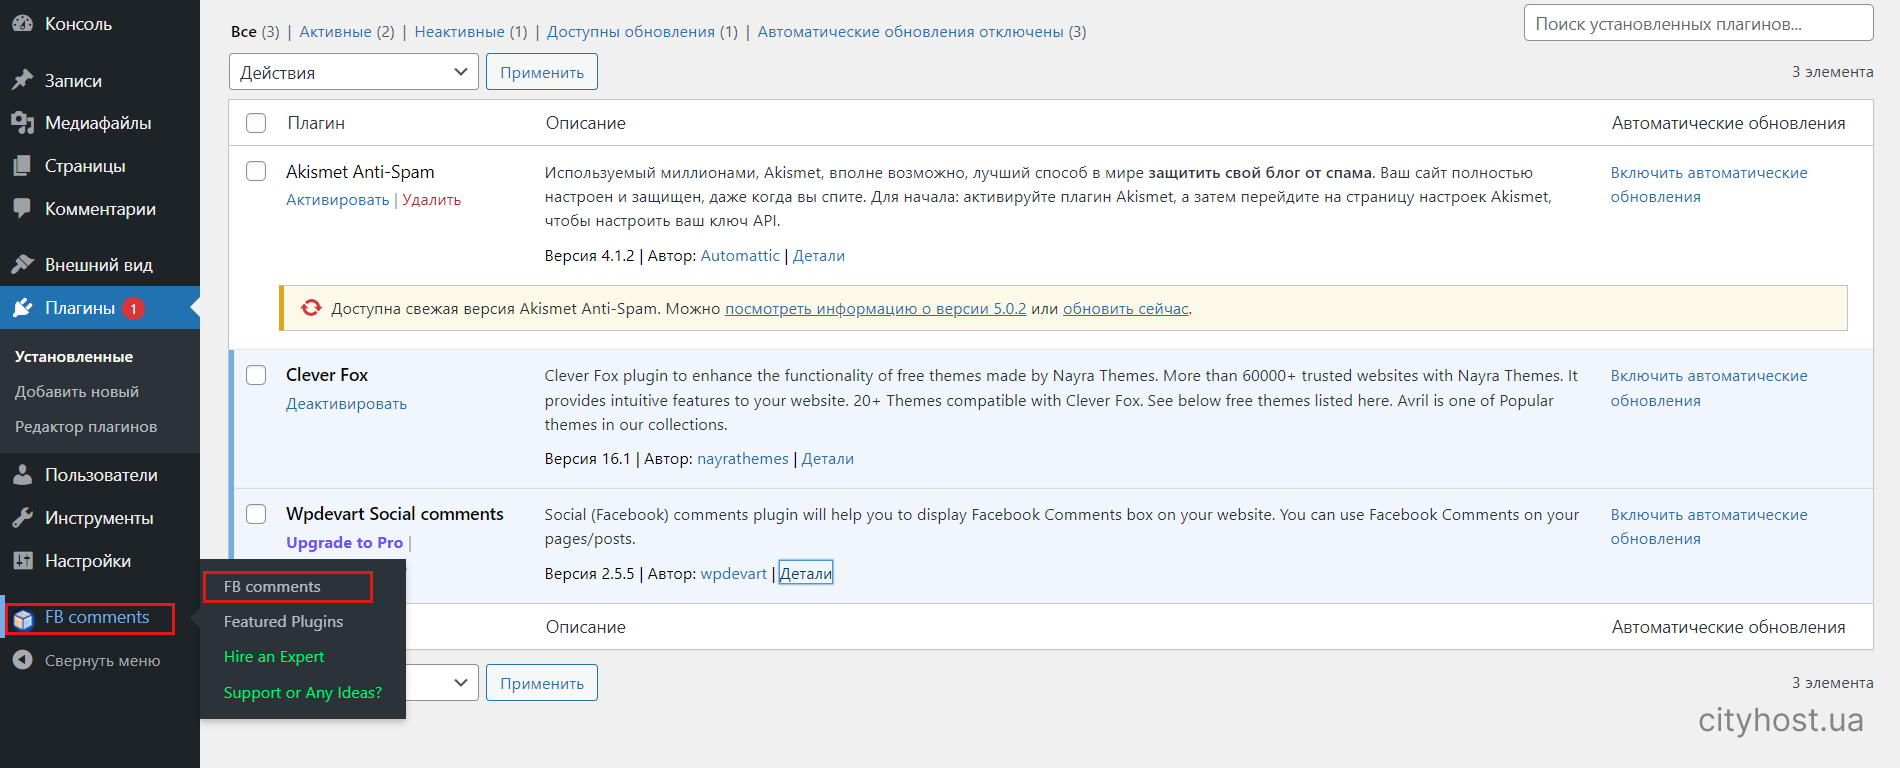
- Go to the plugins section in the admin panel.
Select "Add Plugin" and enter WpDevArt Facebook in the search bar. Install and activate it.
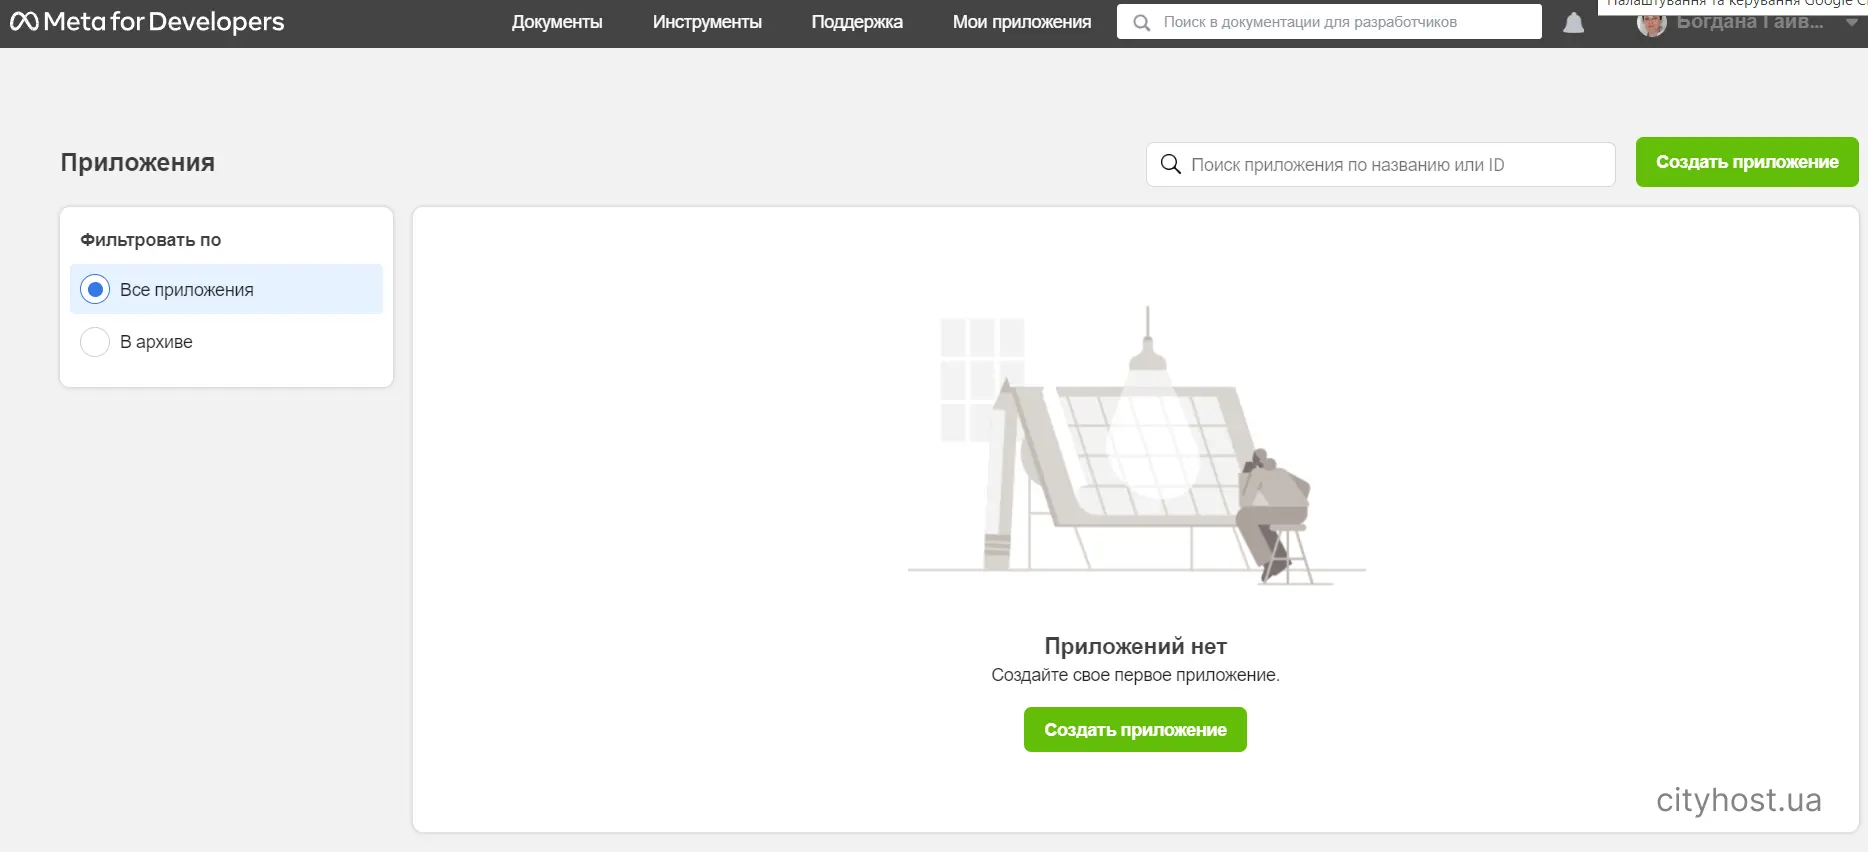
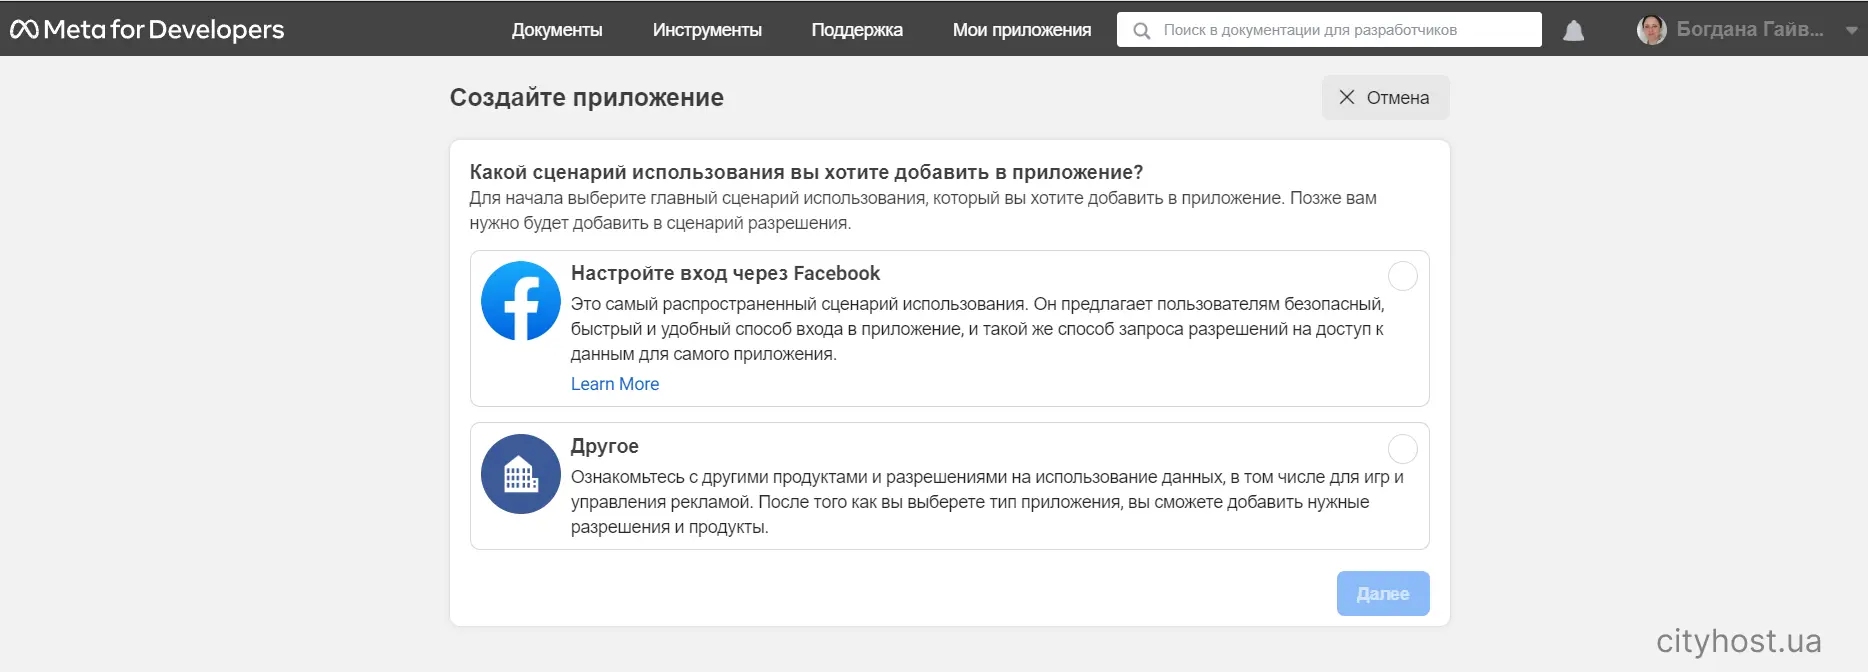
Register in Facebook for Developers and go through the process of creating an application.
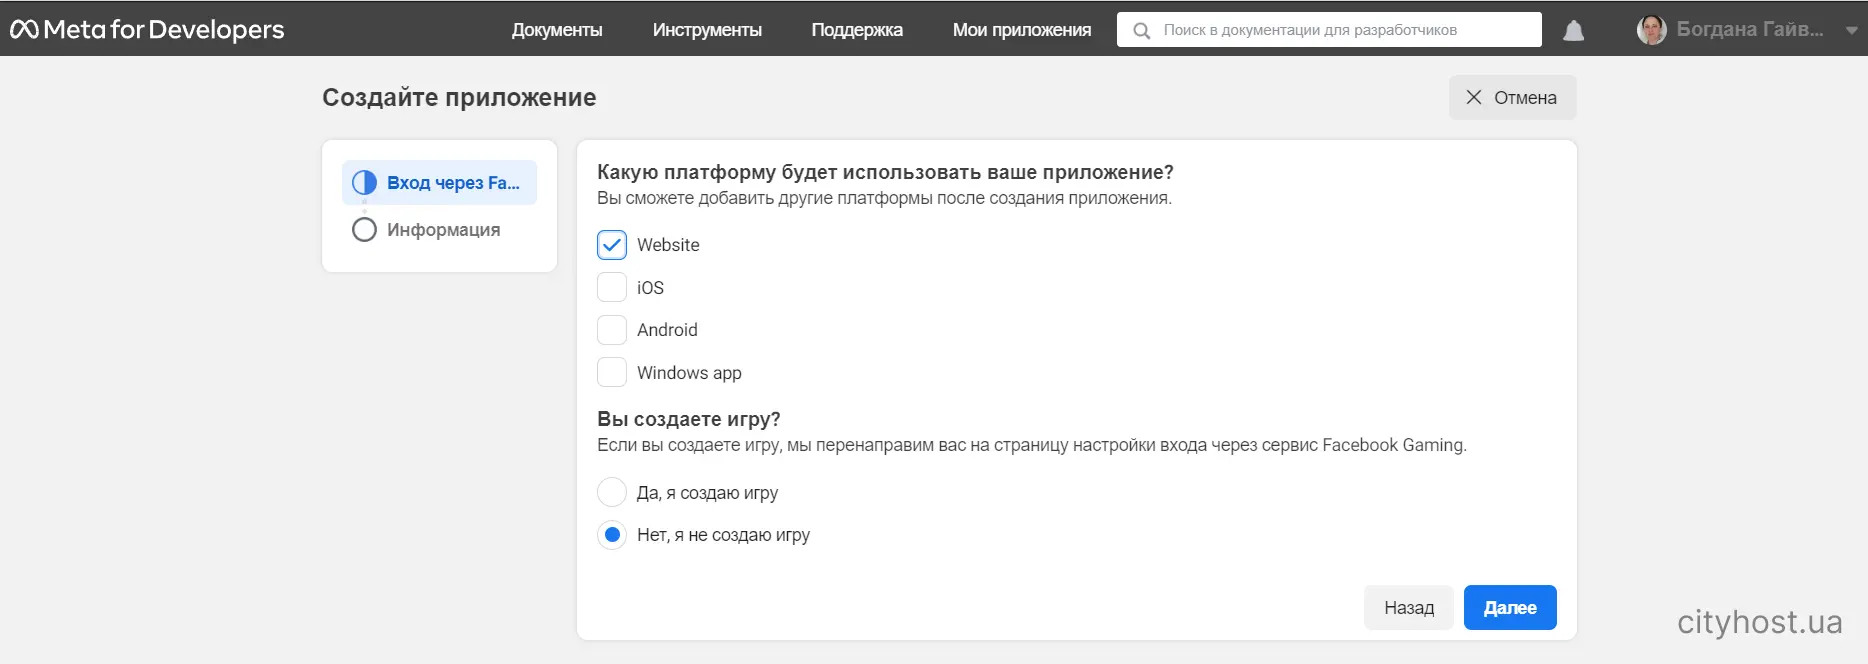
To do this, select the option "Set up login with Facebook".
Select "Website" and "No, I'm not creating a game".
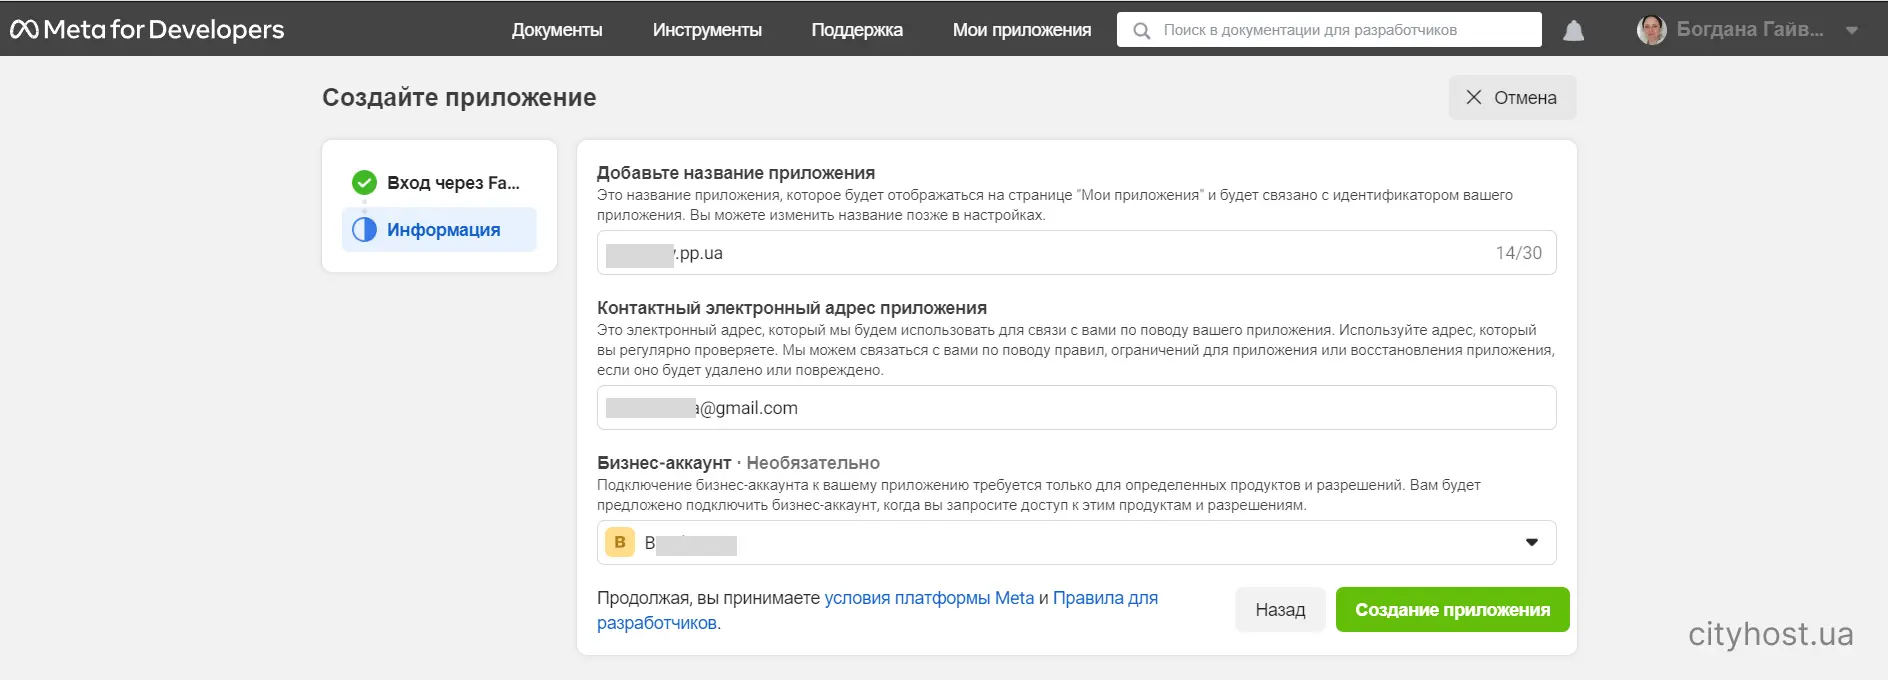
Fill in the fields by specifying the name of the application (you can specify the domain of the site), your email address and your business account (you can choose from the list if you have more than one). Click the "Create application" button.
After that, the system will ask you to enter the password for your Facebook account. After entering it, you will be taken to the developer panel, where you will need to copy the ID. This is done by simply clicking on the numbers.

Return to the site's WP admin panel and go to the plugin settings, which can be found in the left column.
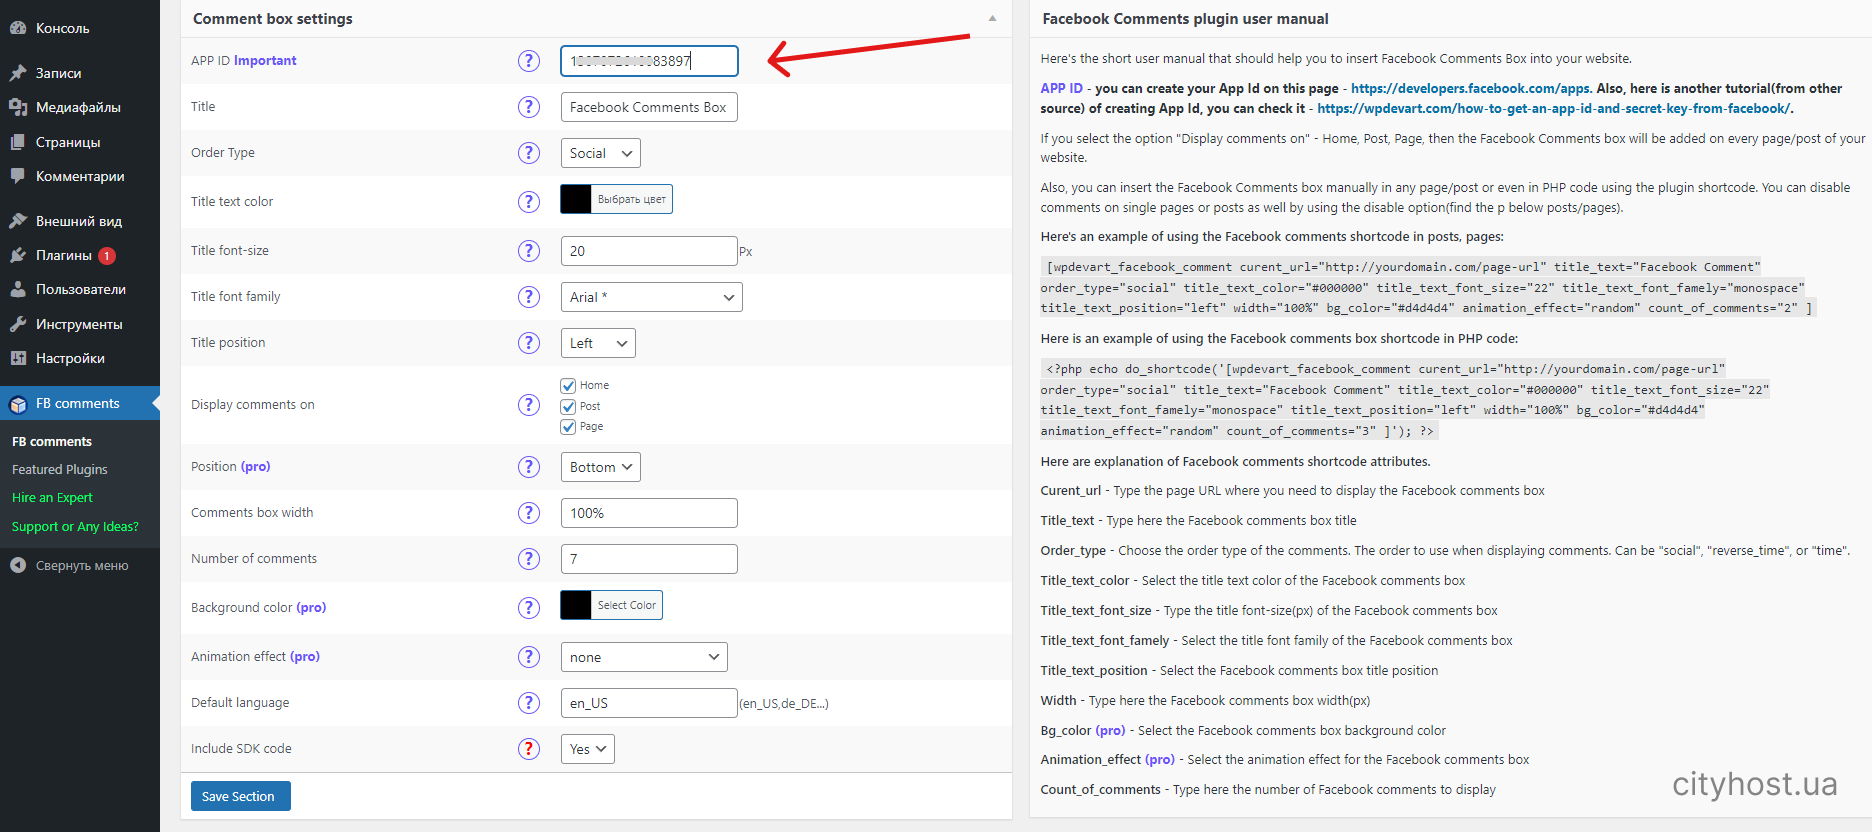
Enter the ID received on Facebook in the APP ID field. You can play with the settings, but even those that are by default are quite suitable for work.
After the whole procedure, we get such a module.
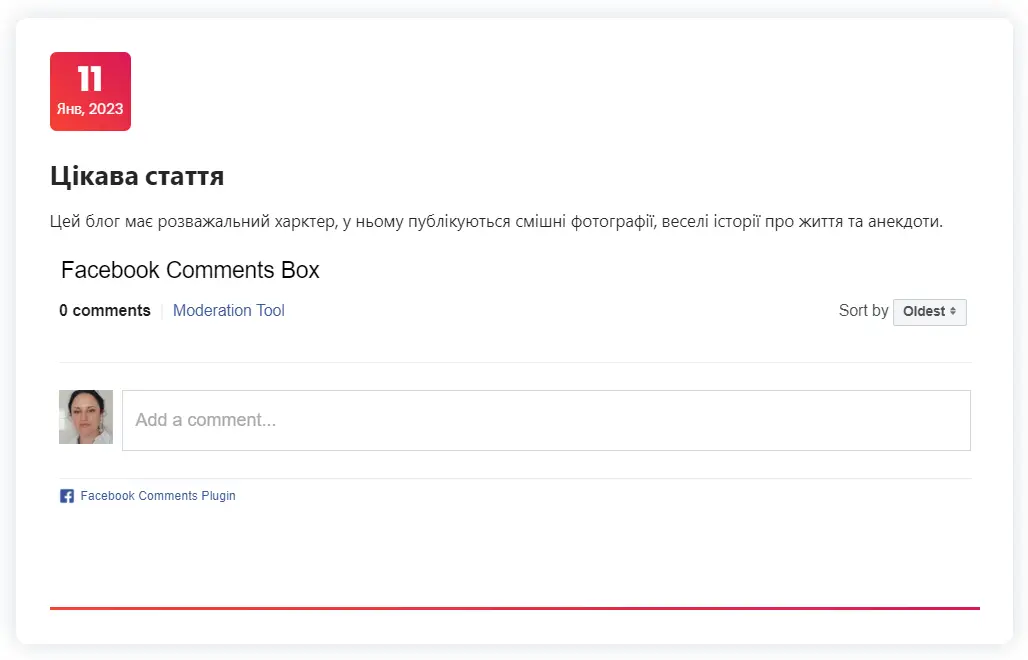
Conclusion: the Facebook widget is installed in several consecutive steps. Newbies may have to figure it out a bit, but in general, the algorithm is understandable even for people with no experience in development.
Read also: How to create a business page on Facebook
Disqus commenting system
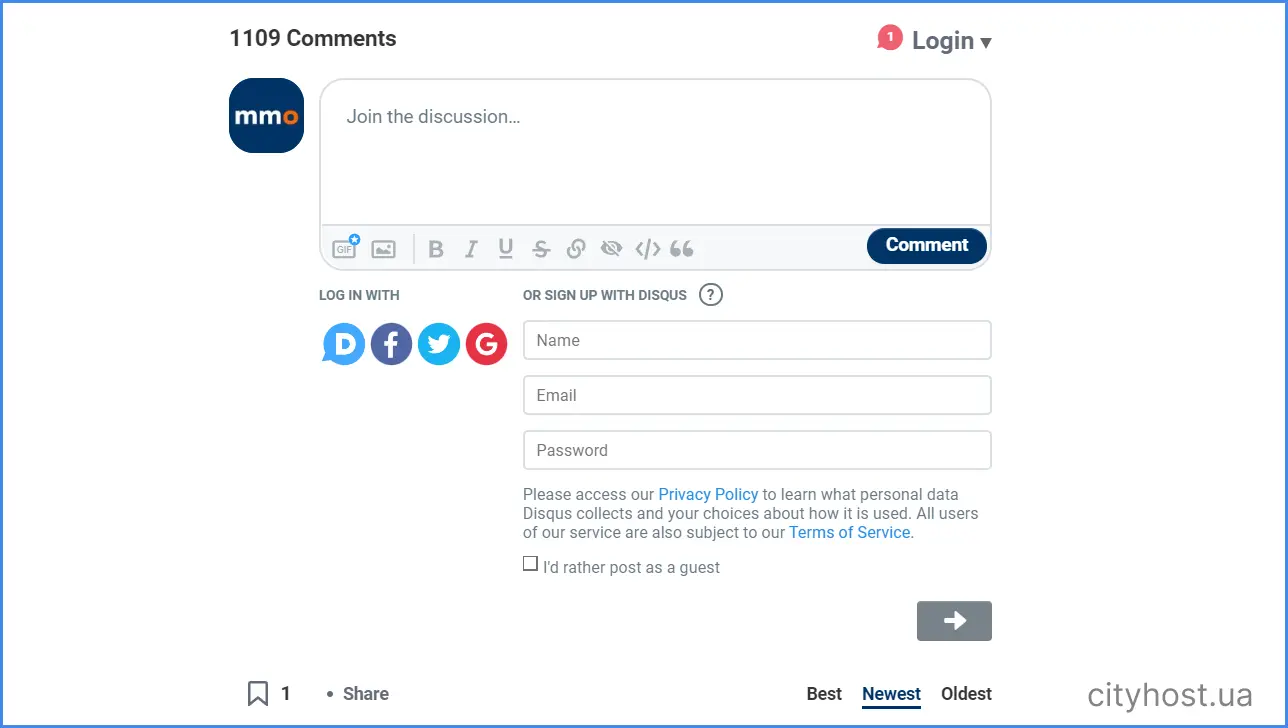
For those who do not want to limit themselves to Facebook users, external services that provide different authorization options for commenting are suitable. One of the most popular platforms is the Discus service, founded in 2007 in San Francisco.
In itself, it is also a social network where you can create an account, follow other commentators, and collect rank badges for commenting activity. The site has a separate page with articles from various sites, which are discussed through the Disqus comment form - you can read them and join.
To comment, you need to log in to Facebook, Twitter or Google, or to Discus itself. There is also an option to write as a guest by checking the "I`d rather post as a guest" checkbox. To do this, you will need to enter your name and e-mail (but let's tell a secret, the e-mail does not always need verification).
In December 2022, Discus was acquired by marketing technology platform Zeta Global. The company's management emphasizes that the system will work according to the rules familiar to users, no significant changes are expected. However, the appearance of a new owner always entails at least small changes in the service policy. For example, some features that slowed down sites connected to Discus have already been fixed.
Advantages of the Disqus widget:
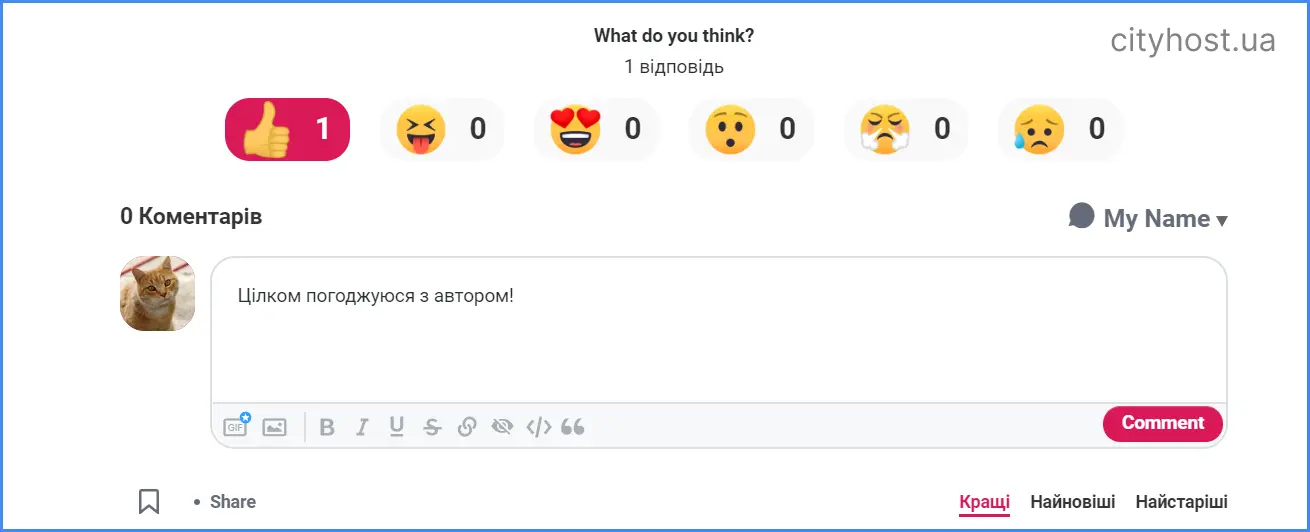
Nice design that can be adapted to the look of the site
There is comment moderation, available directly from the mail. You can also add moderators and create blacklists and whitelists.
You can add media files (photos, videos) to the comment.
It is possible to import old comments to the new site.
From one Disqus account, you can make widgets for several sites at once.
The platform has analysis tools that allow you to track the overall activity of commentators on the site.
When connected to WordPress, it automatically disables embedded comments. This is a big plus, because, for example, the Facebook widget exists in parallel with the built-in comment system (users see two windows at once). You need to disable built-in commenting yourself. For this, you often have to install another plugin.
There is an option not only to write comments, but also to post reactions to the article itself.
Disadvantages of Disqus:
On the free plan, the service will be advertised on your website. The budget tariff for $11 is available for sites with up to 50 thousand visitors per month, and the full tariff for web resources with more active traffic costs already $100. Agree, paying a hundred dollars just for a widget with comments, considering that there are also good free offers, is a bit unprofitable.
Disqus significantly loads the site, increases the number of server resources and makes many requests to the server.
Many tracking trackers that also load the site and also collect information.
But, as we said, Disqus recently changed hands, so let's hope that the shortcomings of the system will be at least partially eliminated.
How to add Disqus to html
To begin with, you need to create an account on Disqus - this is done in the same way as in any other social network, the procedure is intuitive, so we will not dwell on it for a long time.
At the top, under Your sites, add a site to integrate the widget. Be sure to select a category, otherwise the system will not let you continue.
In the left panel, click the Installation button, and you will see a window with various options for installing the plugin. To work with html, you need to scroll down and click the "I don't see my platform listed, install manually with Universal Code" button.

A page with step-by-step instructions for installing the code on the site will open before you. First, you will need to copy a large block of code and paste it on the site in the part where you plan to place the widget.
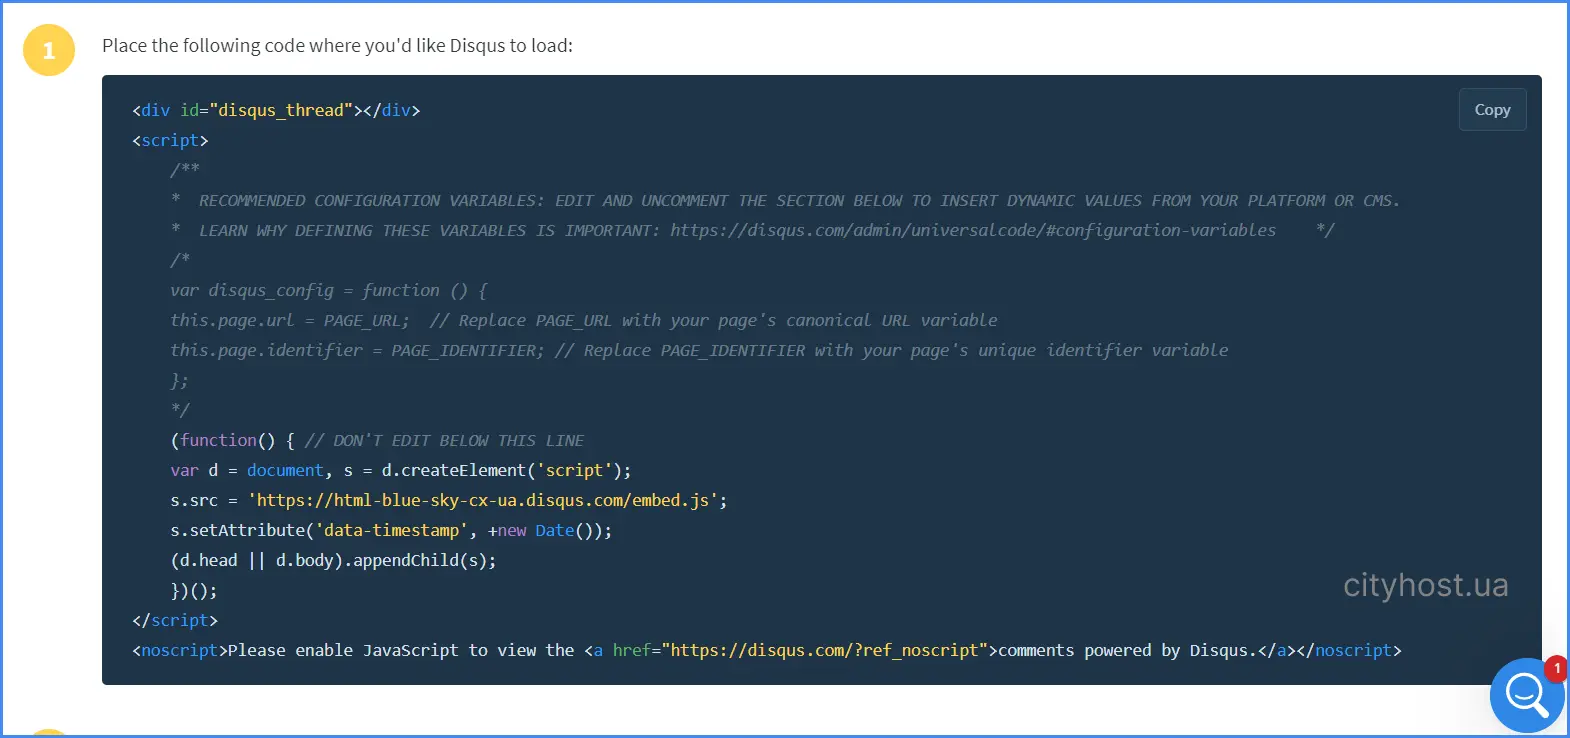
Below is another piece of code to insert into index.html before the closing body tag.

If something is unclear, follow the hints on the integration page.
How to add Disqus to a WordPress site
Dicqus can be installed on WordPress as well as Joomla and Drupal.
The widget is added to the WP site in a similar way as the Facebook widget: you need to install the plugin and associate it with the account.
If you don't have a Disqus account yet, create one and add the site domain on which you want to place the widget through the Your sites tab.
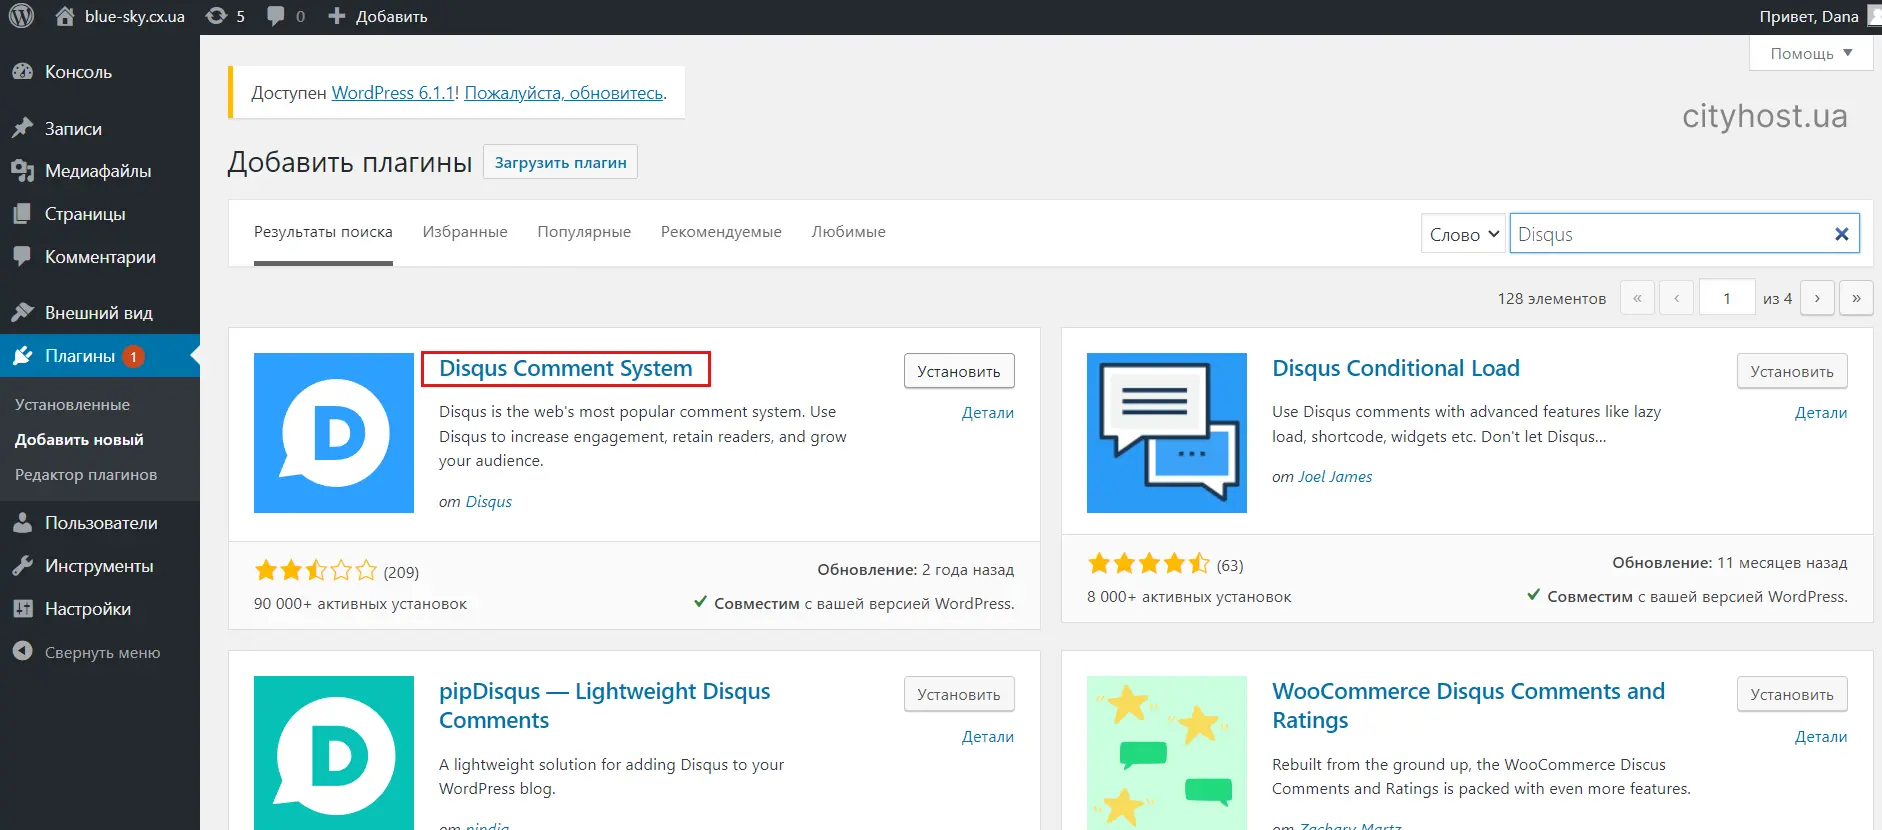
Find Disqus in the plugin store, install and activate it.
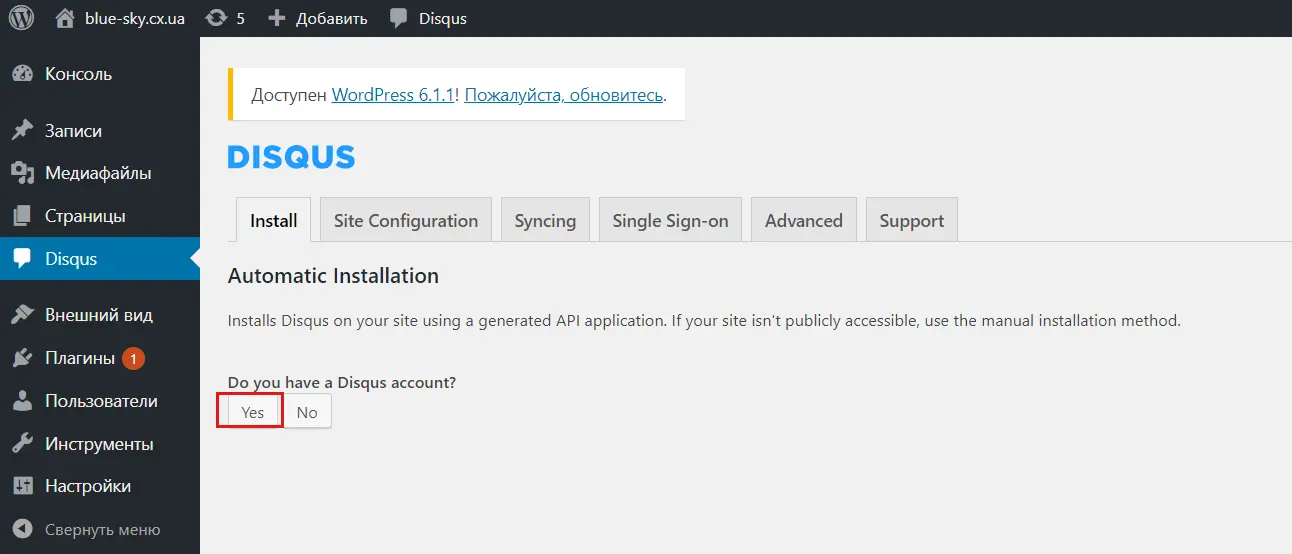
A section with a widget will appear in the left panel, where in the Install tab the system will ask if you have a Disqus account - click YES.
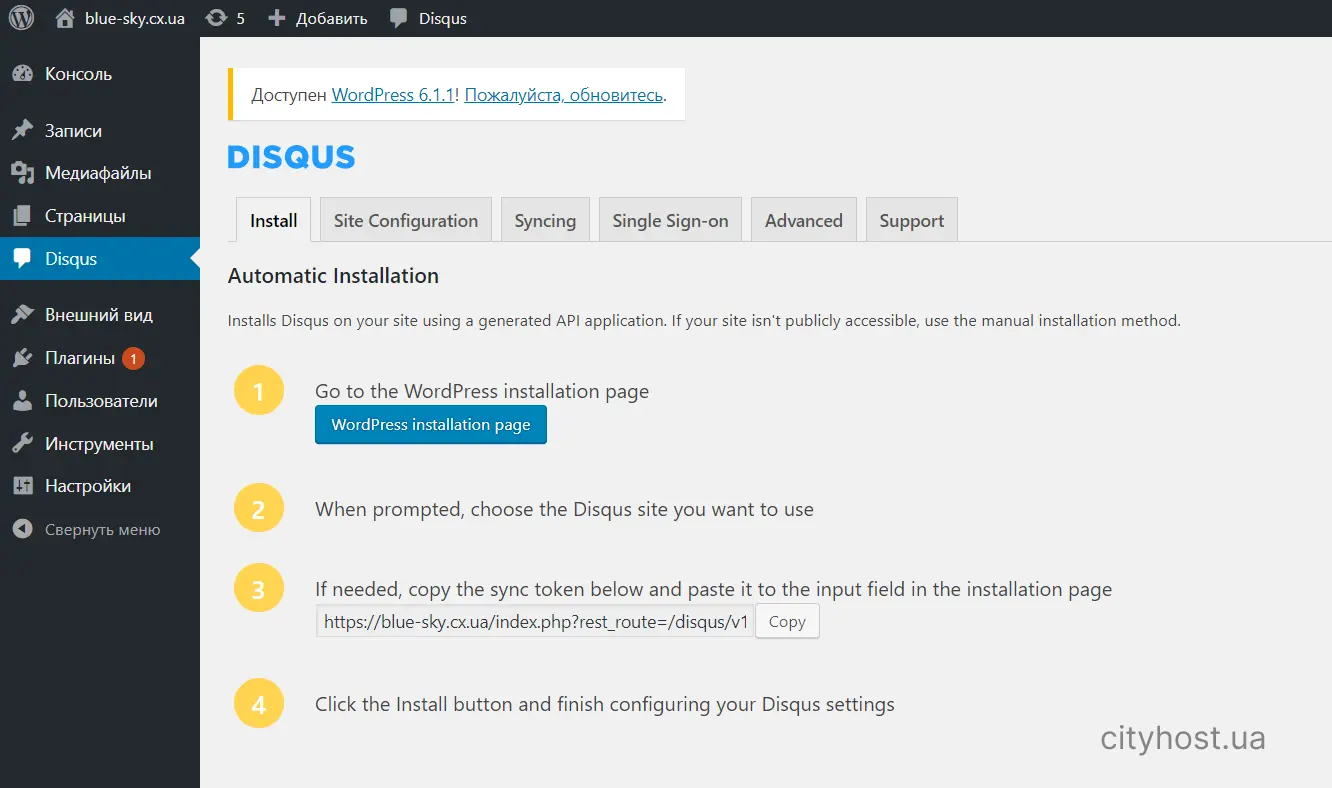
After that, a window with four installation steps will be displayed. Copy the link from point #3 and click on the button in the first point.
You will be redirected to the Disqus site, where you will need to enter the copied code and click the "Install (domain) on your site" button.
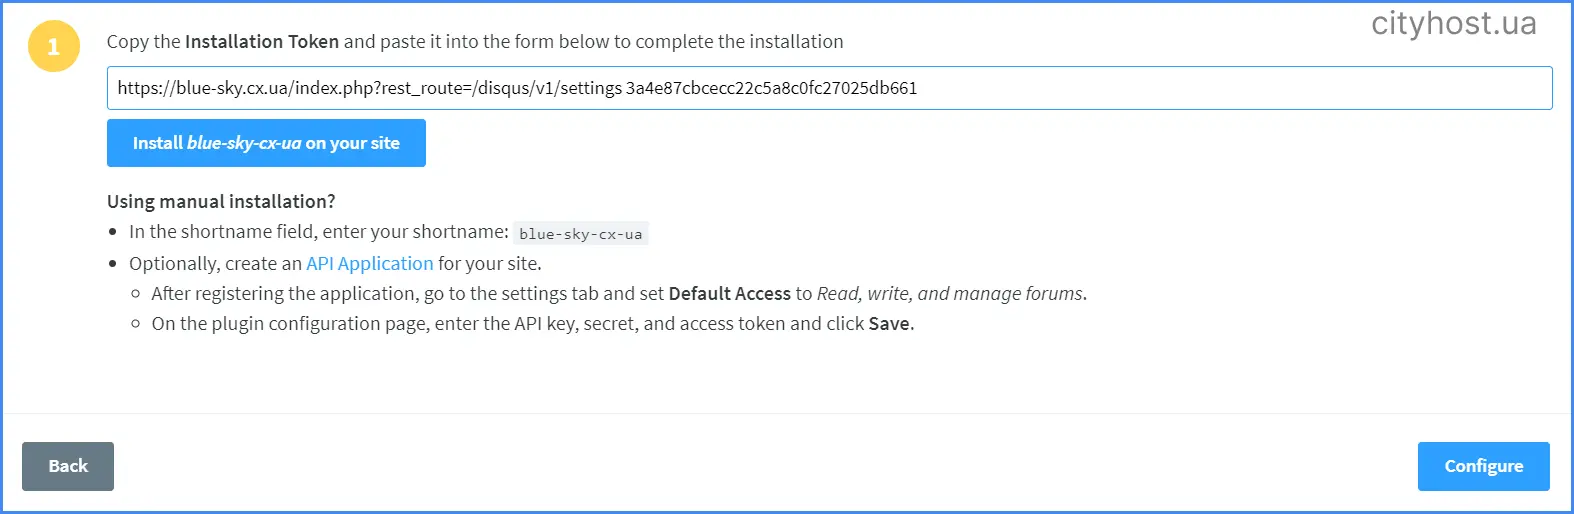
In the next step, you will need to click Configure and fill in the fields in the form with the settings.
Next, you will see an offer to choose one of two comment moderation options — Balanced or Strict. The balanced option is quite suitable for ordinary needs. You can change the settings later if necessary. Select the Balanced block and click the Complete Setup button. After that, a working widget will immediately appear on the site.
Conclusions: The Disqus commenting system is easier to integrate than Facebook and has more features in the basic package. But at the same time, it has a number of systemic shortcomings that force webmasters to look for alternatives.
Commento
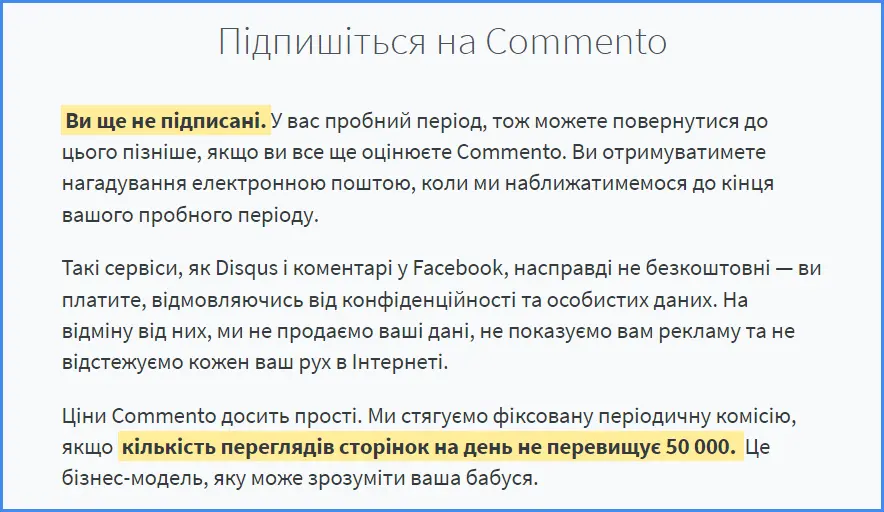
This system was created precisely as an alternative to Disqus and Facebook. No one even hides this - the owners of the company themselves say that, unlike their competitors, they do not collect personal data. However, this advantage is offset by the actual absence of a free version — there is only a trial period.
A subscription to Commento services costs $10 per month or $99 per year at the time of writing. There is only one tariff.
But! Commento is an open source platform, so it is possible to use it for free by hosting it on your own dedicated server or VDS . To do this, use the instructions for placing Commento on the server .
Advantages of the Commento commenting system:
Very easy installation on the site.
It is possible to integrate comments from other services.
Much less site loading than Disqus.
There are many different functions for commenting — voting for answers, pinning favorite comments, highlighting parts of the text in bold or italics.
Ability to comment anonymously.
The moderator can approve or reject comments directly from the mail.
The service independently monitors and blocks spam comments.
There are tools for analyzing commenting statistics.
Disadvantages of the Commento service:
It is not very clear what tariffs large projects should pay, as this information is not available anywhere on the site.
The widget is not supplied in Ukrainian — only English.
How to add Commento to an html site
The service has a very simple installation algorithm.
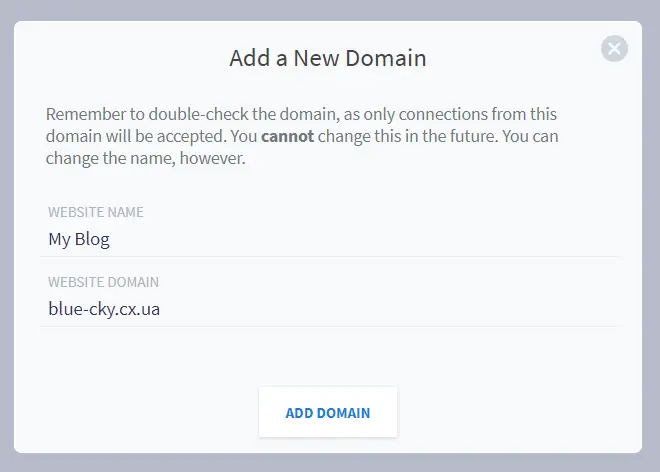
Register an account in Commento and add a site domain.
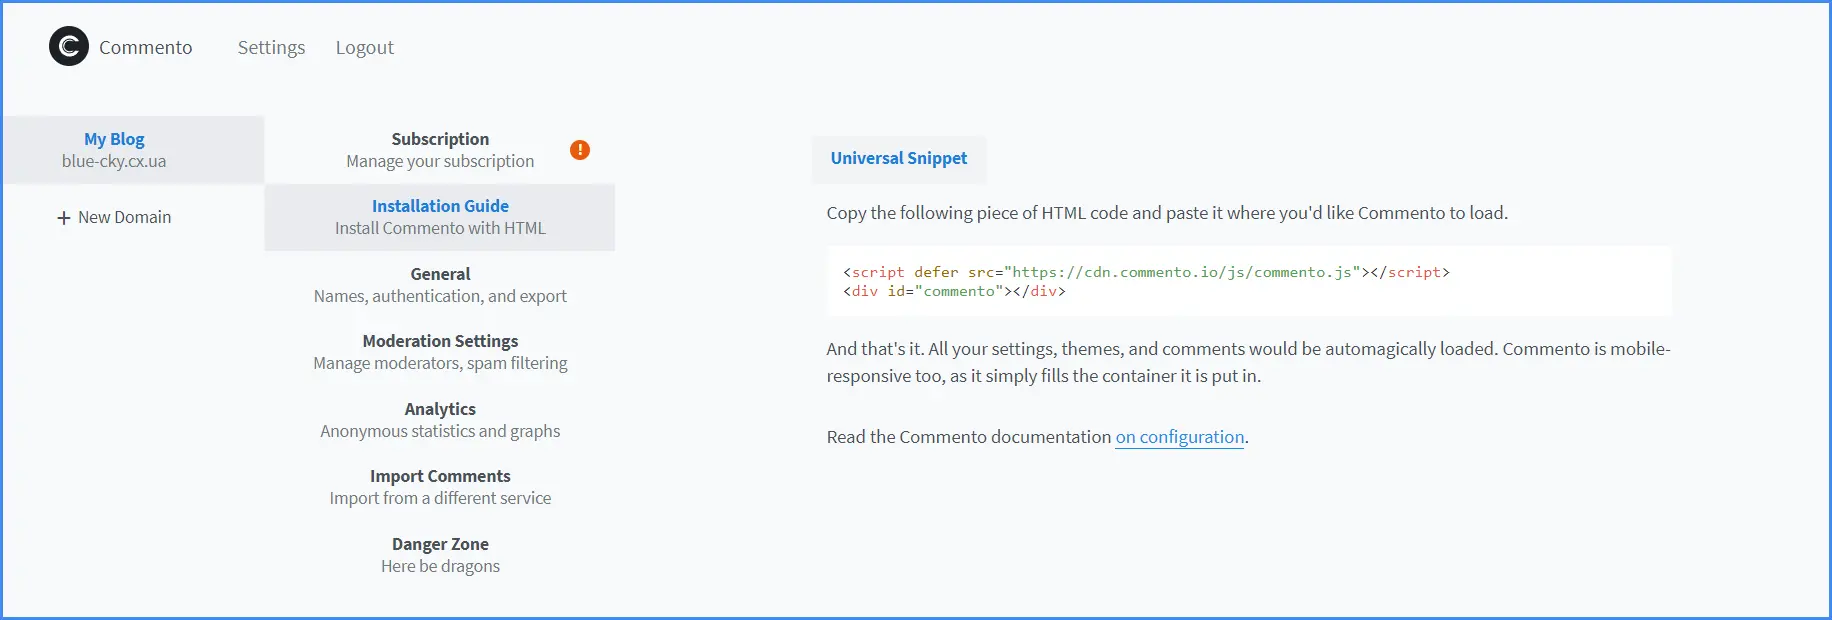
In the Installation Guide section, copy the two lines of code and paste them into the site code where you would like to place the widget.
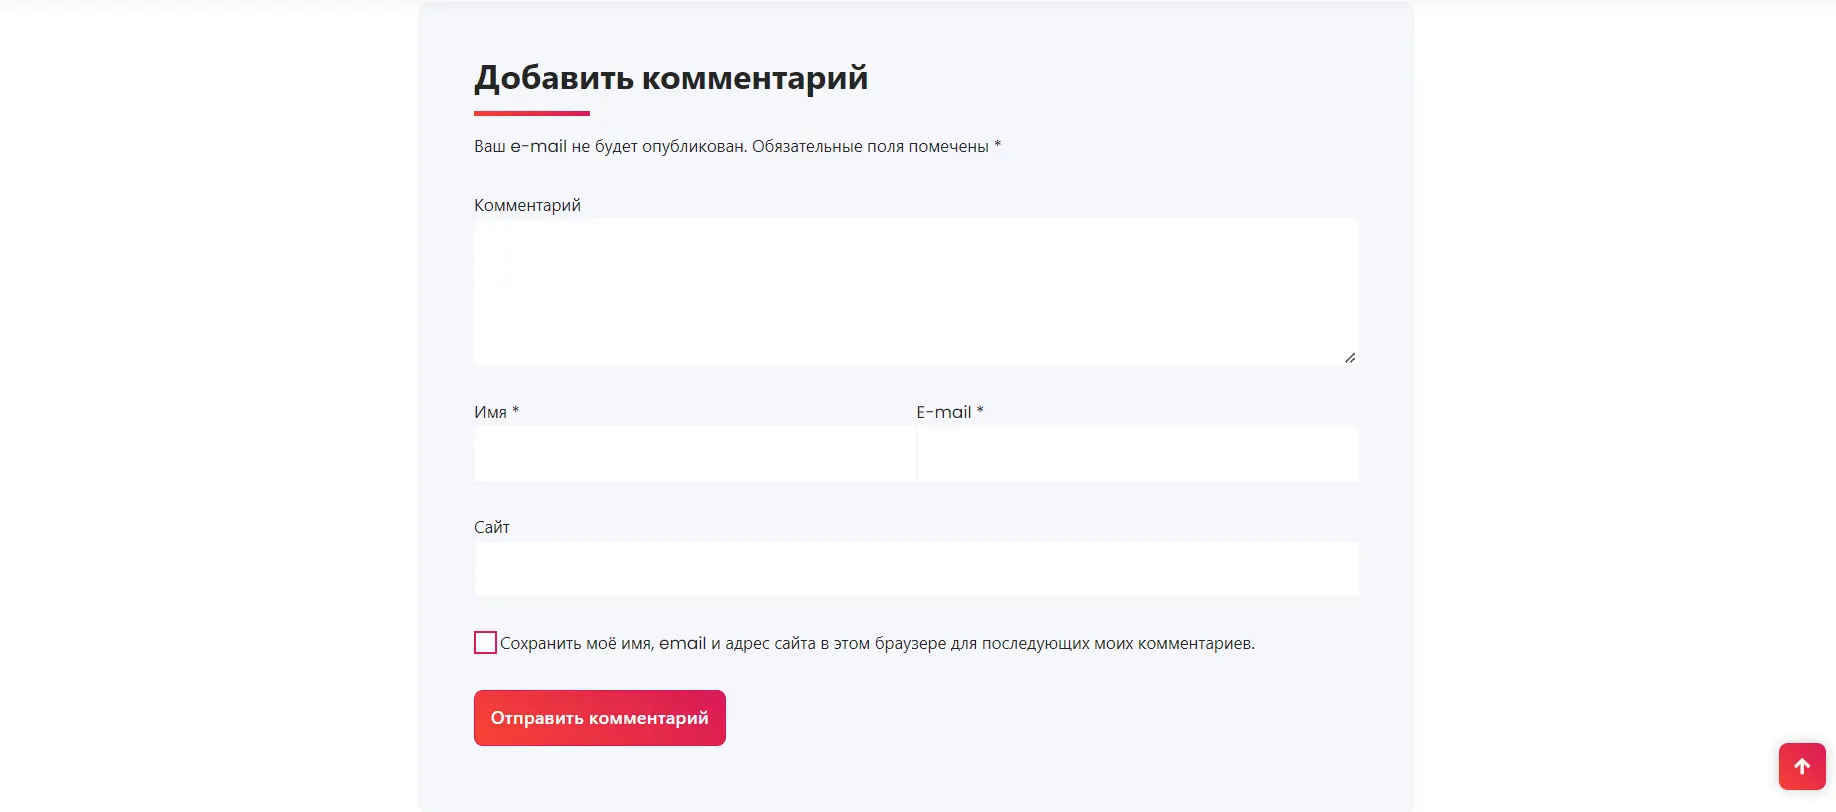
Everything works. If you want to make life easier for users, check the Anonymous Comments option (General section) and remove pre-moderation of comments. Other settings are also available.
How to add Commento to WordPress
There isn't a dedicated plugin for Commento yet, but you can use plugins to insert code and integrate copied lines that way using shortcodes. We tried to insert the widget on the site using the WPCode Lite plugin - it was successful.
If you know the code or have the opportunity to involve a programmer, embed the widget directly in the site files.
Conclusions: Commento is a simple and clear system without unnecessary details that can be integrated in 5 minutes. It requires payment in the cloud version and does not have a simple enough installation algorithm on the CMS for people without knowledge of code. But due to its open source code and the ability to work with it for free on its own server, it will be a good fit for a team that has programmers.
Built-in WordPress plugins
There are many CMS, but since WordPress is the most widespread in the world, let's talk about its built-in capabilities. And they consist in the fact that topics already come with built-in comments, which can be found in the admin panel in the "Settings" - "Discussion" section.
If you're using WordPress, chances are you don't want to install third-party plugins, and instead use the tools available.
The main problem faced by WordPress site owners is the mandatory filling in of the email field for posting a comment, which reduces user activity.
But there are handy themes that allow very flexible customization of embedded comments. For example, the Gradient theme that we used during testing allows you to choose different options for this option. After removing the "bird" from the "Comment author must specify name and e-mail" checkbox, you get a form in which only the comment itself is required, and all other fields can be left empty. Thanks to this, you can get more interaction, because users will not strain once more.
But we must warn you that such a policy has a downside — spambots can hunt your comment forms. Too simple an interaction is like an invitation to them. If you also disable manual pre-moderation of comments, you can get a site full of spam. So choose for yourself which options are better to leave.
You can disable comments in WordPress by unchecking the "Allow comments" checkbox.
Pros of built-in plugins with comments:
They are already there, and there is no need to install anything additionally.
Many themes have a wide range of settings.
The database with comments is not stored on third-party services, as in all previous cases, but on your hosting .
Cons of the built-in WordPress plugin:
It has an outdated look, which is why readers often ignore it.
There are no additional options — liking the post itself and other users' comments, sorting comments. Actually, nothing except the comment itself.
It is not possible to disable comments in all topics, that is why there is a Disable comments plugin. With its help, you can exclude commenting or close comments from search robots.
***
We looked at the four most popular options for connecting comment widgets to the site. Each of them has its pros and cons, but the main thing is that each of them creates additional opportunities for the development of the community around your company and promotion of the site in the search engine.
Read also: TOP 10 SEO and link building tips for 2023
The article uses materials from sources: