This article will be of interest to novice users who are taking their first steps in the world of WP. Wordpress is convenient in that it is well suited for installing affordable hosting . So, it is the #1 choice for a beginner webmaster.
There are two ways to post a post on a Wordpress page. You can add it in the new or old editor. Let's consider both of these options.
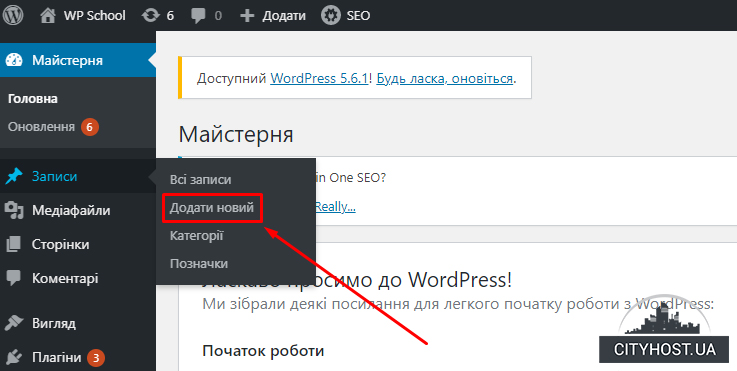
Whichever editor you choose, you will have to work through the admin panel. Here you find the option "Record", then - "Add". If you have a custom dropdown menu, you can use this method.
How to add an entry on a Wordpress page in the new editor?
The name of the new editor is Gutenberg. It is installed on WP versions starting from 5.0.
After you select Add New Record, the tab will display:
2. Text - the article is placed in this field.
3. Status - the publication date is set here.
4. Tags - here we place tags that help find your article.
5. Image - here we place a picture related to the publication.
6. Heading - here you can assign the entry to one of the site's headings.
7. Excerpt - a short description of the article can be placed here.
8. Discussion - this option should be activated if you want readers to leave comments.
9. Publish - after pressing this key, others will be able to see the recording.
10. Preview - here you can see how the recording will be displayed in the browser.
A few useful options you can use in the Text section:
- paragraph - here you can choose style settings;
- H - header format;
- quote - part of the text is displayed as a quote.
We recommend setting up all text parameters before placing it on the site.
To add formatting elements to the text, go to "Paragraph", + add the necessary elements.
When the text is placed, we add the image. We recommend that you do this without fail. Pictures attract the attention of readers. Go to the "Images" tab, select "Set Image". The file is downloaded from the computer. You can select a photo through the Explorer or drag the desired picture from any open folder. When the download is complete, click Install Image. We put a checkmark opposite the desired heading, select the "Publish" option.
How to add entries to a Wordpress page in the old editor?
2. The text is the main section in which the article itself will be located. Here is the toolbar for formatting the record.
3. Publish - the field is intended for publishing a post.
4. Rubrics - you can assign the article to one of the rubrics with the help of a check mark.
5. Tags - tags are published here to help find the record.
6. Image - in this section you can add a picture.
At first glance, the old editor resembles the new one, but there may be some differences in the formatting of the record. I will give an example. To format the text in the old editor, select part of the record. Using the formatting tools, add edits. If you want to add multimedia content to the text, you can use the same panel. After downloading, you will see a small display of the image. To post it, click on the image, select the "Insert" option.
To add a picture to the file, select the "Image" option, add "Set Image". An explorer window will open. Select "Add files" and "Install image". If everything is done correctly, the entry will appear.
Now you can answer the question of how to add a record to a certain Wordpress page. The only thing left is to consolidate the acquired knowledge in practice. If there are any unclear points, indicate them in the comments.