Today, Wordpress is one of the most popular platforms for creating websites. After all, it is absolutely free (you only need to pay for hosting and the domain of the site).
More than 28% of web resources on the network work on Wordpress. More than 45 thousand additions have been created for it. And about the same number of templates. True, most of them are in English. But since the platform is used all over the world, many people have a question: how to transfer a site to Wordpress?
This can be implemented in various ways. In this article, we will consider two simple and convenient solutions. The first is using the PoEdit tool. And the second - with the help of the Loco Translate plugin.
Translation of the site to Wordpress using the PoEdit tool
The PoEdit application works with two file formats: .po and .mo. It is often used to convert a site to Wordpress. A free version is available on the developers' website, the functionality of which is quite sufficient. Although there is a paid option with a large number of functions.
Changing the language on Wordpress using PoEdit is performed in several stages. Let's consider them in more detail.
1. Check the theme
First of all, you need to make sure that the chosen topic can be translated. This possibility is indicated by the phrase "translation-ready" in the description. Most premium templates are ready for translation, although it all depends on the specific developer.
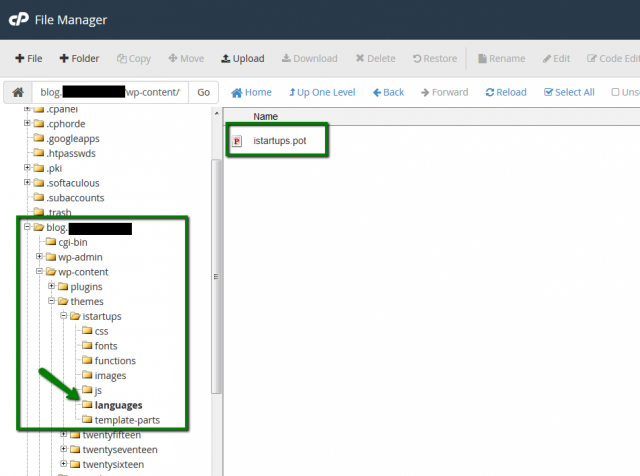
2. Locate the .POT file
For further work, you need to find and save the .POT file on your PC. It is located in the path: /wp-content/themes/template_name/language.
What are .POT files? They are needed for translation because they contain the entire text. Two files are most important:
- .PO – is responsible for the translation of the text, saves the original and the edited version;
- .MO – stores the code of the machine version of the previous file.
3. Start PoEdit
Download the program from the official website of the developers and install it on your PC. Then follow the simple instruction:
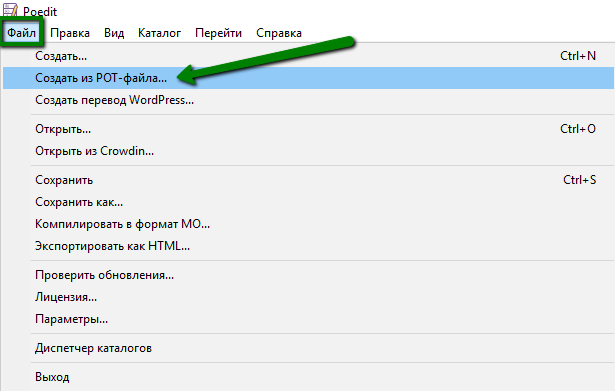
- Open the program.
- Select "File" - "Create from .POT file" and select the file saved earlier.
- Select the language into which you want to translate the site.
- Start translating the topic in the program interface. The working window will be divided into 2 parts: on the left - the original text, on the right - Russian translation options.
- Look at the original text and write the text in Russian in the "Translation" field (at the bottom of the editor).
- When finished, click the "Save" button. The new file is saved to the same location as the original .POT file.
- Find the files ru_RU.po and ru_RU.mo. Then drop them into the "Language" folder where the original file is located.
4. Install a new theme
After the manipulations, you need to choose which language version of the theme to use.
For this you should:
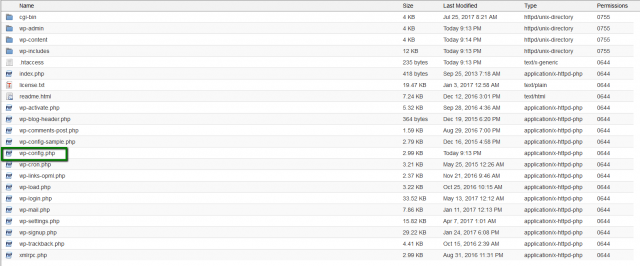
- Find the file wp-config.php in the root folder of the site.
- Add code: define ('WPLANG', 'ru_RU');
- Save the file.
done From now on, the Wordpress theme will be completely in Russian. But keep in mind that some phrases may remain untranslated. This happens if they were not specified in the original .POT file. That is, only those constructions that you specified in the PoEdit program will be translated.
Some phrases are written in the source file of the design theme. And you can translate them only by editing the code of the files of this template.
Changing the language on Wordpress with the Loco Translate plugin
The Loco Translate plugin is considered a simpler and more convenient option for website translation. No need to download third-party programs like PoEdit - just install the extension.
The appropriate functionality will appear in the admin panel, with the help of which you can perform the necessary actions.
So, what is needed to translate a site to Wordpress:
- Download and install the plugin.
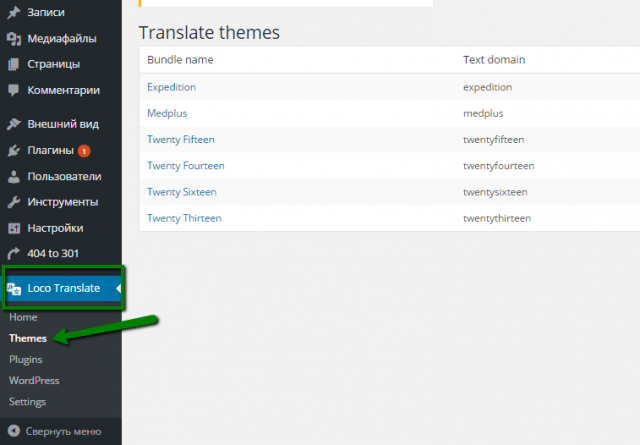
- Go to the Loco Translate – Themes menu and select the current template.
- Click on the "New language" button, select the Russian language and click on "Start Translating".
Next, approximately the same working window as in PoEdit will appear, where you need to manually translate all designs into Russian. After finishing work, be sure to click the "Save" button.
Results
Now you know how to change the language on Wordpress. What to use - a program or a site translation plugin - decide for yourself. The second method is a little easier, although the main part of the work remains the same. Yes, you will have to manually translate all the designs, but what can you do. But then the topic will be completely in Russian, and you will be able to work with it without experiencing any difficulties.