Activation of Node.js functionality on hosting
This article describes the operation of Node.js functionality on virtual hosting. The article is divided into 3 parts - start-up, management and basic principles of operation. In case of problems with the operation of the project on Node.js, make sure that all the basic conditions and principles described below in this article are met.
An example of launching a test project is shown in the instructions ? [link]
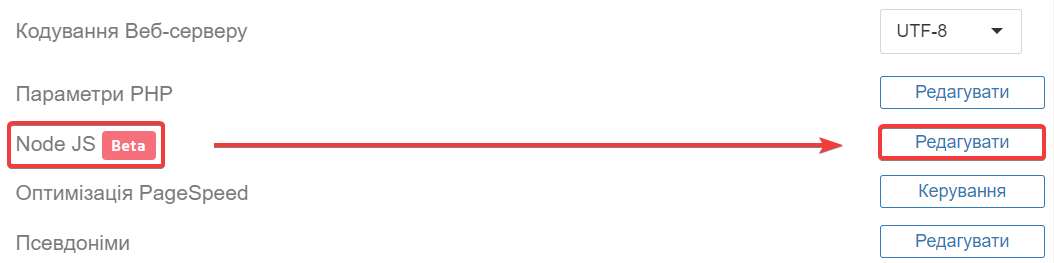
1) To activate the Node.js functionality, you need to go to the hosting control panel , where on the tab of the desired site, click the Edit button opposite Node JS [beta]
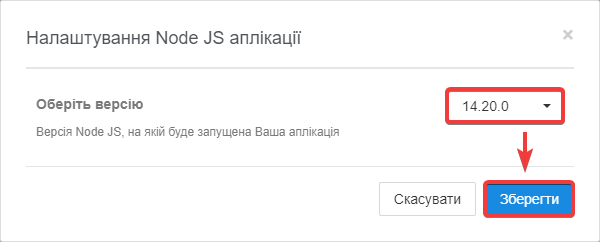
2) If the functionality was not activated before, the system will offer you to choose the version of Node.js on which your project will work. At this point, we recommend that you refer to your application's documentation to select the correct version. Select the version on and click the Save button.
3) After activation, you will see the Node.js functionality control panel. You will see ready-made instructions and detailed instructions on how to proceed, according to which you will be able to launch your own Node.js project.
Management of functionality
The project is restarted and stopped using the Restart or Stop buttons.

You can completely stop the project using the Disable button. The same functionality can be used to change the version of Node.js.

Pay attention to the important points!
After deploying the project in the root folder of the site, you need to execute the npm install command to download all the software dependencies/modules of your project from the repositories. Without this step, the project will run with errors or simply not load.
It is important to direct your project not to a port, but to a socket. In the project files, use the global variable default.env.port , which always refers to the correct socket.
You need to reload the project in case of making program changes to the project, for example after executing npm install
Apache/php functionality is not available on the site while the Node.js functionality is running. You can switch between Node.js and Apache/php by clicking the Disable button.
After the activation of the functionality, the files necessary for the operation of the project will be added to your hosting — the Node.js backend of the selected version and software dependencies/modules. These files are located in the .nvm and .npm directories in the root of the hosting.
If there is no free space/inod on the hosting OR malicious code is found on the hosting at the time of activation of the feature, the feature will not be activated until the problem is resolved.
Node.js functionality is in beta. In case of errors in the work, please report them to technical support
More details 1) To activate the Node.js functionality, you need to go to the hosting control panel, where on the tab of the desired site, click the Edit button opposite Node JS [beta] 2) If the functionality has not been activated before, the system will offer you to choose the version of Node.js on which it will work Your project. At this point, we recommend that you refer to your application's documentation to select the correct version. Select the version on and click the Save button. 3) After activation, you will see the Node.js functionality control panel. You will see ready-made instructions and detailed instructions on how to proceed, according to which you will be able to launch your own Node.js project. An example of running a test project is shown in the instructions [link] (coming soon) Controlling the functionality Restarting and stopping the project is done using the Restart or Stop buttons. You can completely stop the project using the Disable button. You can use the same functionality to change the version of Node.js. Pay attention to the important points! After deploying the project in the root folder of the site, you need to execute the npm install command to download all the software dependencies/modules of your project from the repositories. Without this step, the project will run with errors or simply not load. It is important to direct your project not to a port, but to a socket. In the project files, use the global variable default.env.port, which always refers to the correct socket. You need to reload the project in case of making program changes to the project, for example after executing npm install. During the operation of the Node.js functionality, the Apache/php functionality is not available on the site. You can switch between Node.js and Apache/php by clicking the Disable button. After the activation of the functionality, the files necessary for the operation of the project will be added to your hosting — the Node.js backend of the selected version and software dependencies/modules. These files are located in the .nvm and .nmp directories in the root of the hosting. Additional dependencies are installed to the .nvm/versions/node/[node_js_version]/lib/node_modules directory. These directories use a certain amount of space and inode on the hosting. If there is no free space or inode on the hosting OR malicious code is found on the hosting at the time of activation of the function, the function will not be activated until the problem is solved. Node.js functionality is in beta. In case of errors in the work, please report them to technical support


